Ingredients
Equipment
Method
- Step 1: Get Your Crayons Ready: First things first, you'll need to remove all those paper wrappers from your crayons. This can be a fun little task for patient hands, or a moment of zen for you. Sometimes, soaking them in warm water for a few minutes can make the wrappers peel off super easily!
- Step 2: Shave 'Em Down: Now for the fun part that feels a little like playing! Using a crayon sharpener or a knife (if using a knife, please be super careful and always cut away from yourself), shave your crayons into small, colorful bits. Think of it like making confetti, but waxier! You can separate colors or mix them directly on your work surface – it's all up to your artistic vision.
- Step 3: Create Your Canvas: Lay down a sheet of wax paper. This will be the base for your crayon art. Evenly spread your crayon shavings onto one half of the wax paper. Don't go too thick or too thin; you want a nice, consistent layer for even melting. This is where you can play with color combinations – maybe gradients, swirls, or random bursts of joy!
- Step 4: Seal the Deal: Gently fold the other half of the wax paper over your crayon shavings, creating an enclosed packet. Press firmly around the edges to seal them. This keeps all those lovely shavings in place during the melting process.
- Step 5: Prepare for Melting Magic: Now, safety first! Place your wax paper packet carefully between two sheets of parchment paper. This extra layer of protection is crucial – it keeps your iron clean and prevents any wax from accidentally getting on your ironing board.
- Step 6: Iron and Melt: With adult supervision, set your iron to a low heat setting (no steam!). Gently glide the warm iron over the top sheet of parchment paper, slowly moving it around to melt and blend the crayon shavings inside. You'll see the colors start to blur and merge, creating beautiful, swirling patterns. Keep the iron moving to prevent scorching, and watch the magic unfold!
- Step 7: Let It Cool: Once your crayon wax is beautifully melted and blended, carefully remove the parchment paper sandwich from under the iron and set it aside. Let the melted crayon wax cool and harden completely. This is important – patience will give you a firm, easy-to-cut decoration. Pop it in the fridge for a few minutes if you're in a hurry!
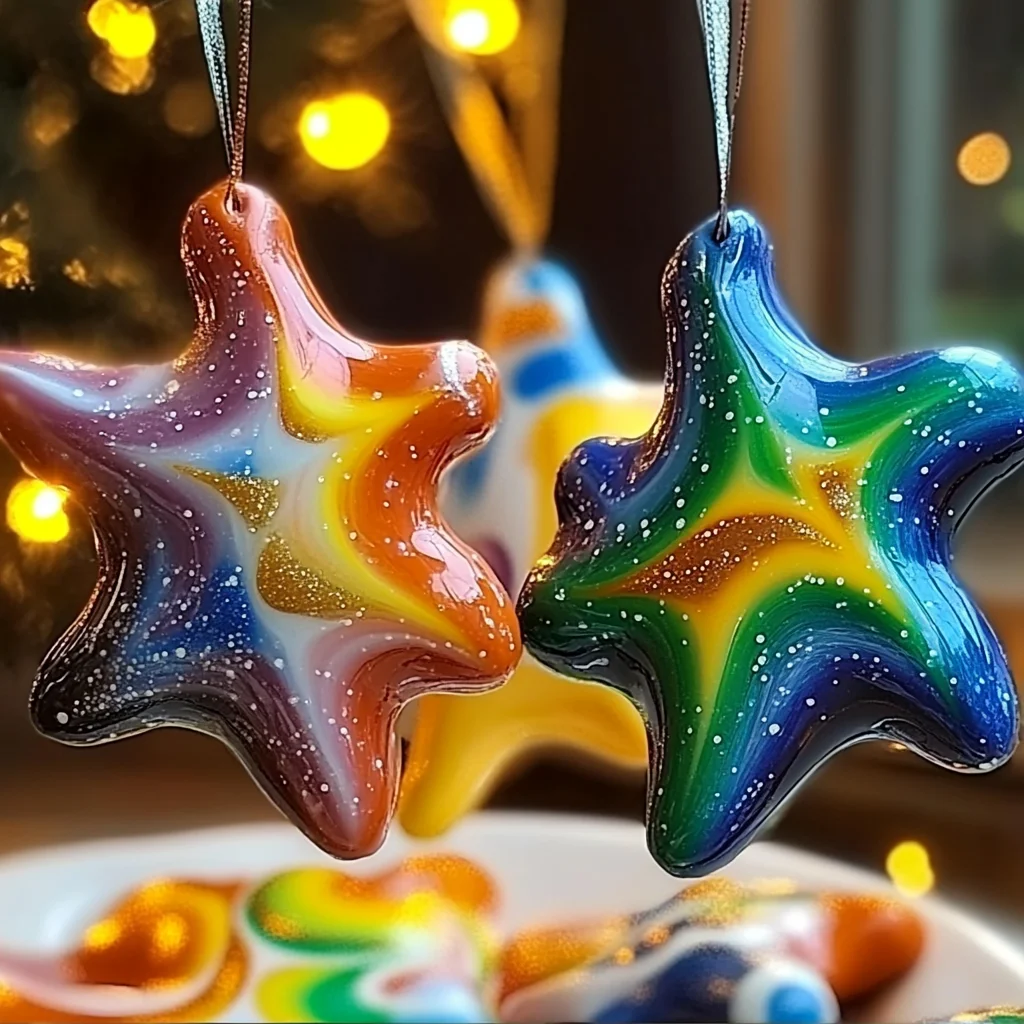
- Step 8: Shape Your Stars: Once completely cool and firm, grab your star stencil or cookie cutter. Place it over the hardened crayon wax, trace around it if using a stencil, or press firmly if using a cookie cutter. Carefully cut out your star shapes with scissors. This is the big reveal, where your abstract art becomes a sparkling star!
- Step 9: Punch a Hole: Take your hole punch and make a small hole at the top of each star. This is where your hanger will go.
- Step 10: Thread and Hang: Finally, thread your baker's twine (or string, or ribbon!) through the hole you just punched. Tie it in a loop, and voilà! Your gorgeous melted crayon star decorations are ready to hang. Aren't they just delightful? These are such a fun way to add a pop of homemade joy to your space.
Notes
Substitutions & Additions:
- Shapes Galore: While stars are classic, don't limit yourself! Use cookie cutters for hearts, circles, leaves, or even little animal shapes. Imagine a whole constellation of different designs!
- Sparkle and Shine: Want extra shimmer? Before you fold the wax paper, sprinkle a tiny bit of fine glitter over your crayon shavings. The heat of the iron will melt it right into the wax, creating a dazzling effect.
- Layered Looks: Try creating layers of color by melting one color, letting it cool slightly, then adding another layer of shavings and melting again. This can give you some really interesting depth!
- Scented Stars: For a subtle aroma, you could try adding a tiny pinch of a non-toxic, crayon-safe scented oil to your shavings before melting. Test a small batch first to ensure it works well and doesn't affect the wax's integrity.
- Gift Tags: Instead of hanging them as decorations, you can cut smaller shapes and use them as unique, personalized gift tags for presents. They add such a thoughtful, handmade touch!
- Iron Temperature is Key: Resist the urge to crank up the heat! A low to medium-low setting is perfect. Too hot, and you risk scorching the wax paper (and potentially your crayons), leading to muddy colors or a sticky mess. Slow and steady wins the race here.
- Even Shaving Matters: Try to get your crayon shavings as uniform in size as possible. This helps them melt at the same rate, giving you a more consistent and beautiful blend of colors.
- Don't Rush the Cool-Down: Seriously, let it cool completely. If you try to cut your stars while the wax is still warm and pliable, they'll stretch, warp, or even break. Pop it in the fridge for a few minutes if you're in a hurry!
- Protect Your Surfaces: Always place a towel or an old sheet under your ironing board, just in case any errant wax finds its way out. Better safe than sorry when it comes to colorful clean-up!
- Adult Supervision: I know I've said it, but it bears repeating: the iron gets hot! Always have an adult handle the ironing part of this craft, especially with younger children around.
- Keep Them Flat: To prevent any warping or bending, store your melted crayon stars flat.
- Avoid Direct Sunlight or Heat: This might seem obvious, but crayon wax can re-melt if exposed to direct sunlight or warm temperatures (like a hot car!). Keep them in a cool, dry place.
- Layer with Paper: If you're stacking them, place a sheet of wax paper or parchment paper between each star to prevent them from sticking together.
- Shelf Life: These decorations have an essentially indefinite shelf life as long as they are stored properly in a cool, dry environment. They'll retain their vibrant colors for years to come!
- Q: Can young children participate in this craft? A: Absolutely! Young children can have a blast with the crayon shaving (with a sharpener, not a knife!) and spreading the colors. However, adult supervision is essential, especially for the ironing step, due to the hot iron.
- Q: What if my crayons don't melt evenly? A: Ensure your crayon shavings are spread evenly and that your iron is at a consistent low heat. Keep the iron moving slowly and gently over the parchment paper. If you notice a stubborn spot, you can apply gentle, sustained heat to that area for a few extra seconds.
- Q: Can I use different types of paper instead of wax and parchment? A: Wax paper is crucial for the crayon layer as it allows the wax to melt and cool without sticking. Parchment paper is necessary to protect your iron and work surface from the wax. Regular paper would absorb the wax or stick, and aluminum foil might get too hot.
- Q: My stars keep breaking when I cut them. What am I doing wrong? A: This usually happens if the crayon wax hasn't cooled and hardened completely, or if the layer of crayon shavings was too thin. Make sure you let it cool for a good amount of time, and next time, try spreading a slightly thicker layer of shavings.