Ingredients
Equipment
Method
- Step 1: Whip Up That Buttercream: In a stand mixer fitted with a paddle attachment (or with a trusty handheld mixer), beat your softened unsalted butter on medium speed until it's light and creamy. This usually takes about 2 minutes. You want it fluffy!
- Step 2: Combine & Beat: Gradually add 5 ½ cups (660g) of your confectioners' sugar to the butter, along with the heavy cream (or milk) and vanilla extract. Start by beating on low speed for about 30 seconds to avoid a sugar cloud! Then, increase the speed to medium-high and beat for a good 2 minutes. It should be looking super smooth.
- Step 3: Taste and Adjust: Give your buttercream a little taste. If it's a bit too sweet for your liking, add a tiny pinch of salt (about ⅛ teaspoon). If you notice any stubborn air bubbles, gently fold the buttercream with a spatula for 1-2 minutes. This little trick helps make it incredibly smooth and pipeable.
- Step 4: Final Consistency Check: If your frosting seems too thin, gradually add up to ½ cup (60g) more confectioners' sugar. If it’s too thick and stiff, add more heavy cream, just 1 tablespoon at a time, until it reaches that ideal, spreadable, and pipeable texture.
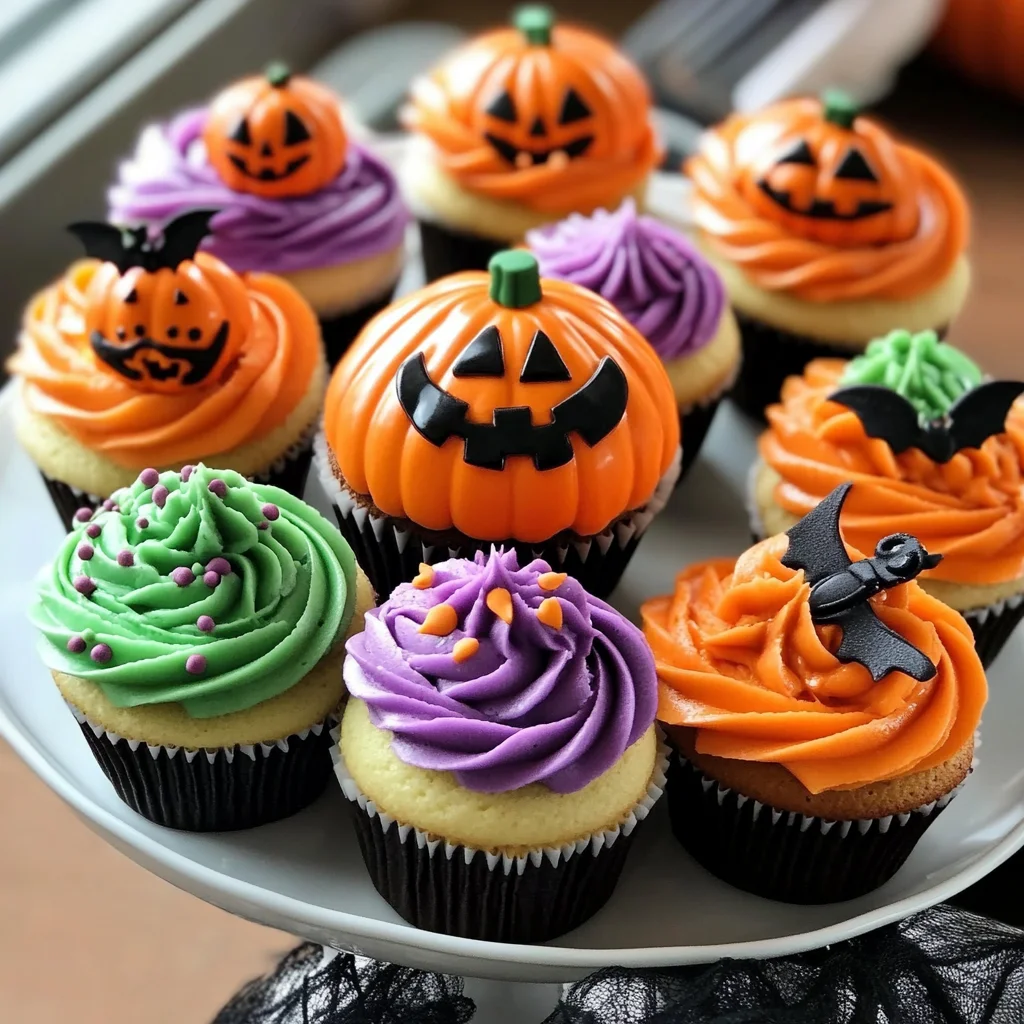
- Step 5: Color Your World (or Cupcakes!): Divide your lovely white buttercream into separate bowls. Add your gel food colorings: Leaf Green, a mix of Fuchsia and Violet to get a vibrant purple, Orange, and Super Black. Mix each until you achieve your desired haunting shades. Don't forget to leave one portion white for those spooky spider webs!
- Step 6: Green Spiral Monsters: Fit a piping bag with a small open star tip (e.g., Wilton 21) and fill it with your green frosting. On a cupcake, pipe a fun spiral, starting from the outside edge and swirling your way inward. Finish by gently pressing a large candy eyeball right into the center – instant cyclops monster!
- Step 7: Purple Starry Monsters: Grab another piping bag and fill it with your purple frosting. Cover a cupcake with piped stars, applying steady, even pressure to create a textured monster look. Then, press a few small candy eyeballs into the frosting. If you’re feeling extra festive, sprinkle some fun Halloween sprinkles on top!
- Step 8: Perfect Pumpkins: For this design, you'll need three piping bags. Fill one with orange frosting and a large petal tip (e.g., Wilton 125). Fill another with green frosting and a small open star tip (e.g., Wilton 21). And finally, one with black frosting and a small round tip (e.g., Wilton 4). First, pipe orange frosting in rounded lines from the top of the cupcake to the bottom, alternating sides and working towards the center to build up that classic pumpkin shape. Next, use the green frosting to pipe a small, cute stem on top. Finally, finish with the black frosting, piping on a whimsical or spooky pumpkin face.
- Step 9: Creepy-Crawly Spider Webs: First, spread a layer of your white frosting evenly over a cupcake using a small offset spatula or butter knife. Next, fill a piping bag with your black frosting, fitted with a small round tip (e.g., Wilton 4). Pipe criss-cross lines on the white frosting, then connect them with curved lines to create that intricate spider web pattern. Carefully place half an Oreo Mini cookie on the web for the spider's body. Pipe tiny black frosting eyes onto the Oreo, then attach two mini candy eyeballs right over them for extra creepiness. Pipe eight skinny spider legs around the Oreo, extending onto the web. Ta-da! A spooky, edible arachnid!
Notes
Substitutions & Additions: Use any sturdy cupcake base like chocolate, vanilla, or red velvet. Vary frosting flavors with almond extract, lemon zest, or pumpkin spice. Consider adding gummy worms, candy corn, mini chocolate chips, or crushed Muddy Buddies. Try other designs like ghosts with mini chocolate chip eyes or mummies by wrapping white frosting strips. For natural colors, use fruit/vegetable extracts or cocoa powder for dark frosting.
Tips for Success: Ensure butter and heavy cream are at room temperature for smooth buttercream. If baking cupcakes from scratch, avoid overmixing batter. Use gel food coloring for vibrant colors without thinning the frosting. Chill cupcakes completely before frosting. If new to piping, practice designs on parchment paper first. Prep ahead by baking cupcakes 1-2 days in advance and storing buttercream in the fridge (re-whip before use).
How to Store: Store decorated cupcakes loosely covered at room temperature for a few hours. For longer enjoyment (up to 5 days), cover them in an airtight container (a cupcake carrier works well) and refrigerate. For best taste and texture, take refrigerated cupcakes out of the fridge 30 minutes to an an hour before serving to allow the buttercream to soften slightly.