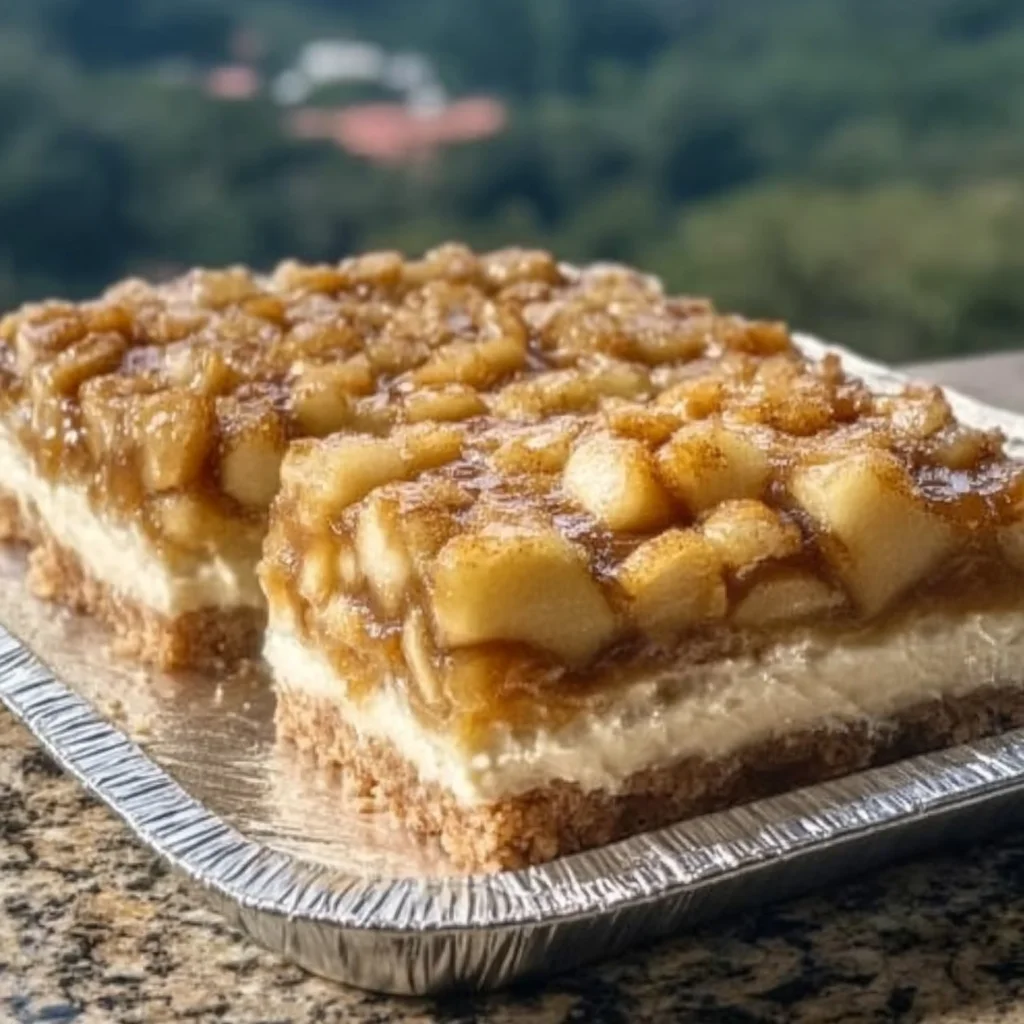
There’s something so comforting about the smell of apples and cinnamon baking in the oven, isn’t there? It takes me right back to those warm fall afternoons spent in Grandma’s kitchen, where the air was filled with the sweet aroma of homemade desserts. If you’ve ever wished you could combine the best of apple pie and cheesecake into one unforgettable treat, you’re in for a real treat today! These Apple Pie Cheesecake Bars are a delightful marriage of rich, creamy cheesecake and the cozy, spiced apple filling you love — all wrapped up in a buttery, cake-mix topping. They’re not only incredibly delicious but also surprisingly simple to make, perfect for busy days or last-minute gatherings.
Whether you’re craving a nostalgic dessert for your family or need a quick, crowd-pleasing gift to bring to a friend’s house, these bars have got you covered. You’ll love how easy they are to whip up, and trust me, once you try them, they’ll become one of your go-to recipes for the season. Plus, they bake up beautifully in just about 40 minutes, so you won’t be waiting forever to enjoy them!
Why You’ll Love Apple Pie Cheesecake Bars
- Fast: From start to finish, these bars take less than an hour to prepare and bake, making them a perfect quick dessert.
- Easy: With just a handful of ingredients — including a trusty box of yellow cake mix — this recipe requires minimal effort and no fancy baking skills.
- Giftable: Cut into neat squares, these bars make a thoughtful and delicious homemade gift for neighbors, teachers, or coworkers.
- Crowd-pleasing: The combination of creamy cheesecake and classic apple pie flavors means there’s something for everyone to enjoy.
Ingredients
Let’s take a closer look at the simple ingredients that come together to make these bars so irresistibly good:
- 1 can apple pie filling: This is your classic apple pie goodness, filled with tender apple slices and warm cinnamon spices. Using canned filling saves so much prep time but still delivers that homemade flavor.
- 8 oz cream cheese, softened: The creamy base for the cheesecake layer. Make sure your cream cheese is softened to room temperature for easy spreading and a smooth texture.
- 1 box yellow cake mix: This adds a lovely sweet, cakey topping that bakes up golden and crisp. Yellow cake mix is a pantry staple that adds convenience and flavor.
- 1/2 cup butter, melted: Pouring melted butter over the cake mix creates a rich, buttery crust that holds everything together beautifully.
That’s it! No eggs, no flour, just four easy ingredients that combine into a dessert that tastes like it took hours to make.
How to Make Apple Pie Cheesecake Bars
Ready to bring this cozy dessert to life? Here’s a step-by-step guide to making your very own Apple Pie Cheesecake Bars, with a few tips along the way to make it even easier.
- Preheat your oven to 350°F (175°C). This is the perfect temperature to get a golden top without overbaking the creamy cheesecake layer underneath.
- Spread the apple pie filling evenly in the bottom of a 9×13-inch baking pan. Use the back of a spoon or an offset spatula to smooth it out so you have a nice, even layer of those tender cinnamon-spiced apples. This layer is the heart of the bars and gives that nostalgic apple pie flavor.
- In a medium bowl, beat the cream cheese until smooth. I like to use an electric mixer for this part because it makes the cream cheese silky and easy to spread. Once smooth, spread the cream cheese evenly over the apple pie filling. Don’t worry if it’s a little thick — that cheesecake layer is what makes these bars so dreamy!
- Sprinkle the yellow cake mix evenly over the cream cheese layer. This step is key — try to distribute the cake mix as evenly as possible without pressing it down. The cake mix will bake into a buttery, crumbly topping that’s just irresistible.
- Pour the melted butter evenly over the cake mix. This might look like a lot of butter, but trust me, it’s what makes the top so rich and golden. Pour gently and try to cover all the dry cake mix. The butter helps it bake into a crisp, buttery topping that contrasts beautifully with the creamy cheesecake below.
- Bake for 35-40 minutes or until the top is golden brown. Keep an eye on it around the 35-minute mark — you want that golden color but don’t want it to dry out. The edges will be bubbly and the top will have a lovely crust.
- Let cool completely before cutting into bars. This is important! If you cut into the bars while they’re still warm, the layers may mix and get messy. I like to pop mine in the fridge for a bit after cooling to help them set perfectly.
And there you have it — a simple but stunning dessert that will have everyone asking for seconds. If you love cheesecake, you might also enjoy the Blackberry White Chocolate Cheesecake recipe, which is just as luscious and easy to make!
Substitutions & Additions
One of the best things about this recipe is how adaptable it is. Feel free to get creative or adjust based on what you have in your pantry. Here are some ideas to make these bars your own:
- Swap the apple pie filling: If you’re not an apple fan or want to try something new, canned cherry pie filling or peach pie filling can be delightful alternatives. You could even mix fresh fruit with a bit of sugar and cinnamon if you prefer homemade.
- Try flavored cake mixes: While yellow cake mix is classic, you could experiment with spice cake or even cinnamon swirl cake mix for an extra warm, autumnal flavor.
- Add nuts: Chopped pecans or walnuts sprinkled over the cake mix before pouring on the butter add a nice crunch and nutty flavor.
- Mix in some oats or brown sugar: Stir a handful of oats or a couple tablespoons of brown sugar into the cake mix for a more textured, crumble-like topping.
- Drizzle with caramel sauce: Once cooled and cut, a drizzle of caramel sauce on top takes these bars from great to show-stopping. This pairs especially well with the apple pie flavors.
If you want to keep the fall vibes going, you might also like baking some Peach Pie Cruffins — they’re a fun twist and just as easy to make!
Tips for Success
Here are some of my tried-and-true tips to make sure your Apple Pie Cheesecake Bars come out perfect every time:
- Use softened cream cheese: This makes it much easier to beat smooth and spread evenly. If you forget to take it out ahead of time, you can microwave it for 10-15 seconds, but don’t let it melt!
- Don’t press down the cake mix: It may be tempting to smooth it out, but leaving it loose helps create that signature crumbly texture once baked.
- Evenly distribute the butter: Pouring melted butter slowly and carefully helps it soak into the cake mix for a golden crust rather than pooling in one spot.
- Let bars cool completely: Patience is key here. Cutting too soon means messy layers and a gooey cheesecake middle. I usually let mine cool for at least an hour, then refrigerate for another 30 minutes if I can wait that long!
- Prep ahead: You can assemble these bars the night before and refrigerate them, then bake fresh the next day. Just add an extra few minutes to the baking time if you bake straight from the fridge.
How to Store Apple Pie Cheesecake Bars
These bars store beautifully, which makes them a great recipe to make ahead for parties or gifting. Here’s what you need to know:
- Room temperature: If you plan to eat them within a day, you can store the bars covered at room temperature. Just make sure they’re in an airtight container or wrapped tightly with plastic wrap to avoid drying out.
- Refrigerator: For longer storage, keep the bars covered in the fridge for up to 4-5 days. The cheesecake layer stays fresh and creamy, and the buttery crust remains delicious.
- Freezing: These bars freeze well! Wrap them tightly in plastic wrap and then foil, or place in an airtight container. Freeze for up to 3 months. Thaw overnight in the fridge before serving.
When you’re ready to enjoy, serve these bars chilled or at room temperature, perhaps alongside a scoop of vanilla ice cream or a dollop of whipped cream for extra indulgence.
FAQs
Can I use fresh apples instead of canned apple pie filling?
Absolutely! Just peel and slice about 3 cups of tart apples (like Granny Smith), then cook them down with sugar, cinnamon, and a bit of lemon juice until soft and syrupy. Let cool before layering.
Do I need to grease the baking pan?
Since the apple pie filling and butter provide plenty of moisture and fat, greasing the pan isn’t necessary, but if you want extra insurance, you can lightly spray or butter the pan before adding the filling.
What if I don’t have yellow cake mix?
You can substitute with plain cake mix or even a spice cake mix for a twist. Just keep in mind that flavors and sweetness will vary slightly.
Can I make these bars gluten-free?
Yes, but you’ll need to use a gluten-free cake mix and confirm your apple pie filling is gluten-free. Many brands offer gluten-free options nowadays.
If you’re interested in other easy and flavorful dessert ideas, don’t miss the No-Bake Peanut Butter Brownie Cookies — they’re a fantastic no-fuss option for busy days!
With just a few simple ingredients and minimal effort, Apple Pie Cheesecake Bars will quickly become a favorite go-to dessert that brings comfort and joy to any table. So next time you want that warm apple pie feeling but with a creamy cheesecake twist, you know exactly what to bake!
For more cozy recipes and baking inspiration, be sure to check out the full collection of easy and delicious recipes on the site. And if you love gathering new ideas and saving your favorite treats, follow us on Pinterest for daily kitchen inspiration!

Deliciously Easy Apple Pie Cheesecake Bars
Ingredients
Equipment
Method
- Step 1: Preheat oven to 350°F (175°C).
- Step 2: Spread the apple pie filling evenly in the bottom of a 9×13-inch baking pan, smoothing it out with the back of a spoon or offset spatula.
- Step 3: In a medium bowl, beat the cream cheese until smooth using an electric mixer. Spread evenly over the apple pie filling layer.
- Step 4: Sprinkle the yellow cake mix evenly over the cream cheese layer, distributing it without pressing down.
- Step 5: Pour the melted butter evenly over the cake mix to cover all dry areas.
- Step 6: Bake for 35-40 minutes until the top is golden brown and bubbly around the edges.
- Step 7: Allow to cool completely before cutting into bars. For best results, chill in the fridge for 30 minutes to set.