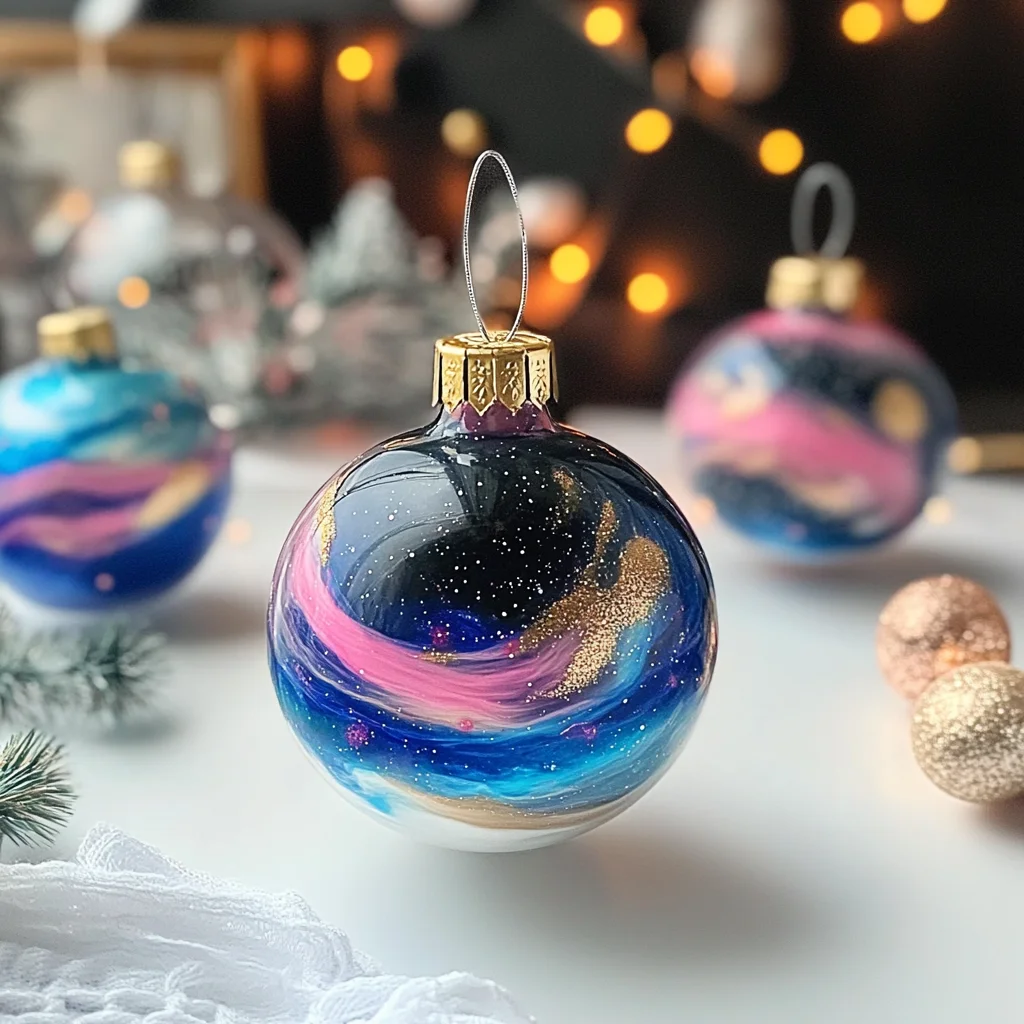
Remember those chilly winter afternoons when you’d cozy up inside, crafting homemade decorations with family or friends? There’s something truly special about creating ornaments by hand — they carry the warmth of memories and make every holiday season even more magical. If you’re looking for a project that’s quick, easy, and downright mesmerizing, these Baking Soda Galaxy Ornaments are absolutely perfect. They don’t just look stunning; they’re also a fun way to bring a little cosmic sparkle into your home or give as thoughtful gifts.
Why You’ll Love Baking Soda Galaxy Ornaments
- Fast: You can whip up the dough and start crafting in under 30 minutes.
- Easy: No fancy tools or complicated steps — just simple ingredients you likely have on hand.
- Giftable: These ornaments make charming, heartfelt presents for friends and family.
- Crowd-pleasing: Kids and adults alike will be fascinated watching the galaxy colors swirl together.
Ingredients
Here’s what you’ll need to craft your very own cosmic ornaments:
- 1 cup baking soda: The base of your ornament dough, it gives a smooth texture and dries hard.
- ½ cup white vinegar: Reacts with the baking soda to help form that soft, moldable dough.
- ½ cup cornstarch: Adds a silky feel and helps your ornaments keep their shape while drying.
- ¼ cup corn syrup: This sticky sweetness keeps the dough pliable and easy to work with.
- Food coloring in galaxy shades (blue, purple, pink, silver, black): These create the stunning marbled effect that brings the galaxy to life.
How to Make Baking Soda Galaxy Ornaments
Ready to dive in? Let’s transform simple kitchen ingredients into shimmering galaxy treasures!
- Set up your space. Cover your work surface with parchment paper or that old tablecloth you’re ready to get messy — trust me, it helps keep things tidy.
- Mix dry ingredients. Grab a large bowl and stir together the baking soda and cornstarch until they’re well-blended. This keeps your dough smooth and easy to work with.
- Combine wet ingredients. In another bowl, gently mix the white vinegar and corn syrup. The fizzing action at first is totally normal — it’s part of the fun!
- Make the dough. Slowly pour the wet mixture into the dry bowl while stirring continuously. You’re aiming for a soft, pliable dough that doesn’t stick to your hands. If it feels too crumbly, add water a teaspoon at a time until it’s just right.
- Divide and color. Split your dough into a few equal portions. Add a couple of drops of your galaxy food coloring to each portion. Instead of mixing them completely, fold the colors gently to create that gorgeous, marbled galaxy effect — think swirling nebulae and shimmering stars!
Once your dough is ready, you can shape the ornaments using cookie cutters, mold them by hand, or even create fun, freeform space shapes. To make them hangable, poke a small hole near the top using a straw or skewer before they dry.
Substitutions & Additions
If you’re feeling creative or need some swaps, here are a few ideas:
- Instead of corn syrup, you can use honey or golden syrup, though the texture may vary slightly.
- Want to try different colors? Metallic food gels or edible glitter sprinkled on top add a stunning cosmic sparkle.
- If you love scented crafts, a few drops of vanilla or cinnamon extract can give your ornaments a subtle festive aroma.
- For an extra flair, after the ornaments dry, paint delicate white star or constellation details with acrylic paint.
Tips for Success
- Work quickly: This dough starts drying fast, so divide and color portions promptly to keep it soft.
- Use parchment paper: It prevents sticking and helps your ornaments dry evenly without warping.
- Keep dough covered: Use a damp cloth on unused portions to prevent them from drying out while you work.
- Dry flat: Let the ornaments air dry on a flat surface for about 24 hours to get that perfect hardness before decorating or hanging.
How to Store Baking Soda Galaxy Ornaments
Once completely dry, your ornaments will last for years if stored properly. Keep them in an airtight container or box, lined with tissue paper, in a cool, dry place. Avoid moisture or direct sunlight, which can dull the colors or soften the ornaments. If you’re looking for more easy DIY projects to fill your holiday season, check out the variety of creative ideas in our homemade crafting and recipe collection.
FAQs
Can these ornaments be baked instead of air-dried?
It’s best to air dry these baking soda ornaments because baking can cause them to puff or crack. Patience is key here!
What if my dough is too sticky or too dry?
If it’s sticky, dust your hands and surface lightly with cornstarch. If too dry, carefully add a small amount of water and knead until pliable.
How can I hang these ornaments on my tree?
Before drying, poke a hole near the top for ribbon or twine. You can also glue a small hook after they’re dry.
Are these ornaments safe for kids to make?
Absolutely! Just supervise small kids with the vinegar and food coloring, and have fun making a galaxy of memories together.
If you love crafting and easy homemade treats alike, you might enjoy my recipe for creamy comfort dishes like the Creamy Lemon Chicken or quick no-bake sweets such as the No-Bake Peanut Butter Brownie Cookies. These both come together easily after your ornament-making fun is done!
Happy crafting and may your holidays be filled with starry nights and cozy magic!
Don’t forget to follow me on Pinterest for more crafty inspiration and delicious recipes.

Baking Soda Galaxy Ornaments
Ingredients
Equipment
Method
- Step 1: Cover your work surface with parchment paper or a cloth to keep things tidy.
- Step 2: In a large bowl, mix the baking soda and cornstarch thoroughly.
- Step 3: In another bowl, gently mix the white vinegar and corn syrup; fizzing is normal.
- Step 4: Slowly pour the wet mixture into the dry ingredients while stirring until you get a soft, pliable dough that doesn’t stick.
- Step 5: Divide the dough into portions and add a few drops of galaxy food coloring to each; fold gently to create a marbled galaxy effect.
- Step 6: Shape the ornaments with cookie cutters or by hand. Poke a hole near the top for hanging before drying.
- Step 7: Let the ornaments air dry flat on parchment paper for about 24 hours until completely hard.