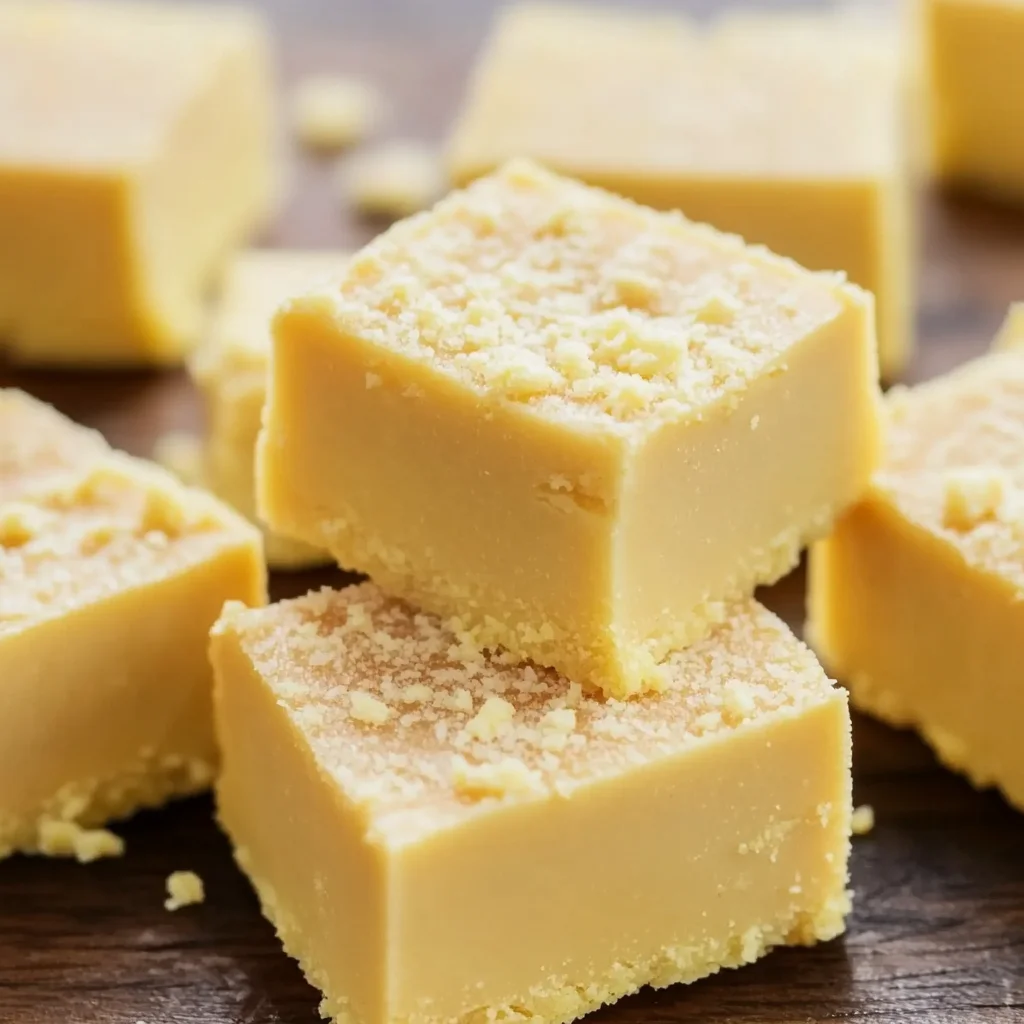
There’s something wonderfully nostalgic about fudge. It’s that classic, melt-in-your-mouth candy that brings back memories of homemade treats wrapped carefully in wax paper, passed around the family table during holiday gatherings. Now, imagine that same rich, creamy texture infused with the tropical, sweet essence of banana. This Banana Fudge recipe is exactly that—a cozy, comforting dessert with a fun twist that’s surprisingly easy to make. Whether you’re a fudge fanatic or just looking for a new way to enjoy bananas beyond your usual bread or smoothie, this recipe is sure to become a beloved staple in your kitchen.
I remember the first time I made banana fudge—it was for a small get-together with friends. The moment I cut into those glossy, yellow squares, there were smiles all around. It’s quick enough to whip up on a weeknight but special enough to gift or bring to a party. Plus, it’s a fun way to surprise anyone who thinks fudge has to be chocolate-only. Ready to get started? Let’s dive into why this Banana Fudge will steal your heart.
Why You’ll Love Banana Fudge
- Fast: From start to finish, you can have this fudge ready in under an hour, with minimal active time.
- Easy: No complicated candy thermometers or tricky techniques—just simple ingredients and straightforward steps.
- Giftable: Wrapped in parchment or a cute box, this fudge makes a delightful homemade gift for friends, neighbors, or coworkers.
- Crowd-pleasing: Its unique banana flavor and creamy texture are sure to wow guests and satisfy sweet cravings.
Ingredients
Let’s talk about the ingredients you’ll need. Each one plays a key role in creating that perfect banana fudge texture and flavor.
- Banana flavoring (2 teaspoons): This is the star that gives the fudge its signature banana taste without the mess of fresh bananas.
- Yellow food color gel (½ teaspoon): Just a touch to give your fudge that sunny, banana-inspired color.
- Salted sweet cream butter (¾ cup): Butter adds richness and smoothness, so use good quality for the best results.
- Half and half (½ cup) & heavy cream (⅓ cup): These dairy ingredients keep the fudge creamy and luscious.
- Clear vanilla flavoring (1 teaspoon): Vanilla enhances the overall flavor profile without overpowering the banana.
- Granulated sugar (3 cups + 2 tablespoons): Sweetness is essential here, and the extra 2 tablespoons are for a slight crunch if you choose to garnish.
- White baking chips (1¾ cups): I recommend Ghirardelli for their smooth melting quality, adding sweetness and texture.
- Marshmallow fluff (7 ounces): This helps create a creamy, slightly fluffy fudge texture that’s easy to cut and enjoy.
- Crushed Nilla wafers (2 tablespoons, optional): A fun garnish that adds a bit of crunch and a hint of vanilla flavor on top.
Having these ingredients on hand is like keeping a little bit of sunshine in your pantry. If you love experimenting, you can even explore substitutions and additions later on.
How to Make Banana Fudge
Now for the fun part—making your banana fudge! I promise, it’s much easier than it looks, and I’ll guide you every step of the way.
- Prepare your pan: Line a 9×9-inch baking dish with parchment paper. Be sure to extend the paper up all sides for easy fudge removal later. Lightly spray the parchment with nonstick cooking spray to prevent sticking, then set it aside.
- Mix banana flavor and color: In a small bowl, combine your banana flavoring and yellow food color gel. Stir well until evenly blended. This little mixture will brighten up your fudge beautifully.
- Melt the butter and cream: In a heavy-bottomed saucepan over medium heat, melt the ¾ cup salted sweet cream butter together with the half and half, heavy cream, and clear vanilla flavoring. Keep stirring gently to prevent scorching. The mixture should become smooth and warm but not boiling.
- Add the sugar: Stir in the granulated sugar. Continue stirring constantly until the mixture reaches a simmer, which usually takes about 6 to 7 minutes. Once simmering, keep stirring and let it cook for another 3 minutes. This step is crucial for dissolving the sugar properly to achieve that perfect fudge consistency.
- Melt the white baking chips: Remove the saucepan from heat and add your white baking chips. Cover the pan for 3 to 4 minutes to let the chips melt gently in the hot mixture. Then stir until the chips are fully incorporated and smooth.
- Incorporate the marshmallow fluff: Add the marshmallow fluff to the mixture and stir until everything is silky smooth and combined. The fluff gives the fudge a wonderfully creamy texture that’s easy to slice.
- Add the banana flavor and color: Pour in the banana flavor and yellow food color mixture you prepared earlier. Stir until the fudge is evenly colored and fragrant with that unmistakable banana aroma.
- Set the fudge: Spread the fudge evenly into your prepared baking dish using a spatula. If you like, sprinkle the top with crushed Nilla wafers for added texture and a lovely vanilla crunch. Cover the dish tightly with aluminum foil.
- Let it rest: Allow the fudge to sit at room temperature for 30 minutes to start setting. Then refrigerate for at least 4 hours, or until completely firm.
- Slice and serve: Use the parchment paper to lift the fudge out of the pan easily. Cut into 25 squares (5 by 5). Store the fudge in the refrigerator until you’re ready to serve, and enjoy!
If you’ve ever tried no-bake treats like the No-Bake Peanut Butter Brownie Cookies, you’ll appreciate how this fudge comes together with similar ease but with a whole new flavor profile.
Substitutions & Additions
While this banana fudge is fantastic as written, don’t be afraid to customize it to your liking or pantry supplies. Here are a few ideas I love:
- Banana flavor swap: If you want a more natural twist, try adding a mashed ripe banana instead of banana flavoring—but keep in mind this may change the texture and require refrigeration to avoid spoilage.
- Color variations: Skip the yellow food color if you prefer a more subtle look, or add a drop of orange for a tropical sunset vibe.
- Chocolate lovers: Fold in mini chocolate chips or swirl melted semi-sweet chocolate on top after spreading the fudge for a marbled effect.
- Nutty upgrade: Add chopped toasted walnuts or pecans into the fudge before setting for crunch and depth.
- Gourmet touch: Sprinkle flaky sea salt over the top just before chilling to bring out the sweetness and add complexity.
- Marshmallow alternatives: If you don’t have marshmallow fluff, you can try using mini marshmallows melted into the mixture, though texture might differ slightly.
Once you master this banana fudge, you might even be inspired to try other flavors, like the rich and creamy Cherry Garcia Fudge for a fruity chocolate treat.
Tips for Success
To make sure your banana fudge turns out perfect every time, here are some tips I’ve learned through trial and error:
- Use a heavy-bottomed saucepan: This helps distribute heat evenly and prevents the sugar from burning on the bottom.
- Constant stirring: When heating the sugar mixture, don’t stop stirring. This keeps the sugar from crystallizing and ensures a smooth fudge.
- Check your simmer: You want a gentle simmer, not a rolling boil. Too high heat can cause grainy fudge.
- Don’t rush cooling: Let the fudge sit at room temperature before refrigerating. This helps prevent condensation and makes cutting easier.
- Line your pan well: Using parchment that extends up the sides is a game-changer—it makes removing the fudge in one piece so much simpler.
- Prep ahead: You can make the fudge a day in advance. Just keep it refrigerated and bring it to room temperature for a few minutes before serving for the best texture.
If you’re a fan of quick and easy desserts, you might also enjoy my collection of simple recipes that are perfect for busy days or last-minute treats.
How to Store Banana Fudge
Proper storage will keep your banana fudge tasting fresh and creamy. Here’s what I recommend:
- Refrigerate: Store the fudge in an airtight container or wrapped tightly in plastic wrap. It will keep well in the fridge for up to two weeks.
- Freeze for longer storage: If you want to keep it longer, wrap individual pieces in wax paper and place in a freezer-safe container. Freeze for up to 3 months. Thaw in the refrigerator before serving.
- Room temperature caution: Because of the dairy and marshmallow, it’s best not to keep banana fudge at room temperature for more than a day or two.
When you’re ready to serve, letting the fudge sit out for about 10 minutes softens it slightly, making it even more luscious and flavorful.
FAQs
Can I use fresh bananas instead of banana flavoring?
Yes, but fresh bananas add moisture which can affect the fudge’s texture and shelf life. You might need to refrigerate it and consume it sooner. Banana flavoring gives a consistent taste and texture.
Why is my fudge grainy?
Graininess often results from sugar crystallization. Make sure to stir constantly while heating and use a heavy-bottomed pan to prevent burning. Avoid stirring once the mixture starts simmering vigorously.
Can I make this fudge vegan or dairy-free?
This recipe relies on dairy for its creamy texture, but you could experiment with plant-based butter, coconut cream, and dairy-free marshmallow fluff. Keep in mind the texture and flavor will differ.
How do I get a glossy finish on my fudge?
The key is proper melting and stirring of the white baking chips and marshmallow fluff. Covering the pan while melting the chips helps prevent overheating, ensuring a smooth, shiny finish.
If you love exploring cozy dessert recipes, you might also enjoy the delightful Banana S’mores Muffins—another great way to celebrate banana’s sweet charm!
Thanks for joining me in the kitchen today! I hope this banana fudge brings a smile to your face and a little extra sweetness to your day. For more delicious recipes and kitchen inspiration, be sure to follow me on Pinterest.
Banana Fudge
Ingredients
Equipment
Method
- Step 1: Line a 9×9-inch baking dish with parchment paper, extending up all sides. Lightly spray with nonstick cooking spray and set aside.
- Step 2: In a small bowl, combine banana flavoring and yellow food color gel. Stir well until evenly blended.
- Step 3: In a heavy-bottomed saucepan over medium heat, melt salted sweet cream butter with half and half, heavy cream, and clear vanilla flavoring. Stir gently until smooth and warm but not boiling.
- Step 4: Stir in granulated sugar constantly until mixture reaches a simmer (6–7 minutes). Continue stirring and cook for another 3 minutes.
- Step 5: Remove saucepan from heat, add white baking chips, cover for 3–4 minutes to melt. Stir until smooth and fully incorporated.
- Step 6: Add marshmallow fluff and stir until silky smooth and combined.
- Step 7: Stir in banana flavor and color mixture until fudge is evenly colored and fragrant.
- Step 8: Spread fudge evenly into prepared baking dish. Optionally, sprinkle top with crushed Nilla wafers. Cover tightly with aluminum foil.
- Step 9: Let fudge sit at room temperature for 30 minutes to start setting, then refrigerate at least 4 hours until firm.
- Step 10: Use parchment paper to lift fudge from pan. Cut into 25 squares (5 by 5). Store refrigerated until serving.