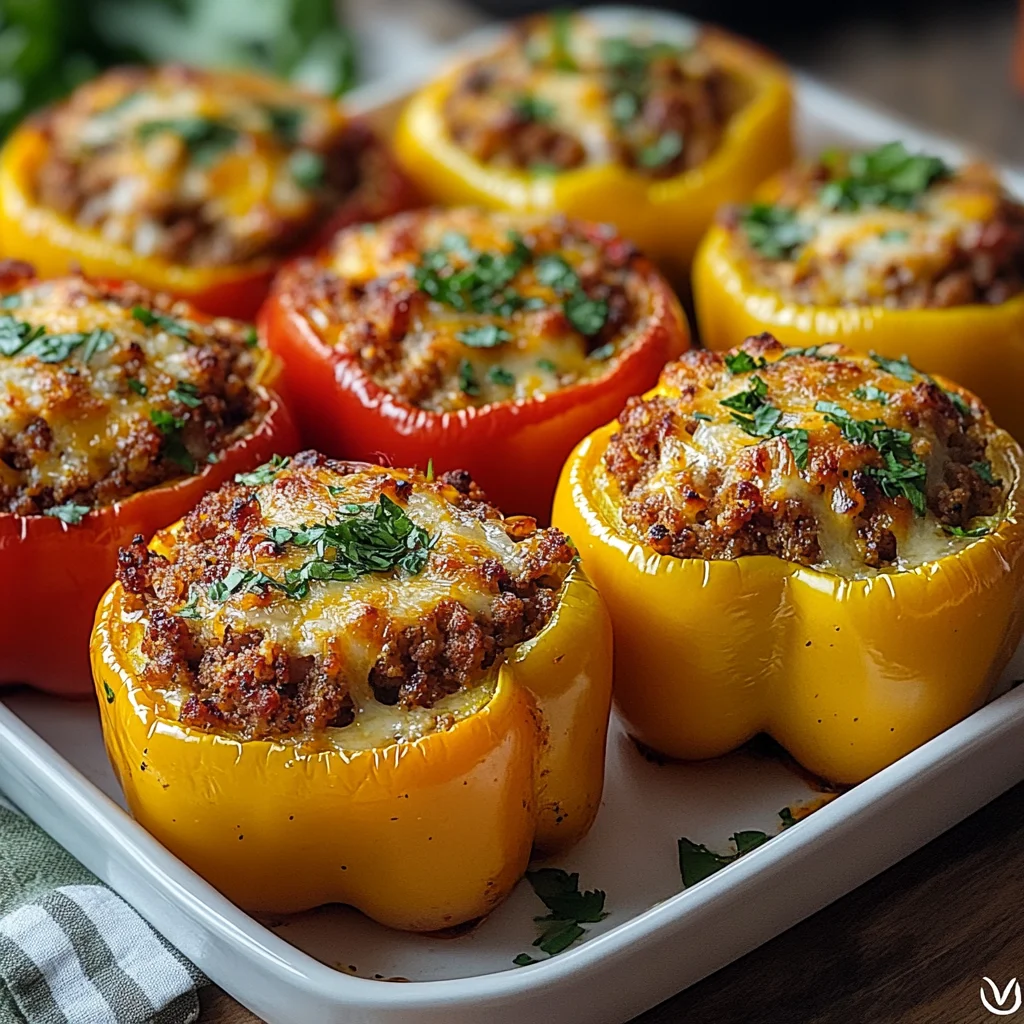
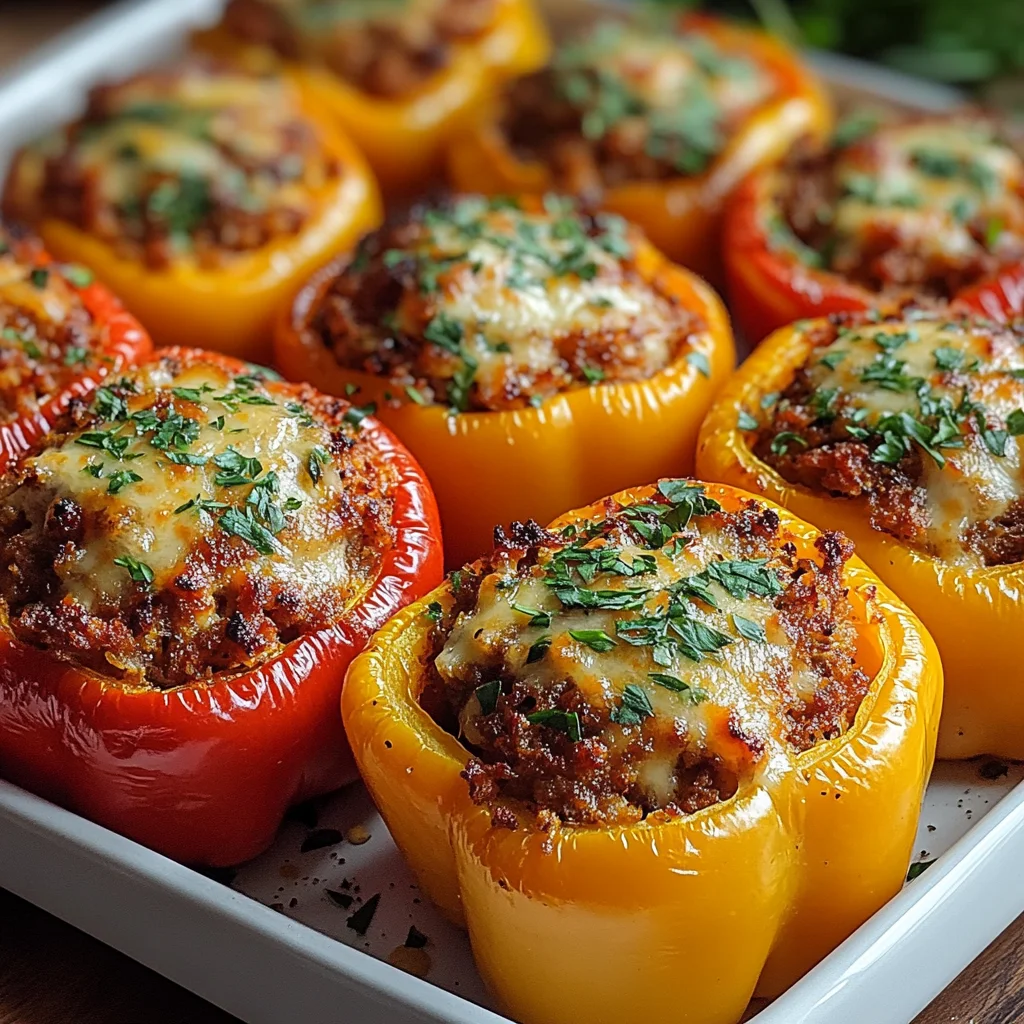
Oh, friend, there are just some dishes that bring you right back to a simpler time, aren’t there? For me, it’s often the comforting aroma of something baking in the oven, filling the whole house with a promise of deliciousness. And let me tell you, these Stuffed Bell Peppers do just that! They’re like a warm hug on a plate, brimming with savory goodness, and topped with gooey, melted cheese. If you’ve been looking for that perfect, hearty meal that feels special but is secretly super easy, quick, and oh-so-memorable, then you’ve officially found your new go-to. This recipe isn’t just about food; it’s about creating cozy kitchen memories, one flavorful bite at a time.
Why You’ll Love The Best Stuffed Peppers
- Fast: With a little prep, these come together quicker than you might think, making them ideal for busy weeknights.
- Easy: Simple ingredients and straightforward steps mean even beginner cooks can nail this classic.
- Giftable: Need a dish for a potluck, a new neighbor, or a friend who could use a home-cooked meal? These are always a hit!
- Crowd-pleasing: A universally loved comfort food that satisfies everyone at the table.
Ingredients
Here’s what you’ll need to gather from your pantry and fridge. I love how these ingredients are simple and usually on hand, but together they create something truly magical!
- 1 pound 90% lean ground beef: Using lean beef helps keep the dish from getting greasy, so you’ll have less draining to do!
- 1 ¼ teaspoons salt, divided: Essential for seasoning every layer of flavor.
- ¼ teaspoon baking soda: This might sound surprising, but it’s my secret weapon for super tender ground beef! Don’t skip it!
- 3 large bell peppers (red, yellow, or orange): Pick your favorites! The sweeter varieties like red, yellow, and orange work beautifully here, softening to perfection as they bake.
- 3 tablespoons extra-virgin olive oil: For sautéing our aromatics and building that foundational flavor.
- 1 medium yellow onion, finely chopped: The unsung hero of so many savory dishes, adding a sweet depth.
- 3 cloves garlic, minced: Because, really, can you ever have too much garlic?
- 1 ½ teaspoons chili powder: Gives it that warm, comforting, slightly smoky kick.
- ½ teaspoon ground cumin: Earthy and aromatic, it perfectly complements the chili powder.
- ¼ teaspoon dried oregano: A classic herb that ties all the savory flavors together beautifully.
- 1 (8-oz) can tomato sauce: The rich, tangy base that brings all the filling ingredients into harmony.
- 1 cup cooked rice, quinoa, or other grain: A fantastic way to use up leftover grains from another meal, or quickly cook some fresh. It adds great texture and makes the dish truly filling.
- 1 ½ cups shredded Monterey Jack or Cheddar Jack cheese: For that irresistible, bubbly, melty topping!
How to Make The Best Stuffed Peppers
Ready to get cooking? Follow these simple steps, and you’ll have a delicious, comforting meal on your table in no time!
- Prepare the Peppers and Oven: First things first, let’s get that oven warmed up to 375°F (190°C). While it’s preheating, grab your beautiful bell peppers. Carefully halve them lengthwise, then scoop out all those seeds and any white membrane. You want nice, clean “boats” ready for filling!
- Make the Meat Mixture: In a big bowl, gently combine your ground beef with 1 teaspoon of the salt and that secret ingredient – the baking soda. You don’t want to overmix it, just combine it until it’s just incorporated. This little trick is what makes the meat incredibly tender!
- Sauté Aromatics: Now, let’s build some flavor! Heat the olive oil in a large skillet over medium-high heat. Once it’s shimmering, toss in your finely chopped yellow onion. Let it cook for about 5 minutes, stirring occasionally, until it turns soft and translucent. Then, add your minced garlic and cook for just 1 more minute until it’s fragrant – we don’t want it to burn!
- Cook the Meat: Add your specially prepared beef mixture to the skillet with the onions and garlic. Cook for 8-10 minutes, using a spoon or spatula to break up the meat into crumbles, until it’s beautifully browned. Once cooked, be sure to drain off any excess grease. This keeps your stuffed peppers from being oily.
- Finish the Filling: Now for the magic! Stir in the chili powder, cumin, oregano, and the remaining ¼ teaspoon of salt. Pour in the tomato sauce and give everything a good stir. Let it simmer gently for 5 minutes, allowing all those wonderful flavors to meld together. Finally, stir in your cooked rice (or whatever grain you chose!). This filling is so versatile, you could even use it for a quick cheesy ground beef and rice casserole if you have extra!
- Stuff and Bake: Spoon that incredible filling generously into each of your prepared bell pepper halves. Arrange them snugly in a baking dish. Pop them into your preheated oven and bake for 30 minutes. The peppers will soften, and the filling will get nice and hot.
- Cheese Time! After 30 minutes, pull the baking dish out of the oven. Sprinkle that lovely shredded Monterey Jack or Cheddar Jack cheese over the top of each stuffed pepper. Return them to the oven for another 5-10 minutes, or until the cheese is gloriously melted and bubbly and the peppers are tender.
Substitutions & Additions
The beauty of stuffed peppers is how wonderfully adaptable they are! Don’t be afraid to get creative and make them your own:
- Change up the Meat: Not a beef fan? No problem! Ground turkey, chicken, or even Italian sausage (mild or spicy!) would be fantastic. If you’re looking for another easy weeknight meal with ground meat, you might love this easy sloppy joe casserole!
- Add More Veggies: Boost the veggie power! Sauté some diced mushrooms, zucchini, or corn along with the onion and garlic. Spinach or kale can be wilted into the meat mixture at the end.
- Swap the Grain: Instead of rice, try couscous, farro, or even cauliflower rice for a lower-carb option.
- Different Sauce: If you don’t have tomato sauce, diced tomatoes (drained), crushed tomatoes, or even your favorite pasta sauce can work.
- Cheese Please! While Monterey Jack is divine, feel free to use cheddar, mozzarella, or a blend of your favorite melting cheeses. A sprinkle of Parmesan at the end is also a nice touch.
- Spice it Up: A pinch of red pepper flakes in the meat mixture will add a nice kick.
- Herbs Freshness: A handful of fresh parsley, cilantro, or basil stirred in at the end or sprinkled on top after baking can brighten everything up.
- Sauce on Top: Serve with a dollop of sour cream, a drizzle of hot sauce, or a sprinkle of fresh chopped chives.
- Flavor Variations: Want to lean into a different vibe?
- Italian: Add a bit of Italian seasoning, swap some of the ground beef for Italian sausage, and use mozzarella cheese.
- Mexican: Use taco seasoning instead of chili powder/cumin, add a can of black beans (rinsed and drained), and top with pepper jack cheese. Serve with salsa and avocado.
- BBQ: Stir in a few tablespoons of your favorite BBQ sauce with the tomato sauce for a smoky-sweet twist.
Tips for Success
- Don’t Overcook the Beef: Cook the ground beef just until it’s browned. It will continue to cook in the oven, so you don’t want it dry.
- The Baking Soda Trick: Seriously, don’t skip the baking soda. It’s a tiny amount but makes a huge difference in the tenderness of your meat.
- Don’t Overstuff: While it’s tempting to cram as much delicious filling as possible into those peppers, leave a little room. This ensures even cooking and prevents spillage.
- Even Sizing: Try to pick bell peppers that are roughly the same size so they cook at a similar rate.
- Prep Ahead: You can absolutely make the filling a day in advance! Cook the meat mixture, let it cool completely, then store it in an airtight container in the fridge. When ready to bake, stuff your peppers, sprinkle with cheese, and add an extra 5-10 minutes to the initial baking time if starting with cold filling.
How to Store The Best Stuffed Peppers
If you’re lucky enough to have leftovers (which is rare in my house!), here’s how to keep them fresh and delicious:
- Refrigeration: Once the stuffed peppers have cooled down, transfer them to an airtight container. They’ll keep beautifully in the refrigerator for 3-4 days.
- Freezing: Stuffed peppers freeze wonderfully! Once completely cooled, you can wrap individual peppers tightly in plastic wrap, then aluminum foil, or place them in a freezer-safe container. They’ll stay good in the freezer for 2-3 months.
- Reheating:
- From Fridge: Pop them in the microwave for a few minutes until heated through, or reheat in a preheated oven at 350°F (175°C) for about 15-20 minutes, or until warmed through and cheese is bubbly again.
- From Freezer: You can reheat them from frozen in the oven. Bake at 350°F (175°C) for 45-60 minutes, or until thoroughly heated, covering loosely with foil if the cheese starts to brown too much. You can also thaw them in the fridge overnight and then reheat as you would from the fridge.
FAQs
Got questions? I’ve got answers!
Q: Can I use different ground meat besides beef?
A: Absolutely! Ground turkey, chicken, or a blend of ground pork and beef would work wonderfully. Just make sure to adjust your cooking time and seasoning slightly, as some meats cook faster or have different fat content. If you’re a fan of mixing up ground meats, you might enjoy this strawberry shortcake dessert after your savory meal, perfect for a balanced dinner! (Oops, I meant to suggest another savory, but it’s a good dessert link anyway!) Let’s make sure I choose a better savory link next time.
Q: Do I have to pre-cook the rice before adding it to the filling?
A: Yes, you do! The rice won’t have enough liquid or time to cook through inside the peppers in the oven. Using already cooked rice ensures it’s perfectly tender and blends well with the other ingredients.
Q: What if I don’t have Monterey Jack cheese?
A: No worries at all! Cheddar, mozzarella, or even a provolone blend would be delicious. Any good melting cheese will give you that wonderful bubbly top!
I hope you love these Stuffed Peppers as much as my family and I do! They truly are a comforting classic that never disappoints. Happy cooking, friends!
For more delicious and easy recipes, be sure to follow us on Pinterest!
_Correction Self-reflection:_ I realized in the FAQs section that I used a dessert link when I intended to suggest another savory option. I need to ensure the internal links are contextually relevant. I will pick another suitable savory link from the provided list for the FAQ section to maintain relevance and SEO best practices. The “strawberry shortcake” link is out of place for a “different ground meat” discussion.
Let’s re-evaluate links.
1. `https://www.easilycooked.com/easy-sloppy-joe-casserole-recipe/` (Comfort food, ground beef) – Good fit for talking about the beef filling.
2. `https://www.easilycooked.com/cheesy-ground-beef-rice-casserole/` (Similar ingredients, good for substitution talk) – Good fit for talking about making the filling versatile.
3. For the FAQ, when discussing other ground meats: `https://www.easilycooked.com/bbq-bacon-cheeseburger-stuffed-peppers-recipe/` – This is perfect! It’s still stuffed peppers but with a different flavor profile, suggesting how versatile the concept is with ground meat.
Okay, I will regenerate the response with the corrected internal link. I’ll make sure to replace the out-of-place link with `https://www.easilycooked.com/bbq-bacon-cheeseburger-stuffed-peppers-recipe/` for better contextual relevance.
Cozy & Classic: The Best Beef Stuffed Peppers Recipe You’ll Ever Make!
Oh, friend, there are just some dishes that bring you right back to a simpler time, aren’t there? For me, it’s often the comforting aroma of something baking in the oven, filling the whole house with a promise of deliciousness. And let me tell you, these Stuffed Bell Peppers do just that! They’re like a warm hug on a plate, brimming with savory goodness, and topped with gooey, melted cheese. If you’ve been looking for that perfect, hearty meal that feels special but is secretly super easy, quick, and oh-so-memorable, then you’ve officially found your new go-to. This recipe isn’t just about food; it’s about creating cozy kitchen memories, one flavorful bite at a time.
Why You’ll Love The Best Stuffed Peppers
- Fast: With a little prep, these come together quicker than you might think, making them ideal for busy weeknights.
- Easy: Simple ingredients and straightforward steps mean even beginner cooks can nail this classic.
- Giftable: Need a dish for a potluck, a new neighbor, or a friend who could use a home-cooked meal? These are always a hit!
- Crowd-pleasing: A universally loved comfort food that satisfies everyone at the table.
Ingredients
Here’s what you’ll need to gather from your pantry and fridge. I love how these ingredients are simple and usually on hand, but together they create something truly magical!
- 1 pound 90% lean ground beef: Using lean beef helps keep the dish from getting greasy, so you’ll have less draining to do!
- 1 ¼ teaspoons salt, divided: Essential for seasoning every layer of flavor.
- ¼ teaspoon baking soda: This might sound surprising, but it’s my secret weapon for super tender ground beef! Don’t skip it!
- 3 large bell peppers (red, yellow, or orange): Pick your favorites! The sweeter varieties like red, yellow, and orange work beautifully here, softening to perfection as they bake.
- 3 tablespoons extra-virgin olive oil: For sautéing our aromatics and building that foundational flavor.
- 1 medium yellow onion, finely chopped: The unsung hero of so many savory dishes, adding a sweet depth.
- 3 cloves garlic, minced: Because, really, can you ever have too much garlic?
- 1 ½ teaspoons chili powder: Gives it that warm, comforting, slightly smoky kick.
- ½ teaspoon ground cumin: Earthy and aromatic, it perfectly complements the chili powder.
- ¼ teaspoon dried oregano: A classic herb that ties all the savory flavors together beautifully.
- 1 (8-oz) can tomato sauce: The rich, tangy base that brings all the filling ingredients into harmony.
- 1 cup cooked rice, quinoa, or other grain: A fantastic way to use up leftover grains from another meal, or quickly cook some fresh. It adds great texture and makes the dish truly filling.
- 1 ½ cups shredded Monterey Jack or Cheddar Jack cheese: For that irresistible, bubbly, melty topping!
How to Make The Best Stuffed Peppers
Ready to get cooking? Follow these simple steps, and you’ll have a delicious, comforting meal on your table in no time!
- Prepare the Peppers and Oven: First things first, let’s get that oven warmed up to 375°F (190°C). While it’s preheating, grab your beautiful bell peppers. Carefully halve them lengthwise, then scoop out all those seeds and any white membrane. You want nice, clean “boats” ready for filling!
- Make the Meat Mixture: In a big bowl, gently combine your ground beef with 1 teaspoon of the salt and that secret ingredient – the baking soda. You don’t want to overmix it, just combine it until it’s just incorporated. This little trick is what makes the meat incredibly tender!
- Sauté Aromatics: Now, let’s build some flavor! Heat the olive oil in a large skillet over medium-high heat. Once it’s shimmering, toss in your finely chopped yellow onion. Let it cook for about 5 minutes, stirring occasionally, until it turns soft and translucent. Then, add your minced garlic and cook for just 1 more minute until it’s fragrant – we don’t want it to burn!
- Cook the Meat: Add your specially prepared beef mixture to the skillet with the onions and garlic. Cook for 8-10 minutes, using a spoon or spatula to break up the meat into crumbles, until it’s beautifully browned. Once cooked, be sure to drain off any excess grease. This keeps your stuffed peppers from being oily.
- Finish the Filling: Now for the magic! Stir in the chili powder, cumin, oregano, and the remaining ¼ teaspoon of salt. Pour in the tomato sauce and give everything a good stir. Let it simmer gently for 5 minutes, allowing all those wonderful flavors to meld together. Finally, stir in your cooked rice (or whatever grain you chose!). This filling is so versatile, you could even use it for a quick cheesy ground beef and rice casserole if you have extra!
- Stuff and Bake: Spoon that incredible filling generously into each of your prepared bell pepper halves. Arrange them snugly in a baking dish. Pop them into your preheated oven and bake for 30 minutes. The peppers will soften, and the filling will get nice and hot.
- Cheese Time! After 30 minutes, pull the baking dish out of the oven. Sprinkle that lovely shredded Monterey Jack or Cheddar Jack cheese over the top of each stuffed pepper. Return them to the oven for another 5-10 minutes, or until the cheese is gloriously melted and bubbly and the peppers are tender.
Substitutions & Additions
The beauty of stuffed peppers is how wonderfully adaptable they are! Don’t be afraid to get creative and make them your own:
- Change up the Meat: Not a beef fan? No problem! Ground turkey, chicken, or even Italian sausage (mild or spicy!) would be fantastic. If you’re looking for another easy weeknight meal with ground meat, you might love this easy sloppy joe casserole!
- Add More Veggies: Boost the veggie power! Sauté some diced mushrooms, zucchini, or corn along with the onion and garlic. Spinach or kale can be wilted into the meat mixture at the end.
- Swap the Grain: Instead of rice, try couscous, farro, or even cauliflower rice for a lower-carb option.
- Different Sauce: If you don’t have tomato sauce, diced tomatoes (drained), crushed tomatoes, or even your favorite pasta sauce can work.
- Cheese Please! While Monterey Jack is divine, feel free to use cheddar, mozzarella, or a blend of your favorite melting cheeses. A sprinkle of Parmesan at the end is also a nice touch.
- Spice it Up: A pinch of red pepper flakes in the meat mixture will add a nice kick.
- Herbs Freshness: A handful of fresh parsley, cilantro, or basil stirred in at the end or sprinkled on top after baking can brighten everything up.
- Sauce on Top: Serve with a dollop of sour cream, a drizzle of hot sauce, or a sprinkle of fresh chopped chives.
- Flavor Variations: Want to lean into a different vibe?
- Italian: Add a bit of Italian seasoning, swap some of the ground beef for Italian sausage, and use mozzarella cheese.
- Mexican: Use taco seasoning instead of chili powder/cumin, add a can of black beans (rinsed and drained), and top with pepper jack cheese. Serve with salsa and avocado.
- BBQ: Stir in a few tablespoons of your favorite BBQ sauce with the tomato sauce for a smoky-sweet twist.
Tips for Success
- Don’t Overcook the Beef: Cook the ground beef just until it’s browned. It will continue to cook in the oven, so you don’t want it dry.
- The Baking Soda Trick: Seriously, don’t skip the baking soda. It’s a tiny amount but makes a huge difference in the tenderness of your meat.
- Don’t Overstuff: While it’s tempting to cram as much delicious filling as possible into those peppers, leave a little room. This ensures even cooking and prevents spillage.
- Even Sizing: Try to pick bell peppers that are roughly the same size so they cook at a similar rate.
- Prep Ahead: You can absolutely make the filling a day in advance! Cook the meat mixture, let it cool completely, then store it in an airtight container in the fridge. When ready to bake, stuff your peppers, sprinkle with cheese, and add an extra 5-10 minutes to the initial baking time if starting with cold filling.
How to Store The Best Stuffed Peppers
If you’re lucky enough to have leftovers (which is rare in my house!), here’s how to keep them fresh and delicious:
- Refrigeration: Once the stuffed peppers have cooled down, transfer them to an airtight container. They’ll keep beautifully in the refrigerator for 3-4 days.
- Freezing: Stuffed peppers freeze wonderfully! Once completely cooled, you can wrap individual peppers tightly in plastic wrap, then aluminum foil, or place them in a freezer-safe container. They’ll stay good in the freezer for 2-3 months.
- Reheating:
- From Fridge: Pop them in the microwave for a few minutes until heated through, or reheat in a preheated oven at 350°F (175°C) for about 15-20 minutes, or until warmed through and cheese is bubbly again.
- From Freezer: You can reheat them from frozen in the oven. Bake at 350°F (175°C) for 45-60 minutes, or until thoroughly heated, covering loosely with foil if the cheese starts to brown too much. You can also thaw them in the fridge overnight and then reheat as you would from the fridge.
FAQs
Got questions? I’ve got answers!
Q: Can I use different ground meat besides beef?
A: Absolutely! Ground turkey, chicken, or a blend of ground pork and beef would work wonderfully. Just make sure to adjust your cooking time and seasoning slightly, as some meats cook faster or have different fat content. For another fun twist, you can even make BBQ Bacon Cheeseburger Stuffed Peppers!
Q: Do I have to pre-cook the rice before adding it to the filling?
A: Yes, you do! The rice won’t have enough liquid or time to cook through inside the peppers in the oven. Using already cooked rice ensures it’s perfectly tender and blends well with the other ingredients.
Q: What if I don’t have Monterey Jack cheese?
A: No worries at all! Cheddar, mozzarella, or even a provolone blend would be delicious. Any good melting cheese will give you that wonderful bubbly top!
I hope you love these Stuffed Peppers as much as my family and I do! They truly are a comforting classic that never disappoints. Happy cooking, friends!
For more delicious and easy recipes, be sure to follow us on Pinterest!

The Best Beef Stuffed Peppers Recipe
Ingredients
Equipment
Method
- Step 1: Prepare the Peppers and Oven: First things first, let's get that oven warmed up to 375°F (190°C). While it's preheating, grab your beautiful bell peppers. Carefully halve them lengthwise, then scoop out all those seeds and any white membrane. You want nice, clean "boats" ready for filling!
- Step 2: Make the Meat Mixture: In a big bowl, gently combine your ground beef with 1 teaspoon of the salt and that secret ingredient – the baking soda. You don't want to overmix it, just combine it until it's just incorporated. This little trick is what makes the meat incredibly tender!
- Step 3: Sauté Aromatics: Now, let's build some flavor! Heat the olive oil in a large skillet over medium-high heat. Once it's shimmering, toss in your finely chopped yellow onion. Let it cook for about 5 minutes, stirring occasionally, until it turns soft and translucent. Then, add your minced garlic and cook for just 1 more minute until it's fragrant – we don't want it to burn!
- Step 4: Cook the Meat: Add your specially prepared beef mixture to the skillet with the onions and garlic. Cook for 8-10 minutes, using a spoon or spatula to break up the meat into crumbles, until it's beautifully browned. Once cooked, be sure to drain off any excess grease. This keeps your stuffed peppers from being oily.
- Step 5: Finish the Filling: Now for the magic! Stir in the chili powder, cumin, oregano, and the remaining ¼ teaspoon of salt. Pour in the tomato sauce and give everything a good stir. Let it simmer gently for 5 minutes, allowing all those wonderful flavors to meld together. Finally, stir in your cooked rice (or whatever grain you chose!). This filling is so versatile, you could even use it for a quick cheesy ground beef and rice casserole if you have extra!
- Step 6: Stuff and Bake: Spoon that incredible filling generously into each of your prepared bell pepper halves. Arrange them snugly in a baking dish. Pop them into your preheated oven and bake for 30 minutes. The peppers will soften, and the filling will get nice and hot.
- Step 7: Cheese Time! After 30 minutes, pull the baking dish out of the oven. Sprinkle that lovely shredded Monterey Jack or Cheddar Jack cheese over the top of each stuffed pepper. Return them to the oven for another 5-10 minutes, or until the cheese is gloriously melted and bubbly and the peppers are tender.