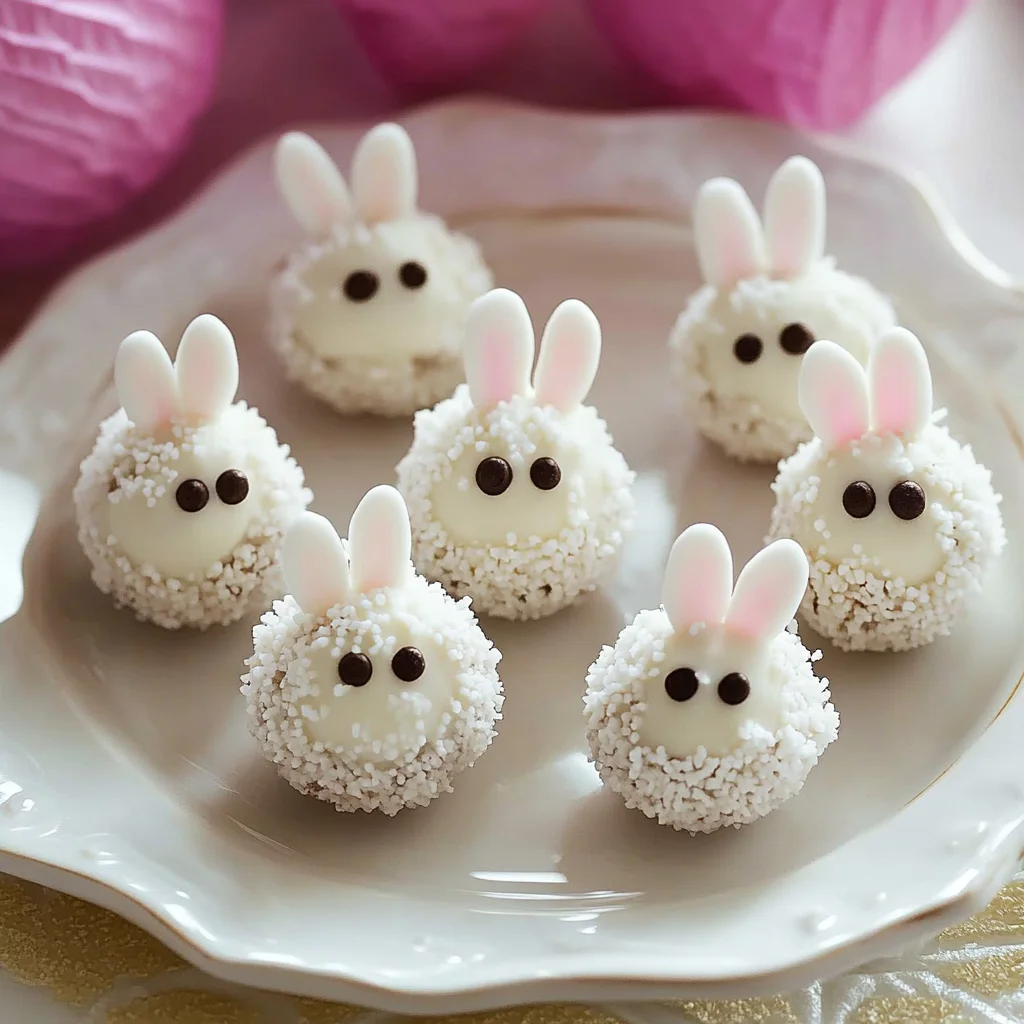
There’s something so magical about treats that bring back childhood memories—those moments when you’d sneak a sweet bite and feel instant joy. Bunny Oreo Balls are one of those nostalgic delights that never fail to put a smile on my face. Whether it’s Easter, a spring party, or just a cozy day in the kitchen, these adorable little bites are quick to whip up and just as fun to decorate. Plus, they’re made with classic Oreo cookies, which means they’re packed with that irresistible crunch and creaminess we all adore.
If you’re looking for a dessert that’s both simple and memorable, Bunny Oreo Balls are your new best friend. They come together in no time, require no baking, and are perfect for sharing—or keeping all to yourself! I love how they look so festive and cute, but you don’t need to be a pro baker to nail this recipe. Grab your favorite Oreos and let’s get started on these sweet little bunnies that are sure to charm everyone at your next gathering.
Why You’ll Love Bunny Oreo Balls
- Fast: From crushing Oreos to dipping in chocolate, it only takes about an hour including chilling time.
- Easy: No fancy skills or equipment needed, just a bowl, some chocolate, and a bit of creativity.
- Giftable: These adorable bunny treats make wonderful gifts for neighbors, teachers, or friends.
- Crowd-pleasing: Oreo lovers of all ages will swoon over the creamy and crunchy combo in every bite.
Ingredients
Here’s what you’ll need to bring these sweet bunnies to life. I like to use quality Oreos and make sure my cream cheese is softened to blend easily. The candy melts come in fun colors that help make the decorations pop, but you can always get creative here!
- 1 package (14.3 oz) Oreo cookies: The classic crunch and chocolate flavor makes these perfect for the base.
- 8 oz cream cheese, softened: This adds that luscious creaminess and helps bind the cookie crumbs.
- 12 oz white chocolate or white candy melts: For coating the balls in a smooth, sweet shell.
- 1/2 cup pink candy melts: Perfect for cute bunny noses and a splash of color.
- 1/2 cup black candy melts: Use for whiskers and other fine details.
- Mini marshmallows: These become the bunny ears when cut and decorated.
- Pink sugar sprinkles (optional): Adds a fun sparkle to the ears.
- Edible black food marker: Great for drawing eyes and other small details.
How to Make Bunny Oreo Balls
Let’s walk through the process step-by-step so you feel confident and ready to create these charming treats. I always recommend preparing everything before you start because once you’re in the dipping stage, things move quickly!
Step 1: Prepare the Oreo Mixture
Start by crushing the Oreo cookies into fine crumbs. You can use a food processor to make it super quick, or place the cookies in a sealed plastic bag and crush them with a rolling pin. Either way works well—just aim for a sandy texture without big chunks. Then, transfer the crumbs to a mixing bowl and add the softened cream cheese. Mix everything together with your hands or a spoon until it forms a smooth, dough-like consistency. This mixture is the heart of your bunny balls, so make sure it’s well combined!
Step 2: Shape the Balls
Next, roll the Oreo and cream cheese mixture into 1-inch diameter balls. I find using a cookie scoop can help keep the sizes uniform, but rolling by hand works just fine too. Place the balls on a baking sheet lined with parchment paper. Now, here’s a little trick I use: chill them in the refrigerator for about 30 minutes. This helps them firm up so they dip more easily in the chocolate without falling apart.
Step 3: Coat with Chocolate
While the balls chill, melt your white chocolate or candy melts in a microwave-safe bowl. Heat in 20-second bursts and stir in between to prevent burning. You want the chocolate silky smooth and ready for dipping. Once melted, dip each Oreo ball into the chocolate, making sure it’s fully coated. Use a fork or dipping tool to lift them out and gently tap off excess chocolate. Place them back on the parchment-lined sheet to set. If you’re in a hurry, pop them in the fridge for 10-15 minutes to harden the coating faster.
Step 4: Decorate as Bunnies
Here’s where the fun really begins! To make the bunny ears, cut mini marshmallows diagonally. The sticky cut side is perfect for dipping into pink sugar sprinkles, giving the ears a sweet, sparkly touch. While the chocolate coating is still a bit tacky, gently press the marshmallow ears onto the top of each Oreo ball. For the facial details, melt the pink and black candy melts separately. Use a toothpick or a small piping bag to add the bunny noses with pink candy melts, and draw whiskers with the black. Finish by drawing eyes with an edible black food marker or carefully pipe small dots with the black candy melts. I love how these little touches bring the bunnies to life!
Step 5: Final Touches
Allow all decorations to set completely before handling your Bunny Oreo Balls. This usually takes about 20-30 minutes at room temperature, or you can speed it up by refrigerating. Once set, store these delights in an airtight container in the fridge. They’ll keep perfectly fresh for up to 5 days, making them a great make-ahead treat for parties or gifting.
Substitutions & Additions
One of the best things about this recipe is how flexible it is. You can easily switch up ingredients or add your own flair to suit your taste or occasion.
- Cookies: Swap Oreos for other sandwich cookies like Golden Oreos or chocolate-filled wafers for a twist on flavor.
- Cream cheese alternatives: Use Neufchâtel cheese for a lower-fat option or mascarpone for extra richness.
- Chocolate coatings: Try milk or dark chocolate melts if you prefer a deeper flavor over white chocolate.
- Decorations: Add edible glitter, colored sugar, or tiny candy eyes to make your bunnies even more festive.
- Flavor boosts: Mix in a teaspoon of vanilla extract or a pinch of cinnamon into the Oreo mixture for an extra special touch.
If you enjoy creative no-bake treats like these, you might also want to try the No Bake Peanut Butter Brownie Cookies which are just as easy and packed with flavor, or dive into the delightful world of Oreo Stuffed Cinnamon Rolls for a fun breakfast twist!
Tips for Success
Making Bunny Oreo Balls is simple, but a few handy tips can make the process smoother and the results even better. Here’s what I keep in mind every time:
- Soft cream cheese is key: Make sure your cream cheese is softened to room temperature so it mixes easily with the cookie crumbs without lumps.
- Uniform size matters: Rolling the balls to the same size helps them cook and set evenly, plus they look prettier when served.
- Chocolate temperature: Don’t overheat your candy melts. They should be warm and smooth but not too hot, or the coating won’t set properly.
- Work quickly when decorating: Attach marshmallow ears while the chocolate is still tacky to ensure they stick well without sliding off.
- Prep ahead: You can make the Oreo mixture a day in advance and refrigerate it. Just remember to roll the balls fresh before dipping.
- Use parchment paper: It prevents sticking and makes cleanup a breeze, especially when working with melted chocolate.
How to Store Bunny Oreo Balls
Once your Bunny Oreo Balls are decorated and set, storing them properly will keep them fresh and tasty. I recommend placing them in an airtight container and keeping them in the refrigerator. This will preserve the texture of the cream cheese filling and keep the chocolate shell firm. They typically last up to 5 days stored this way, making them a perfect make-ahead dessert for your next get-together.
If you want to freeze them, arrange the Oreo balls on a tray lined with parchment paper and freeze until solid, then transfer to a freezer-safe container. They can be frozen for up to a month. When ready to enjoy, thaw them in the fridge for a few hours before serving to keep the best texture.
FAQs
- Can I use other cookies besides Oreos? Absolutely! Any sandwich cookie with cream filling should work well, just crush them finely.
- What if I don’t have candy melts? You can substitute with good-quality white chocolate chips, just be careful melting so they don’t burn.
- How do I keep the marshmallow ears from falling off? Attach them while the chocolate coating is still slightly wet so they stick better. You can also use a dab of melted chocolate as “glue.”
- Can these Oreo balls be made ahead of time? Yes! Make the Oreo mixture up to 2 days in advance and keep it refrigerated. Roll and dip when ready.
These Bunny Oreo Balls are such a delightful treat that I’m sure will become a family favorite. Their simplicity reminds me of how even the smallest kitchen projects can bring the biggest smiles. If you’re craving more easy, crowd-pleasing desserts, explore the full collection of recipes on Crispy Kitchens for endless inspiration and cozy kitchen fun.
For more sweet ideas and adorable treats like these, don’t forget to follow us on Pinterest where we share all kinds of mouthwatering recipes and beautiful food styling tips to brighten your day!

Delightfully Cute & Easy Bunny Oreo Balls
Ingredients
Equipment
Method
- Step 1: Crush Oreo cookies into fine crumbs using a food processor or by placing them in a sealed bag and crushing with a rolling pin. Transfer crumbs to a mixing bowl.
- Step 2: Add softened cream cheese to the Oreo crumbs and mix well until a smooth, dough-like consistency forms.
- Step 3: Roll the mixture into 1-inch diameter balls using your hands or a cookie scoop. Place the balls on a baking sheet lined with parchment paper.
- Step 4: Chill the balls in the refrigerator for about 30 minutes to firm up for easier dipping.
- Step 5: Melt white chocolate or candy melts in a microwave-safe bowl in 20-second bursts, stirring in between until smooth.
- Step 6: Dip each chilled ball into the melted white chocolate, coating fully. Tap off excess chocolate and place back on parchment paper. Refrigerate for 10-15 minutes to set the coating.
- Step 7: Cut mini marshmallows diagonally and dip the sticky side into pink sugar sprinkles if using. Attach these as bunny ears to the top of each coated ball while the chocolate is still tacky.
- Step 8: Melt pink and black candy melts separately. Use a toothpick or small piping bag to add bunny noses with pink melts, then draw whiskers with black melts.
- Step 9: Use an edible black food marker or black candy melts to draw eyes and other fine facial details.
- Step 10: Allow all decorations to fully set at room temperature for 20-30 minutes or refrigerate to speed up setting before handling or storing.
- Step 11: Store Bunny Oreo Balls in an airtight container in the refrigerator for up to 5 days. For longer storage, freeze them on a parchment-lined tray then transfer to a container; thaw in fridge before serving.