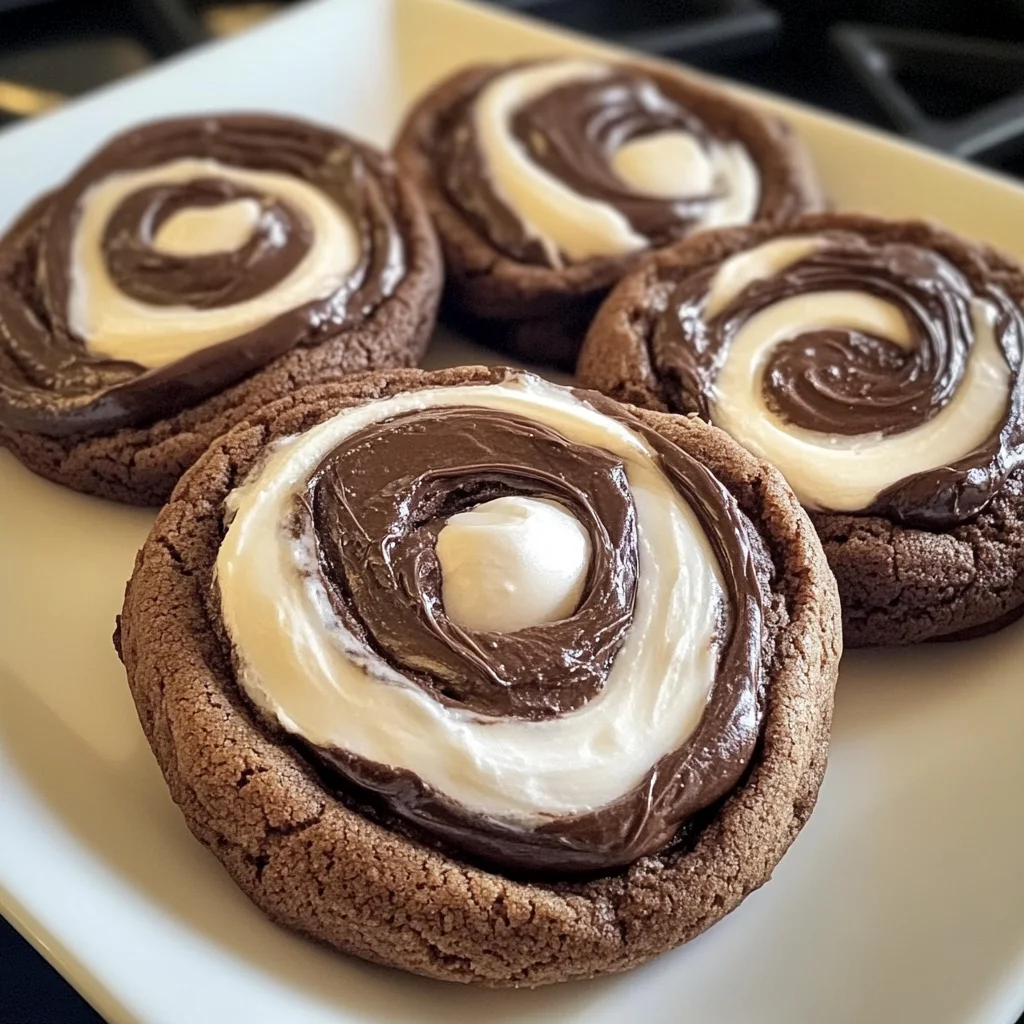
There’s something undeniably magical about the smell of freshly baked cookies wafting through the kitchen, isn’t there? For me, chocolate and marshmallows are a nostalgic pair that instantly bring back memories of chilly nights by the fire, cozy blankets, and laughter-filled family gatherings. These Chocolate Marshmallow Swirl Cookies capture all those warm feelings in every bite — rich, chocolaty, melt-in-your-mouth cookies with little pockets of gooey marshmallow delight. If you’re looking for a recipe that’s both simple and impressive, these cookies will quickly become your new favorite go-to.
What I love most about this recipe is how easy it is to pull together. You don’t need any fancy equipment or hard-to-find ingredients, yet the result feels special — like a bakery-style treat made just for you. Whether you’re baking for a last-minute gift, a crowd-pleasing dessert at a party, or just a sweet moment to brighten your day, these cookies deliver. Plus, the swirl of marshmallow fluff adds that perfect soft, chewy texture that makes every bite unforgettable.
Why You’ll Love Chocolate Marshmallow Swirl Cookies
- Fast: While the dough needs some chill time, the actual hands-on prep is under 15 minutes.
- Easy: No complicated steps or tricky techniques—just classic cookie-making with a gooey twist.
- Giftable: These cookies look stunning and taste even better, making them the perfect homemade gift.
- Crowd-pleasing: Chocolate lovers and marshmallow fans alike will be reaching for seconds (and thirds!).
Ingredients
Before you get started, let’s talk about the ingredients you’ll need. I always recommend using quality basics because they really shine in simple recipes like this:
- All-purpose flour: The foundation of your cookies, providing the perfect structure.
- Unsweetened cocoa powder: This gives the cookies their rich chocolate flavor—go for Dutch-processed if you have it for a smoother taste.
- Baking soda: Helps the cookies rise just right, ensuring a soft yet sturdy texture.
- Salt: Just a pinch to balance and enhance the chocolate flavor.
- Unsalted butter: Softened to room temperature, it creates that tender crumb and buttery richness.
- Granulated sugar: Adds sweetness and helps with that desirable crisp edge.
- Large eggs: At room temperature for better mixing and texture.
- Pure vanilla extract: A small but essential flavor booster that complements the chocolate beautifully.
- Marshmallow fluff: The star of the show! This gooey goodness gets swirled right into the cookie centers for a melty surprise.
How to Make Chocolate Marshmallow Swirl Cookies
Ready to bake? Let’s walk through the process step-by-step. I’ll share some tips along the way to make sure your cookies come out perfect every time.
- Mix the dry ingredients: In a medium bowl, whisk together the flour, cocoa powder, baking soda, and salt. This keeps everything evenly distributed so your cookies bake consistently.
- Cream the butter and sugar: In a large bowl, beat the softened butter and granulated sugar on medium-high speed until light and fluffy, about 3-4 minutes. This step aerates the dough, giving your cookies a tender texture. Don’t forget to scrape down the sides of the bowl to make sure everything blends well.
- Add eggs and vanilla: Add the eggs one at a time, beating well after each addition. Then mix in the vanilla extract. This builds the structure and flavor of your dough.
- Combine wet and dry ingredients: With the mixer on low speed, gradually add the flour mixture to the wet ingredients. Mix just until combined — overmixing can make cookies tough, so slow and steady wins here.
- Chill the dough: Cover your dough and pop it in the fridge for at least 1 hour, or overnight if you have the time. Chilling firms up the dough, making it easier to scoop and helping the cookies keep their shape while baking.
- Prepare for baking: Preheat your oven to 350°F (175°C) and line two baking sheets with parchment paper. This prevents sticking and helps with even baking.
- Scoop and create marshmallow centers: Using a 1.5-tablespoon scoop, portion the dough into balls and space them about 2 inches apart on the baking sheets. Then, gently press your thumb or the back of a spoon into the center of each ball to create a deep indentation. This little nest will hold the marshmallow fluff.
- Add marshmallow fluff: Spoon about 1 teaspoon of marshmallow fluff into each indentation. Be careful not to overfill, or it might spill over during baking.
- Bake: Bake one sheet at a time, placing it in the center of the oven for 10-12 minutes. You’ll want to watch for the edges to set and the tops to look dry, but the centers should still be soft. This ensures the marshmallow stays gooey without melting away completely.
- Cool: Let the cookies cool on the baking sheet for 5-10 minutes before transferring them to a wire rack to cool completely. This resting time helps the cookies firm up and makes them easier to handle.
If you love the idea of mixing marshmallows into baked goods, you might also enjoy my recipe for Banana S’mores Muffins. They’re another cozy treat that’s perfect for breakfast or a snack!
Substitutions & Additions
Feel free to get creative with this recipe! Here are some ideas to personalize your Chocolate Marshmallow Swirl Cookies or tweak them based on what you have on hand:
- Flour: You can swap all-purpose flour for a gluten-free blend if needed, but be sure it’s a 1:1 baking blend for best results.
- Cocoa powder: If you prefer a bit sweeter chocolate flavor, try mixing in a tablespoon of unsweetened baking chocolate, finely chopped, for extra richness.
- Butter: For a dairy-free option, use a plant-based butter substitute that measures the same.
- Marshmallow fluff: Instead of marshmallow fluff, mini marshmallows can be pressed into the centers, but they might melt differently. I find fluff provides the best gooey texture.
- Add-ins: Stir in some chocolate chips or chopped nuts (pecans or walnuts work great) to add crunch and extra chocolate pockets. Just fold them in before chilling the dough.
- Spices: A pinch of cinnamon or chili powder can add a subtle warm kick to the chocolate — perfect for an adult twist.
Tips for Success
Having made these cookies more times than I can count, I’ve learned a few tricks that help them turn out perfectly every time. Here are some of my favorite tips:
- Don’t skip chilling the dough: It’s tempting to bake right away, but chilling is key for flavor development and prevents the cookies from spreading too much.
- Use room temperature eggs and butter: This helps the ingredients blend smoothly, giving you a better crumb and even rise.
- Indentations matter: Be sure to press a deep enough well in each cookie ball to hold the marshmallow fluff securely during baking.
- Bake one sheet at a time: Oven temperature can fluctuate with multiple trays, so baking one sheet at a time gives more consistent results.
- Watch the baking time closely: Every oven is different, so start checking at 10 minutes. You want set edges and soft centers for that perfect gooey texture.
- Use parchment paper or silicone mats: This prevents sticking and makes cleanup a breeze.
- Prep ahead: The dough freezes beautifully. Scoop balls onto a tray, freeze until firm, then transfer to a freezer bag. When you want fresh cookies, bake straight from frozen, adding a couple extra minutes to the bake time.
How to Store Chocolate Marshmallow Swirl Cookies
To keep your cookies fresh and delicious, proper storage is important. Here’s what I recommend:
- Room temperature: Store cooled cookies in an airtight container at room temperature. They’ll stay soft and fresh for up to 4 days.
- Refrigerate: If you want to keep them a bit longer, you can refrigerate them in an airtight container for up to a week. Just bring them to room temp or warm slightly before serving for that melty marshmallow effect.
- Freeze: Cookies freeze well, either baked or as dough balls. For baked cookies, wrap them tightly and freeze for up to 3 months. Thaw at room temperature or warm gently in the oven.
These storage tips come in handy when making batches for holiday gift boxes or when you want to keep a stash on hand for unexpected sweet cravings.
FAQs
Can I use regular marshmallows instead of marshmallow fluff?
Yes, you can! Mini marshmallows work fine, but they tend to melt and spread differently. Marshmallow fluff holds its shape better in the cookie centers and provides that signature gooey swirl.
How do I prevent the marshmallow from burning?
Keeping the baking time within 10-12 minutes and baking one sheet at a time helps prevent the marshmallow from browning too much. Also, avoid overfilling the indentation to reduce spillover.
Can I make these cookies vegan?
With a few swaps like plant-based butter, egg replacer, and vegan marshmallow fluff, you could adapt this recipe. However, I haven’t tested it myself, so results may vary.
Why is it important to chill the dough?
Chilling helps the dough firm up, which prevents the cookies from spreading too much in the oven. It also allows the flavors to meld, producing a richer taste and better texture.
If you’re looking for more delicious cookie ideas that are just as fun and easy, be sure to check out my collection of sweet and savory recipes. And if you love chocolate, you might also enjoy the decadent Nutella Stuffed Cookie Pie—another crowd-pleaser that’s perfect for sharing.
Ready to bake up these scrumptious Chocolate Marshmallow Swirl Cookies? I promise once you try them, they’ll become a staple in your baking rotation, bringing smiles and cozy vibes to every occasion. Happy baking!
Don’t forget to follow me on Pinterest for more tasty recipes and kitchen inspiration.

Chocolate Marshmallow Swirl Cookies
Ingredients
Equipment
Method
- Step 1: In a medium bowl, whisk together the flour, cocoa powder, baking soda, and salt.
- Step 2: In a large bowl, beat the softened butter and granulated sugar on medium-high speed until light and fluffy, about 3-4 minutes. Scrape down the sides as needed.
- Step 3: Add eggs one at a time, beating well after each. Mix in vanilla extract.
- Step 4: Gradually add the dry ingredients to the wet mixture on low speed. Mix just until combined.
- Step 5: Cover dough and chill in the fridge for at least 60 minutes or overnight.
- Step 6: Preheat oven to 350°F (175°C). Line two baking sheets with parchment paper.
- Step 7: Using a 1.5-tablespoon scoop, portion dough into balls spaced 2 inches apart on baking sheets. Press a thumb or spoon into center of each ball to create a deep indentation.
- Step 8: Spoon about 1 teaspoon of marshmallow fluff into each indentation carefully to avoid overfilling.
- Step 9: Bake one sheet at a time in center of oven for 10-12 minutes. Edges should be set and tops dry, centers soft and gooey.
- Step 10: Let cookies cool on baking sheet for 5-10 minutes, then transfer to wire rack to cool completely.