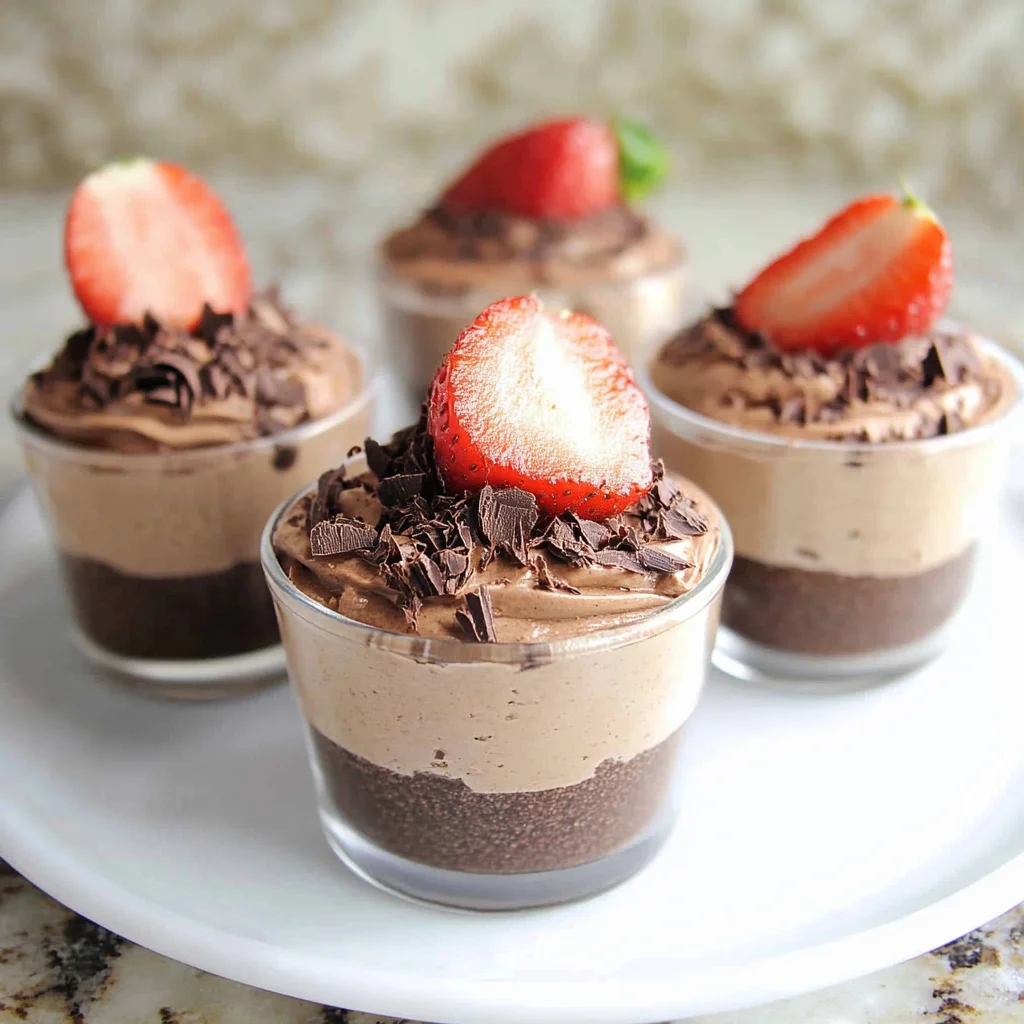
There’s something truly magical about those moments when you dive into a creamy, dreamy cheesecake that doesn’t even require you to turn on the oven. Maybe it reminds you of those carefree summer afternoons, sharing sweet treats with friends or family, or perhaps it’s just the joy of enjoying a rich dessert without all the fuss. These Creamy Chocolate No-Bake Cheesecake Cups are exactly that kind of treat—simple, luscious, and absolutely unforgettable. If you’re looking for a quick dessert that feels like a special occasion, but comes together in a snap, this recipe is your new best friend.
I first made these cheesecake cups on a lazy weekend when I wanted something chocolatey but didn’t want to heat up the kitchen or mess with complicated baking. The result? Pure bliss in a cup! Perfect for last-minute guests, a cozy night in, or even as a sweet gift to brighten someone’s day. Let me walk you through why these no-bake treats deserve a permanent spot in your recipe collection.
Why You’ll Love Creamy Chocolate No-Bake Cheesecake Cups
- Fast: Ready in under 30 minutes, with minimal cleanup.
- Easy: No baking skills required, just mixing and chilling.
- Giftable: Beautifully layered in cups, they make wonderful edible gifts.
- Crowd-pleasing: Chocolate lovers and cheesecake fans alike will rave about these.
These cups are a perfect example of how you can whip up an elegant dessert without breaking a sweat. Whether you’re a beginner or a seasoned baker, you’ll appreciate how forgiving and adaptable this recipe is. Plus, the silky texture combined with a crunchy base makes every bite a delight. Don’t be surprised if these become a staple at your family gatherings or potlucks!
Ingredients
Before we jump into the steps, let’s talk ingredients. Each one plays a key role in making these cheesecake cups irresistible:
- Chocolate graham cracker crumbs (3/4 cup): This forms the crunchy, flavorful base. If you want a twist, crushed OREO cookies work beautifully and add a bit of extra chocolate punch.
- Salted butter (2 tablespoons, melted): Binds the crumbs together and adds a rich, buttery flavor that’s essential for that perfect crust.
- Heavy cream or whipping cream (2 cups): This is what makes the cheesecake filling so delightfully fluffy and creamy.
- Unsweetened cocoa powder (1/2 cup): For that deep chocolate flavor that balances the sweetness.
- Powdered sugar (1 cup, divided): Sweetens the filling just right without any graininess.
- Cream cheese (8 oz, softened): The heart of the cheesecake, providing that rich tang and smooth texture.
- Vanilla extract (1 teaspoon): Adds a warm, aromatic depth that makes the chocolate pop even more.
These ingredients are easy to find and you probably have most of them already in your pantry or fridge. I love how this recipe combines familiar flavors in a fresh, no-fuss way. If you’re curious about other cheesecake treats, you might enjoy my easy no-bake Oreo cheesecake, which also skips the oven but brings a different kind of cookie crunch to the table.
How to Make Creamy Chocolate No-Bake Cheesecake Cups
Let me guide you through each step, so you feel confident and excited to make these gorgeous cheesecake cups yourself.
- Prepare the crust: Start by combining the melted salted butter with the chocolate graham cracker crumbs in a small bowl. Stir them together until every crumb is coated and the mixture looks like wet sand. This is your base, so make sure it’s well mixed!
- Layer the crust: Spoon about 2 to 3 tablespoons of this crumb mixture into the bottom of each glass or serving dish. Press down lightly with the back of the spoon or your fingers to create an even, firm layer. This will give you that wonderful crunch against the creamy filling.
- Whip the chocolate cream: In a clean mixing bowl, combine the heavy cream, unsweetened cocoa powder, and 3/4 cup of powdered sugar. Using an electric mixer, beat on medium-high speed until stiff peaks form. This means when you lift the beaters, the cream holds its shape firmly. It should be glossy and thick, not runny.
- Prepare the cream cheese mixture: In another bowl, beat the softened cream cheese with the remaining 1/4 cup powdered sugar until it’s silky smooth and free of lumps. Add the vanilla extract and mix until well combined. This step is key for that classic cheesecake tang.
- Fold it all together: Gently fold the cream cheese mixture into the whipped chocolate cream. Use a spatula and mix carefully so you keep all the air you whipped into the cream. This gives you that light, airy texture that feels like a cloud of chocolate cheesecake.
- Assemble your cups: Spoon or pipe the creamy chocolate cheesecake filling over the crust layer in each cup. Fill them evenly for a beautiful presentation that looks as good as it tastes.
- Garnish and chill: Top with fresh fruit like raspberries or strawberries, or sprinkle some extra cookie crumbs on top for texture. Cover the cups and refrigerate for at least 1 hour. This resting time lets the flavors meld and the filling set perfectly.
And voilà! You’ve got a dessert that’s rich, creamy, and perfectly balanced between sweet and chocolatey. These cups are so versatile—you can dress them up for a fancy dinner party or keep them casual for a fun family night. If you like no-bake desserts, you might also want to check out this no-bake peanut butter brownie cookies recipe for a peanut butter twist on simple sweets.
Substitutions & Additions
One of the best things about this recipe is how easy it is to customize to your taste or what you have on hand. Here are some ideas to make it your own:
- Crust options: Swap chocolate graham cracker crumbs for crushed Oreos for an extra chocolate kick, or try digestive biscuits for a lighter base.
- Sweetener swaps: If you prefer less sweetness, reduce the powdered sugar slightly. For a natural alternative, powdered coconut sugar can work well.
- Dairy alternatives: Use coconut cream instead of heavy cream for a dairy-free version, but keep in mind the flavor will shift slightly.
- Add texture: Fold in mini chocolate chips or chopped nuts like toasted pecans or hazelnuts for a delightful crunch inside the filling.
- Flavor twists: Add a splash of espresso or coffee extract to the cream cheese mixture for a mocha vibe, or a pinch of cinnamon for warmth.
- Fresh toppings: Fresh raspberries, sliced strawberries, or even a dollop of whipped cream make the presentation pop and add freshness.
Feel free to experiment! I’ve found that these cheesecake cups respond beautifully to little tweaks, so don’t hesitate to get creative. If you want to explore more no-bake cheesecake ideas, there’s a lovely variety on my recipe page that you might find inspiring.
Tips for Success
Making no-bake cheesecake cups is straightforward, but here are some helpful tips to ensure your dessert turns out perfectly every time:
- Use room temperature cream cheese: This makes it much easier to beat smooth and prevents lumps in your filling.
- Don’t overbeat the cream: Whip just until stiff peaks form to avoid turning it into butter or grainy texture.
- Gently fold: When combining the cream cheese mixture with the whipped cream, fold carefully to keep the light, airy texture.
- Chill well: At least an hour in the fridge helps the filling set and flavors to meld. Overnight is even better if you have the time!
- Prep ahead: These cups are great for making a day ahead, which is perfect when you’re planning a party or busy weeknight.
By following these simple tips, you’ll avoid the most common pitfalls and end up with those dreamy, creamy cups that everyone will ask for again and again. And if you love the idea of no-bake treats but want something fruity and fun, don’t miss the easy mini raspberry cheesecake bites, another quick crowd-pleaser.
How to Store Creamy Chocolate No-Bake Cheesecake Cups
Storing these cheesecake cups properly will keep them fresh and delicious for days. Here’s what you need to know:
- Refrigerate: Always keep the cheesecake cups covered tightly with plastic wrap or a lid to prevent them from absorbing other fridge odors.
- Shelf life: They stay fresh for up to 3-4 days in the refrigerator, though they taste best within the first 2 days when the texture is at its peak.
- Freezing tips: While you can freeze these cups, I recommend freezing without the fresh fruit topping. Wrap them tightly and consume within 1 month. Thaw overnight in the fridge before serving.
- Serving after storage: Give them a gentle stir or a quick whisk before serving if they have separated a bit after resting.
Keeping these storage tips in mind means you can make these cheesecake cups ahead of time and have them ready whenever the craving strikes—or for your next celebration!
FAQs
Can I use low-fat cream cheese or cream?
For best texture and flavor, I recommend full-fat cream cheese and heavy cream. Low-fat versions may result in a less creamy and stable filling.
Do I have to use an electric mixer?
While you can whisk by hand, an electric mixer makes it much easier to achieve stiff peaks and a smooth cream cheese mixture, especially for beginners.
Can I make these gluten-free?
Absolutely! Use gluten-free graham cracker crumbs or gluten-free cookies for the crust to make this recipe safe for gluten-sensitive friends and family.
What’s the best way to serve these cheesecake cups?
Serve chilled straight from the fridge with a garnish of fresh berries or a sprinkle of chocolate shavings. They pair wonderfully with a hot cup of coffee or a refreshing iced tea.
If you enjoyed this easy no-bake cheesecake, you might also want to explore other comforting recipes like my creamy lemon chicken for a savory dinner that’s just as fuss-free and satisfying.
Thanks for stopping by the kitchen today! I hope you have as much fun making these Creamy Chocolate No-Bake Cheesecake Cups as I did sharing them with you. Don’t forget to bookmark this recipe and share it with your chocolate-loving friends.
For more delightful recipes and kitchen inspiration, follow us on Pinterest and keep the delicious ideas coming!

Creamy Chocolate No-Bake Cheesecake Cups
Ingredients
Equipment
Method
- Step 1: Prepare the crust by mixing melted salted butter with chocolate graham cracker crumbs until well coated and resembling wet sand.
- Step 2: Spoon 2 to 3 tablespoons of the crumb mixture into the bottom of each serving cup and press down firmly to create an even crust layer.
- Step 3: In a mixing bowl, combine heavy cream, unsweetened cocoa powder, and 3/4 cup powdered sugar. Beat with an electric mixer on medium-high until stiff peaks form.
- Step 4: In another bowl, beat softened cream cheese with the remaining 1/4 cup powdered sugar until smooth. Add vanilla extract and mix until combined.
- Step 5: Gently fold the cream cheese mixture into the whipped chocolate cream, preserving as much air as possible for a light, fluffy texture.
- Step 6: Spoon or pipe the cheesecake filling over the crust layer in each cup evenly for a beautiful presentation.
- Step 7: Garnish with fresh fruit like raspberries or strawberries, or sprinkle extra cookie crumbs on top. Cover and refrigerate for at least 1 hour before serving to allow filling to set.