Hey there, friend! Let’s talk party food. You know the kind – the stuff that disappears faster than you can say “seconds”? The bites that everyone crowds around, asking “What IS this?!” Yep, we’re diving into that delicious territory today. And trust me, these Cheddar-Stuffed BBQ Bacon Bombs are about to become your absolute secret weapon. They bring back memories of backyard BBQs and cozy game nights, and the best part? They are SO incredibly easy to make. Seriously, you’ll wonder where they’ve been all your life.
Why You’ll Love This Recipe
Alright, let’s break down why these little flavor powerhouses are going to steal your heart (and your guests’ attention!).
- Fast
- Easy
- Giftable
- Crowd-pleasing
Ingredients
Gather ’round, friends! Here’s what you’ll need for these magical little bites. Nothing fancy, just good old comfort food ingredients!
- 1 lb ground beef or ground pork: Use what you love! Both work beautifully. I often go for a mix!
- 4 oz cheddar cheese, cubed: Sharp, mild, white, orange – your favorite kind of cheddar works! Cut it into nice little cubes. About half an inch or so is perfect.
- 12 slices thin-cut bacon: Thin cut is key here! It wraps and crisps up beautifully.
- 1/2 cup BBQ sauce: Use your go-to favorite! Smoky, sweet, tangy? It’s all good!
- 1 teaspoon garlic powder: Adds that essential savory depth.
- 1 teaspoon onion powder: Another pantry staple for flavor building.
- 1 tablespoon Worcestershire sauce: A little secret ingredient that adds a fantastic umami punch to the meat.
- 1/2 teaspoon salt: Just enough to enhance the flavors.
- 1/2 teaspoon black pepper: Freshly ground if you can!
- 1 tablespoon brown sugar (optional): This adds a lovely caramelized sweetness to the BBQ glaze, highly recommended if you like that sticky-sweet finish!
- Toothpicks: Essential for holding those bacon wraps in place!
How to Make It
Okay, let’s get cooking! You won’t believe how simple these are to assemble. Think of it as a fun little kitchen project!
First things first, let’s get that oven ready. Preheat your oven to 375°F (190°C). While it’s warming up, grab a baking sheet and line it with foil. This makes cleanup about a million times easier, and trust me, you’ll thank yourself later!
Next, time to season that meat! In a medium mixing bowl, pop in your ground meat (beef or pork, or a combo!). Add the Worcestershire sauce, garlic powder, onion powder, salt, and black pepper. Now, get your hands in there and mix it all together gently but thoroughly. You want those spices to be evenly distributed, but try not to overwork the meat.
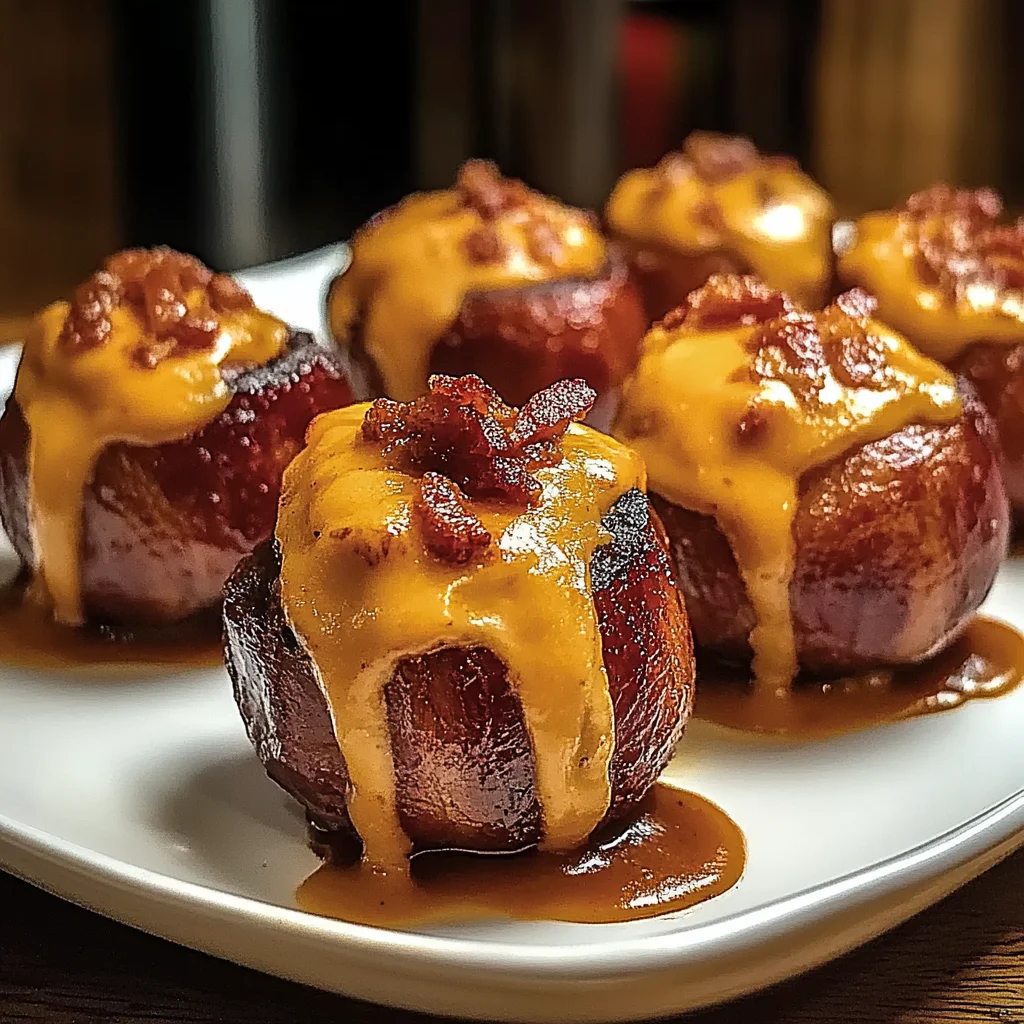
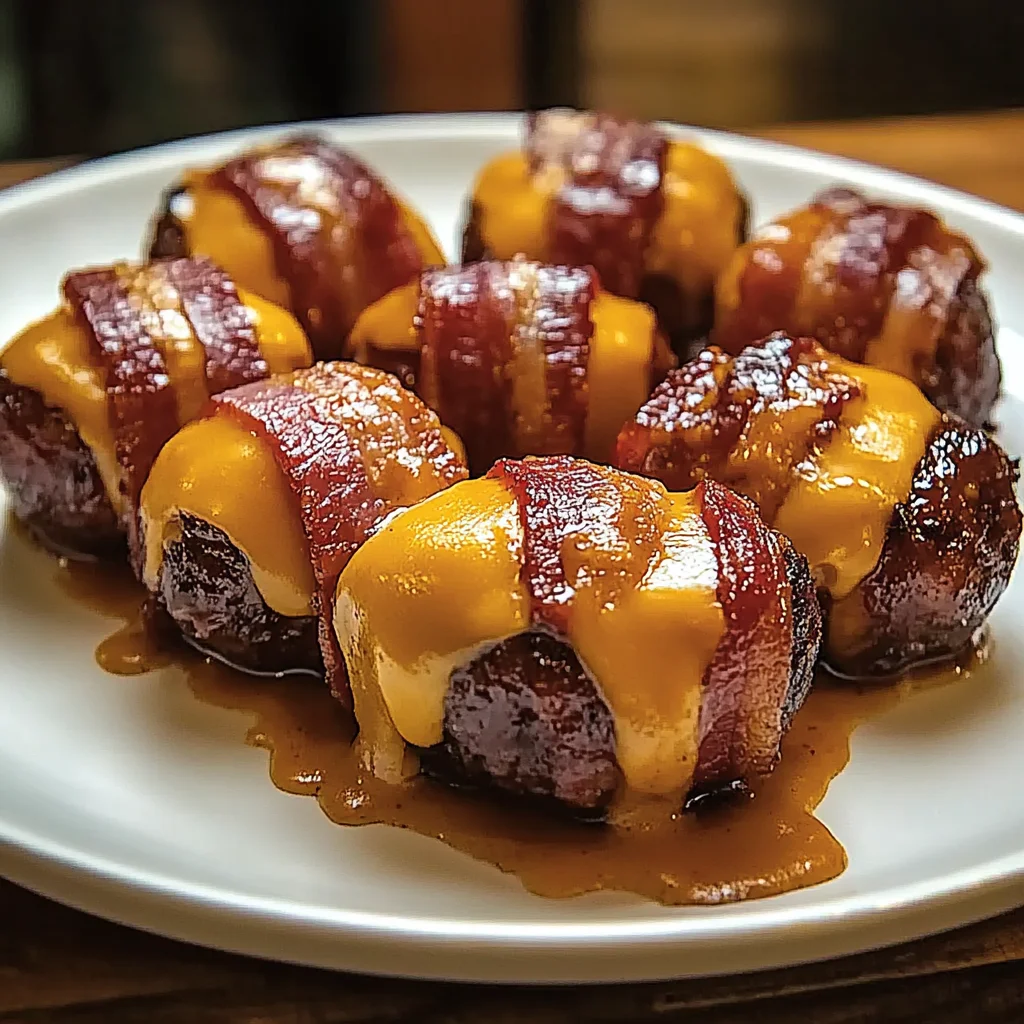
Now for the fun part – stuffing! Take a small portion of the seasoned meat mixture. I usually aim for about the size of a golf ball, maybe a little smaller. Flatten it out in your palm. Place one of those lovely cheddar cheese cubes right in the center. Now, carefully gather the meat around the cheese and shape it into a nice, snug little ball. Make sure the cheese is completely sealed inside so you don’t have any cheesy breakouts while baking! Repeat this process until all your meat is used up. You should get about 10-12 bombs depending on how big you make them.
Time for the bacon hug! Grab a slice of thin-cut bacon. Tightly wrap each meatball with a slice of bacon. Start at one end and wind it around until the meatball is fully encased. Secure the bacon wrap with a toothpick right through the bacon layers and into the meatball. This keeps everything neat and tidy as it cooks.
Almost there! Place the bacon-wrapped meatballs on your foil-lined baking sheet. Now, grab your favorite BBQ sauce and a brush. Generously brush the outside of each bomb with a good layer of BBQ sauce. Don’t be shy! If you’re using the optional brown sugar (and I highly recommend it for that extra sticky goodness!), you can sprinkle or brush it over the BBQ sauce now too.
Into the oven they go! Bake for 25-30 minutes. About halfway through the baking time (around the 12-15 minute mark), pull them out and give them another brush of BBQ sauce. This builds up that delicious glaze.
Want that extra crispy bacon finish? After the main baking time, you can carefully turn on the broiler for just 2-3 minutes. Keep a very, VERY close eye on them during this step, as they can go from perfectly crisp to burnt in a flash! Watch for the bacon to get nice and crispy and the sauce to caramelize.
Once they’re done, let them cool slightly on the baking sheet for a few minutes. This helps them hold their shape and keeps you from burning your tongue (ask me how I know!). Before serving, remember to carefully remove all the toothpicks! Serve them hot and watch them disappear!
Substitutions & Additions
One of the best things about a great recipe is making it your own! Here are a few ideas to mix things up:
- Cheese Please! Swap cheddar for Pepper Jack for a little kick, Monterey Jack, or even a smoked gouda!
- Meat Swap: Not feeling beef or pork? You could try ground chicken or turkey, though they might be a little drier. Add a touch more Worcestershire or BBQ sauce to the mix if you do.
- Spice It Up: Add a pinch of cayenne pepper or red pepper flakes to the meat mixture for some heat. Or, tuck a small slice of jalapeño inside with the cheese cube!
- Different Sauce: Experiment with different BBQ sauce flavors – spicy, honey, mustard-based, whatever your heart desires!
- Herb Power: Mix in a little dried parsley or chives into the meat mixture.
Tips for Success
Even easy recipes have little tricks to make them perfect. Here are a few things I’ve learned:
- Don’t Overwork the Meat: Mix just until everything is combined. Overmixing can lead to tough meatballs.
- Seal the Cheese: This is important! Make sure the meat completely surrounds the cheese cube to prevent leaks. If a little does escape, it’s okay, it just makes a tasty crispy bit on the pan!
- Use Thin Bacon: Thick-cut bacon takes longer to crisp and might not cook through properly in the time it takes the meatball to cook. Thin-cut is your friend here.
- Secure with Toothpicks: Don’t skip this step! It really helps the bacon stay wrapped snugly.
- Watch the Broiler: I cannot stress this enough! Broilers are powerful. Stay right there and watch continuously if you choose to broil.
- Prep Ahead: You can assemble the bacon-wrapped bombs (without the BBQ sauce) a few hours ahead of time and keep them covered in the fridge. Brush with sauce just before baking.
How to Store It
Got leftovers? (Highly unlikely, but theoretically possible!) Here’s how to keep them fresh:
Let the bombs cool completely. Store them in an airtight container in the refrigerator for 3-4 days. To reheat, you can microwave them, but for best results (to get the bacon crispy again), reheat them in a toaster oven or regular oven at 350°F (175°C) until heated through.
FAQs
Got questions? I’ve got answers!
Can I make these in an air fryer?
Absolutely! Preheat your air fryer to 375°F (190°C). Place the bombs in a single layer, making sure not to overcrowd the basket. Cook for 12-18 minutes, flipping halfway through, until cooked through and bacon is crispy. Cooking time will vary by air fryer, so keep an eye on them!
Can I prepare these ahead of time?
Yes! You can assemble the bacon-wrapped meatballs (without the sauce) up to a day in advance and store them, covered, in the refrigerator. Add the BBQ sauce just before baking.
What kind of ground meat is best?
Both ground beef and ground pork work great. Ground beef (like 80/20) will be classic, while ground pork can be a little sweeter and juicier. Using a mix of both is also a popular and delicious option!

Easy Cheesy BBQ Bacon Bombs
Ingredients
Equipment
Method
- Step 1: Prep Oven & Baking Sheet. Preheat your oven to 375°F (190°C). Line a baking sheet with foil for easy cleanup.
- Step 2: Season the Meat. In a medium mixing bowl, combine the ground meat (beef, pork, or mix) with Worcestershire sauce, garlic powder, onion powder, salt, and black pepper. Mix gently but thoroughly with your hands until spices are evenly distributed.
- Step 3: Stuff and Shape. Take a small portion of seasoned meat (about golf ball size). Flatten it in your palm. Place a cheddar cheese cube in the center. Gather the meat around the cheese and shape into a snug ball, ensuring the cheese is completely sealed inside.
- Step 4: Wrap with Bacon. Tightly wrap each meatball with a slice of thin-cut bacon. Secure the bacon wrap by inserting a toothpick through the bacon layers and into the meatball. Place the bacon-wrapped meatballs on the foil-lined baking sheet.
- Step 5: Apply BBQ Glaze. Generously brush the outside of each bomb with BBQ sauce. If using the optional brown sugar, sprinkle or brush it over the BBQ sauce now.
- Step 6: Bake. Bake for 25-30 minutes at 375°F (190°C). About halfway through (12-15 minutes), remove the sheet and brush the bombs with another layer of BBQ sauce to build the glaze.
- Step 7: Optional Crispy Finish. For extra crispy bacon, carefully turn on the broiler for 2-3 minutes after the main baking time. Watch them continuously under the broiler as they can burn quickly.
- Step 8: Cool and Serve. Let the bombs cool slightly on the baking sheet for a few minutes. Carefully remove all toothpicks before serving. Serve hot.
Notes
Tips: Don't overwork the meat. Ensure cheese is completely sealed. Use thin-cut bacon. Secure with toothpicks. Watch carefully if broiling. Assemble ahead (without sauce) and refrigerate; add sauce before baking.
Storage: Store cooled leftovers in an airtight container in the fridge for 3-4 days. Reheat in a toaster oven or regular oven at 350°F (175°C) for best results, or microwave.
Air Fryer: Preheat air fryer to 375°F (190°C). Cook in a single layer for 12-18 minutes, flipping halfway, until cooked through and bacon is crispy (time varies by air fryer).