Okay, friend, let me tell you about a recipe that’s about to change your weeknight dinner game. You know those nights? The ones where you’re tired, maybe the fridge is looking a little bare, but you still want something comforting, flavorful, and utterly satisfying? Enter these Cheesy Chicken Garlic Wraps! They remind me of grabbing a quick, delicious bite on the go, but making them at home is even better because you know exactly what’s going in, and they come together SO fast. Seriously, from start to finish, you can be sinking your teeth into one of these warm, cheesy, garlicky pockets of joy in under 30 minutes. They’re easy, they’re flavorful, and trust me, once you make them, they’ll be on repeat in your kitchen!
Why You’ll Love This Recipe
- Fast: Dinner is ready in less than 30 minutes!
- Easy: Simple steps, minimal cleanup.
- Giftable: (Okay, maybe not giftable in the traditional sense, but definitely shareable! Perfect for casual get-togethers).
- Crowd-pleasing: Who doesn’t love cheesy chicken and garlic wrapped in a warm tortilla?
Ingredients
Gather ’round, here’s what you’ll need for these amazing wraps:
- 2 large chicken breasts, diced: The star of the show! Dicing helps it cook super fast and evenly.
- 4 large flour tortillas: The vehicle for all that goodness. Make sure they’re large enough to hold the filling!
- 1 tablespoon olive oil: Just a little bit to help that chicken get nice and golden.
- 2 teaspoons garlic powder: Because garlic is life, right?
- 1 teaspoon onion powder: Adds another layer of savory flavor.
- 1 teaspoon paprika: For a touch of color and mild sweetness.
- Salt, to taste: Seasoning is key!
- Pepper, to taste: A little kick never hurt anyone.
- 1 cup shredded cheddar cheese: Melty, classic, delicious.
- 1/2 cup shredded mozzarella cheese: Adds that perfect gooey stretch!
- 1/2 cup creamy garlic sauce: This is the secret weapon! Use your favorite store-bought or homemade.
- Fresh parsley, chopped (optional, for garnish): Adds a pop of color and freshness at the end.
How to Make It
Let’s get cooking! It’s really so simple, you’ll see.
1. First things first, let’s get that chicken ready. Grab your diced chicken and pop it into a medium bowl. Drizzle over the olive oil, then sprinkle in the garlic powder, onion powder, paprika, salt, and pepper. Get in there with your hands (or a spoon!) and give it a good toss, making sure every piece of chicken is coated beautifully with those seasonings. This is where the flavor building starts!
2. Now, heat up your trusty non-stick skillet over medium heat. Once it’s warm, add that seasoned chicken to the skillet. Let it cook, stirring occasionally, for about 6-8 minutes. You’re looking for it to turn golden brown and be cooked all the way through, no pink inside. Remove the cooked chicken from the skillet and set it aside to cool just slightly while you get the wraps ready.
3. Alright, wrap assembly time! Lay out your big flour tortillas on a clean surface. Grab that creamy garlic sauce and spread a nice, even layer over each tortilla, getting close to the edges but leaving a little border for folding. Then, divide that delicious cooked chicken evenly among the four tortillas, placing it just below the center. Now for the best part – sprinkle that wonderful shredded cheddar and mozzarella cheese generously over the chicken. Don’t be shy with the cheese!
4. Time to fold! This is where you tuck all that goodness in. I find folding the sides in first, then rolling from the bottom up like a burrito works best to keep everything contained. Pop these folded beauties back into that same non-stick skillet (no need to wash it yet!). Grill the folded wraps for about 2-3 minutes per side. You want the tortillas to get golden brown and crispy, and you’ll see and feel that cheese inside getting wonderfully melty!
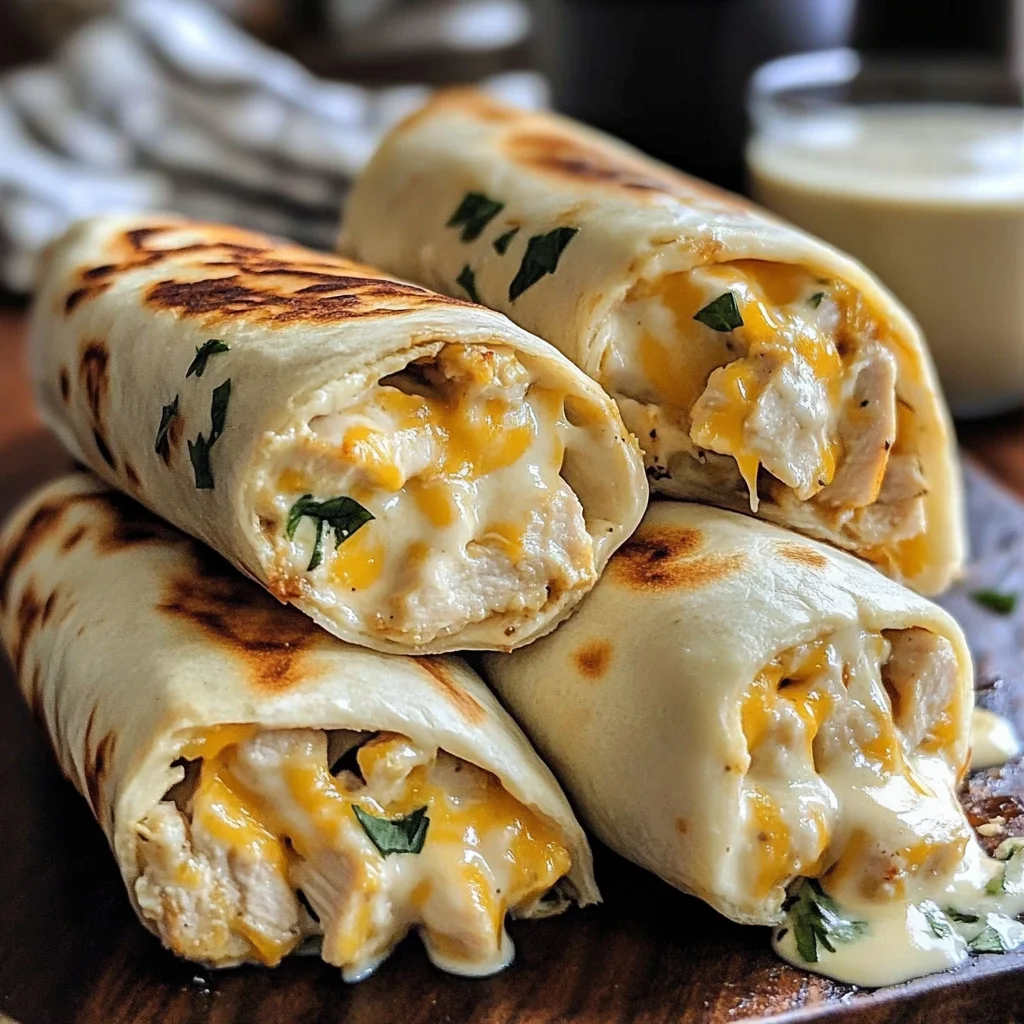
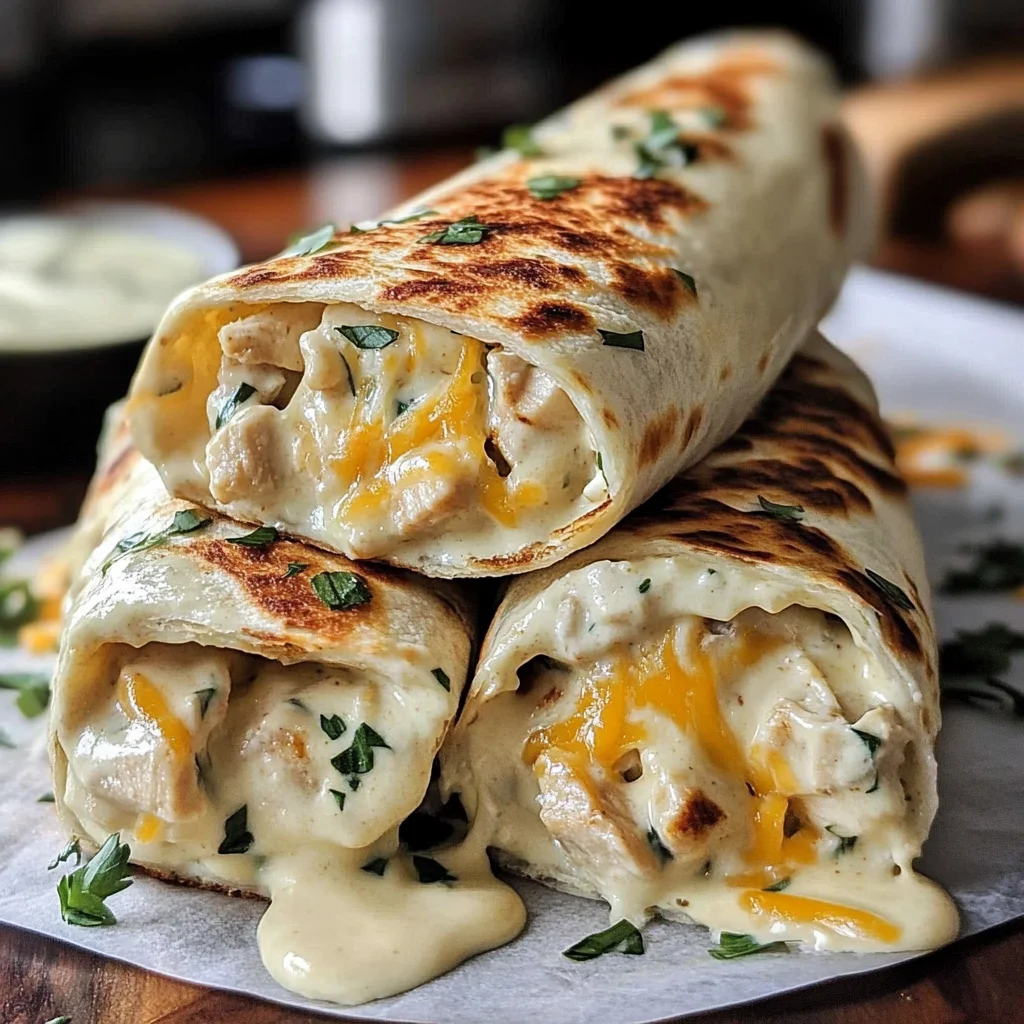
5. Almost there! Take the finished, golden wraps off the skillet. I like to cut each one in half on the diagonal – it makes them easier to handle and shows off that amazing cheesy filling! If you have some fresh parsley handy, a little sprinkle on top adds a lovely pop of color and freshness. Serve ’em up right away while they’re hot and the cheese is still pulling. Enjoy!
Substitutions & Additions
Want to switch things up? Here are a few ideas:
- Change the Protein: Not a chicken fan? Try cooked ground turkey, shrimp, or even black beans for a vegetarian version!
- Swap the Cheese: Feel free to use your favorite melty cheese! Monterey Jack, provolone, pepper jack for a little heat, or even a Mexican blend would be fantastic.
- Alternate Sauce: No creamy garlic sauce? Ranch dressing works beautifully, or you can whip up a quick mix of mayo, garlic powder, a squeeze of lemon, and a splash of milk. Sriracha mayo would add a nice kick!
- Add Some Veggies: Sautéed onions and peppers, fresh spinach (it will wilt inside the hot wrap), corn, or even some diced tomatoes can be added with the chicken before wrapping.
- Spice it Up: Add a pinch of red pepper flakes to the chicken seasoning, or use a spicy paprika.
Tips for Success
Here are a few little pointers to make sure your wraps turn out perfect every time:
- Don’t Overfill: It’s tempting to stuff them full, but too much filling makes them hard to fold and can cause them to break open while grilling.
- Use Large, Flexible Tortillas: This gives you plenty of room to work with when folding. Warm them slightly in the microwave for 10-15 seconds if they seem stiff.
- Medium Heat is Your Friend: When grilling the wraps, keep the skillet at medium heat. Too high and the tortillas will burn before the cheese melts properly.
- Don’t Overcook the Chicken Initially: The chicken will cook a little more inside the wrap, so aim for just cooked through in the first step.
- Prep Ahead: You can cook the seasoned chicken ahead of time and store it in the fridge for 2-3 days. When you’re ready, just assemble the wraps and grill!
How to Store It
Got leftovers? (Highly unlikely, but just in case!)
Let the wraps cool completely, then store them in an airtight container in the refrigerator for 2-3 days. For best results when reheating, pop them back in a skillet over medium heat, in a toaster oven, or an air fryer until warmed through and crispy again. The microwave works, but they might lose some of their crispiness.
FAQs
Here are answers to a couple of questions you might have:
Q: Can I use different meat besides chicken?
A: Absolutely! Cooked ground turkey or even thinly sliced cooked beef would work well in this recipe.
Q: Is there a way to make these gluten-free?
A: Yes, just swap the flour tortillas for your favorite brand of gluten-free tortillas of a similar size.
Q: I don’t have creamy garlic sauce. What else can I use?
A: Ranch dressing is a great substitute! Or mix together mayonnaise with garlic powder and a tiny splash of milk or water to reach a creamy consistency.

Easy Cheesy Chicken Garlic Wraps Recipe
Ingredients
Equipment
Method
- 1. First things first, let's get that chicken ready. Grab your diced chicken and pop it into a medium bowl. Drizzle over the olive oil, then sprinkle in the garlic powder, onion powder, paprika, salt, and pepper. Get in there with your hands (or a spoon!) and give it a good toss, making sure every piece of chicken is coated beautifully with those seasonings. This is where the flavor building starts!
- 2. Now, heat up your trusty non-stick skillet over medium heat. Once it's warm, add that seasoned chicken to the skillet. Let it cook, stirring occasionally, for about 6-8 minutes. You're looking for it to turn golden brown and be cooked all the way through, no pink inside. Remove the cooked chicken from the skillet and set it aside to cool just slightly while you get the wraps ready.
- 3. Alright, wrap assembly time! Lay out your big flour tortillas on a clean surface. Grab that creamy garlic sauce and spread a nice, even layer over each tortilla, getting close to the edges but leaving a little border for folding. Then, divide that delicious cooked chicken evenly among the four tortillas, placing it just below the center. Now for the best part – sprinkle that wonderful shredded cheddar and mozzarella cheese generously over the chicken. Don't be shy with the cheese!
- 4. Time to fold! This is where you tuck all that goodness in. I find folding the sides in first, then rolling from the bottom up like a burrito works best to keep everything contained. Pop these folded beauties back into that same non-stick skillet (no need to wash it yet!). Grill the folded wraps for about 2-3 minutes per side. You want the tortillas to get golden brown and crispy, and you'll see and feel that cheese inside getting wonderfully melty!
- 5. Almost there! Take the finished, golden wraps off the skillet. I like to cut each one in half on the diagonal – it makes them easier to handle and shows off that amazing cheesy filling! If you have some fresh parsley handy, a little sprinkle on top adds a lovely pop of color and freshness. Serve 'em up right away while they're hot and the cheese is still pulling. Enjoy!