Oh, friend, do you ever find yourself longing for those lazy, sun-drenched afternoons, where creativity just flows and simple joys fill the air? Maybe it’s the memory of childhood crafts, or perhaps you just need a little burst of color to brighten a dreary day. Well, get ready, because today we’re diving into a project that brings all that warmth and charm right into your home: making your very own DIY Suncatchers! This isn’t just a craft; it’s a little piece of bottled sunshine, and I promise you, it’s so incredibly easy, quick, and satisfying, you’ll wonder why you didn’t try it sooner. It’s the perfect way to add a personal touch to your windows, or even create heartfelt, handmade gifts that truly shine.
Why You’ll Love DIY Suncatcher
- Fast: The hands-on part takes minutes!
- Easy: No special skills or tools required.
- Giftable: Perfect for birthdays, holidays, or just because!
- Crowd-pleasing: Kids and adults alike adore making and admiring them.
Ingredients
Gathering your supplies for these radiant beauties is a breeze. You likely have most of these lying around your house already!
- Clear School Glue: Think good old Elmer’s or any clear-drying craft glue. This is the magical base for our suncatchers!
- Food Coloring or Liquid Watercolor Paints: This is where the magic happens! Food coloring gives a vibrant, transparent look, while liquid watercolors can offer slightly softer hues. Choose your favorite rainbow of colors!
- Plastic Lid or Clear Plastic Sheet: Repurpose those sturdy plastic container lids (like from sour cream or yogurt) or grab some clear plastic sheets from a craft store. The flatter and smoother, the better!
- Toothpicks or Paintbrushes: For swirling and creating those gorgeous patterns.
- Optional: Glitter, Sequins, or Mini Beads: Because a little sparkle never hurt anyone, right?
- Optional: String or Suction Cup Hooks: To hang your masterpiece and let it catch all that beautiful light!
How to Make DIY Suncatcher
Ready to get crafty? Let’s turn some simple supplies into dazzling art!
- First things first, let’s get your workspace ready. Lay down some wax paper or an old newspaper to protect your surface – glue can be a little messy, but it’s easy to clean up! Then, lay out your plastic lids or cut your clear plastic sheets into your desired shapes. I find round lids work perfectly for classic suncatcher shapes, but squares or even cut-out stars can be fun too.
- Now for the glue! Pour clear school glue into each plastic lid. You’re aiming for a thickness of about 0.5 to 1 cm (that’s about 1/4 to 1/2 inch). Don’t be shy with the glue; a good thick layer is key for a sturdy suncatcher. Gently tilt the lid to make sure the glue spreads evenly across the entire surface.
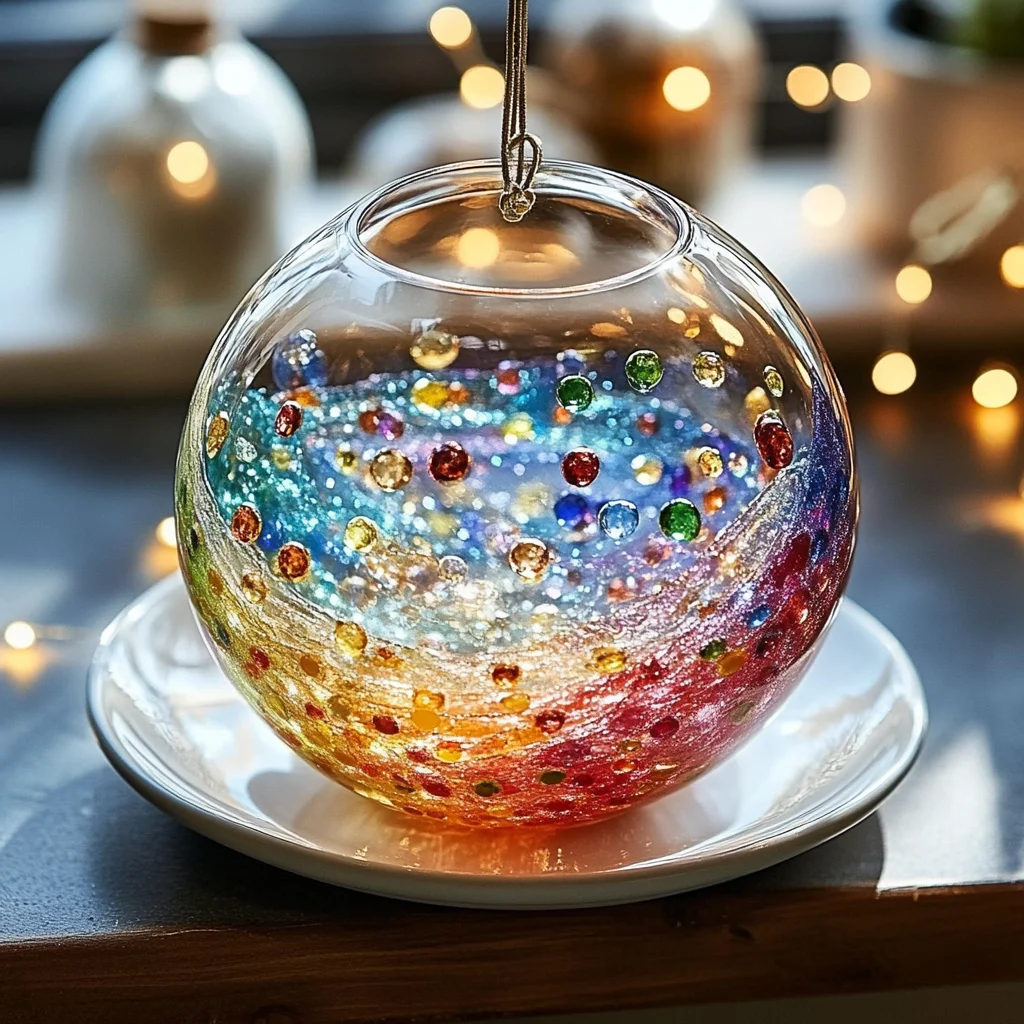
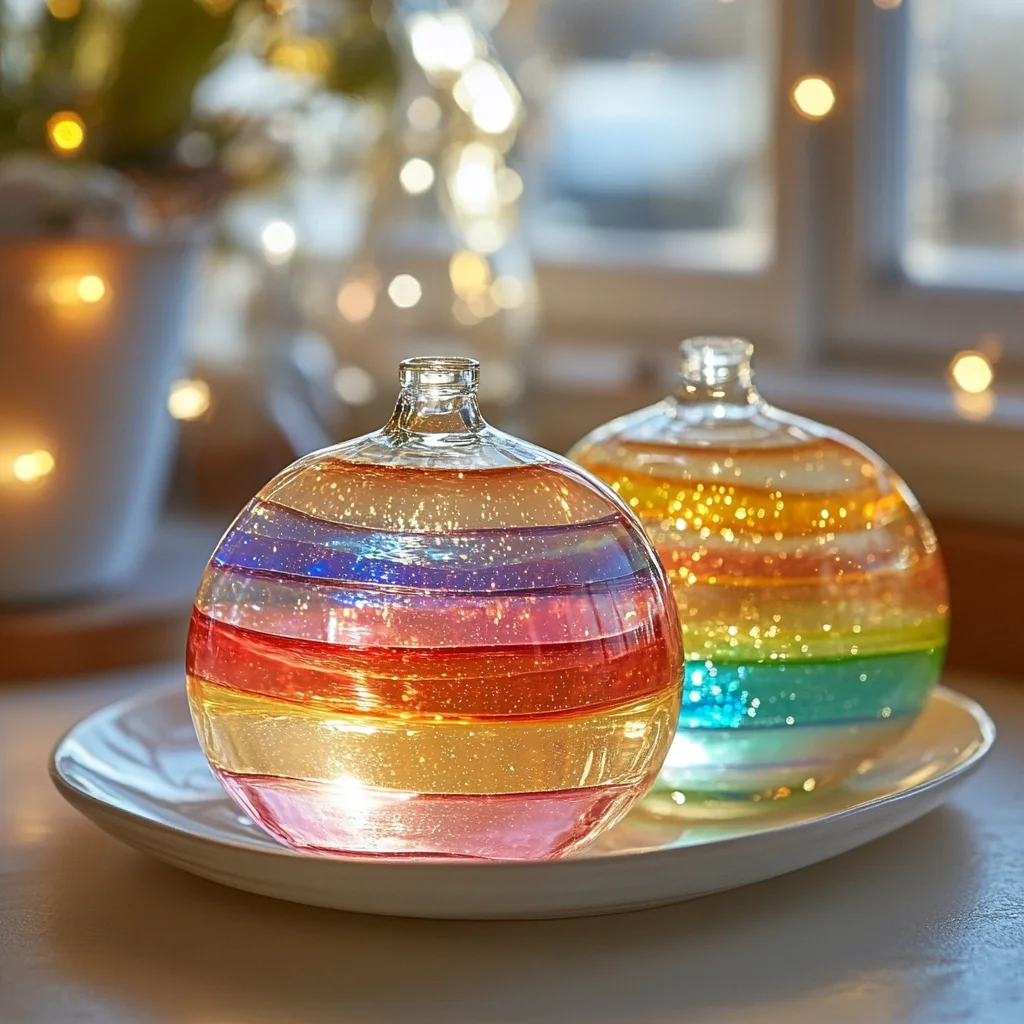
- Time for color! Carefully apply drops of your chosen food coloring or liquid watercolor paints onto the wet glue. I usually do one drop per color, spaced out a bit, but feel free to add more for a more intense hue. This is also the perfect moment to sprinkle in any optional glitter, sequins, or mini beads if you’re feeling extra fancy.
- Grab a toothpick or a small paintbrush and start gently swirling the colors together. This is the most artistic part! You can create marble effects, abstract designs, or even attempt simple shapes. Remember, less is often more when swirling – you want the colors to blend, not become muddy. Think about how much fun you had with our Easy 3-Ingredient Slime, and let that creative energy flow!
- Once you’re happy with your design, the hardest part begins: waiting! Place your designed suncatcher flat in a safe spot where it won’t be disturbed. It needs to dry completely, which can take anywhere from 24 to 72 hours, depending on the humidity and how thick your glue layer is. You’ll know it’s ready when the glue becomes perfectly transparent and easily peels away from the lid. Patience is a virtue here, just like waiting for a perfectly baked batch of Ultimate Classic Carrot Cake!
- Once fully dry, carefully peel your suncatcher from the plastic lid. It should pop right off! If there are any rough edges, you can neatly trim them with a pair of scissors to give your suncatcher a polished look.
- Finally, it’s time to display your sparkling creation! Punch a small hole at the top of your suncatcher (a standard hole punch works great, or you can carefully use a needle for smaller holes). Thread some string or ribbon through the hole, or if you prefer a seamless look, you can use a small piece of clear tape to attach a loop of string. Hang your beautiful suncatcher in a sunny window, or use suction cup hooks for a secure display. It’s truly amazing how a little light can transform simple materials into something so enchanting!
Substitutions & Additions
The beauty of DIY is making it your own! Don’t feel limited by the basic recipe.
- For the “Mold”: Instead of plastic lids, try using cookie cutters on a sheet of parchment paper laid over a flat surface. Pour the glue inside the cookie cutter, let it dry, then remove the cutter. You’ll get perfectly shaped suncatchers!
- Natural Elements: Before the glue dries, press in small, flat leaves, flower petals, or even tiny shells for a more organic, earthy vibe.
- Theme It Up: For holidays, use specific colors (red and green for Christmas, pastels for Easter) and add holiday-themed glitter or small plastic trinkets. Think about how you’d decorate for a party, like with our Easy No-Bake Caramel Pretzel Bars, and apply that same festive energy!
- Sparkle Overload: Don’t be shy with the glitter! Different sizes and colors of glitter can create amazing depth and shimmer.
- Glow-in-the-Dark: Add a few drops of glow-in-the-dark paint (ensure it’s non-toxic and compatible with glue) for a suncatcher that shines even after sunset!
Tips for Success
To ensure your suncatcher project goes smoothly and you get the best results, keep these pointers in mind:
- Even Glue Layer: This is crucial! An uneven layer will dry at different rates and might lead to warping or cracking. Take your time spreading it out.
- Don’t Over-Swirl: It’s tempting to keep swirling, but too much mixing will blend your beautiful colors into a muddy mess. A few gentle swirls are all you need to create stunning patterns.
- Patience is Key for Drying: I know it’s hard to wait, but resist the urge to peel it up too soon! If it’s still tacky or cloudy, it’s not ready. Drying time truly varies, so just check periodically.
- Flat Drying Surface: Make sure your suncatcher dries on a perfectly flat surface. Any bumps or angles will affect the final shape.
- Kids and Cleanup: This is a wonderfully kid-friendly activity! Just make sure little hands are supervised, and have some wet wipes handy for easy cleanup. It’s a great companion craft to something like the Baking Soda Vinegar Balloon Experiment for a full afternoon of fun!
How to Store DIY Suncatcher
Once your suncatchers are finished, they’re pretty robust, but a little care goes a long way:
- Display: The best place is, of course, a sunny window! The more light they get, the more they’ll sparkle.
- Cleaning: If they get a little dusty, gently wipe them with a soft, dry cloth. Avoid water or harsh cleaners, as they might damage the glue.
- Long-Term Storage: If you need to store them (maybe you’re making seasonal ones!), lay them flat between sheets of wax paper or tissue paper in a box. Avoid folding or creasing them, as this could cause them to crack. Kept properly, these suncatchers can last for years!
FAQs
Got a few questions swirling around? Let’s clear them up!
Q: Can I use different types of glue?
A: Clear school glue is best. Other glues might not dry completely transparent, or they might crack. Always test a small amount first if you’re unsure!
Q: What if my suncatcher sticks to the plastic?
A: It might not be fully dry. Give it more time. If it’s truly stuck, try gently loosening an edge with a thin, non-sharp object, but be very careful not to scratch or tear it.
Q: Are these waterproof?
A: No, not really. They are designed for indoor use. Exposure to rain or high humidity outdoors will likely cause the glue to revert to its liquid state or become cloudy.
Q: Can I cut shapes out of the dried glue?
A: Absolutely! Once completely dry, the glue becomes a flexible, plastic-like sheet that’s easy to cut with scissors. Get creative with your shapes!
For more easy and delicious recipes, follow us on Pinterest!

DIY Suncatchers That Sparkle!
Ingredients
Equipment
Method
- Step 1: Prepare your workspace by laying down wax paper or old newspaper to protect your surface. Lay out your plastic lids or cut clear plastic sheets into your desired shapes. Round lids work perfectly for classic suncatcher shapes, but squares or cut-out stars can be fun too.
- Step 2: Pour clear school glue into each plastic lid. Aim for a thickness of about 0.5 to 1 cm (1/4 to 1/2 inch). Gently tilt the lid to make sure the glue spreads evenly across the entire surface.
- Step 3: Carefully apply drops of your chosen food coloring or liquid watercolor paints onto the wet glue. One drop per color, spaced out a bit, is usually sufficient, but add more for a more intense hue. This is also the perfect moment to sprinkle in any optional glitter, sequins, or mini beads.
- Step 4: Grab a toothpick or a small paintbrush and start gently swirling the colors together. Create marble effects, abstract designs, or even attempt simple shapes. Remember, less is often more when swirling – you want the colors to blend, not become muddy.
- Step 5: Once you're happy with your design, place your suncatcher flat in a safe spot where it won't be disturbed. It needs to dry completely, which can take anywhere from 24 to 72 hours, depending on the humidity and how thick your glue layer is. You'll know it's ready when the glue becomes perfectly transparent and easily peels away from the lid.
- Step 6: Once fully dry, carefully peel your suncatcher from the plastic lid. It should pop right off! If there are any rough edges, you can neatly trim them with a pair of scissors to give your suncatcher a polished look.
- Step 7: Punch a small hole at the top of your suncatcher (a standard hole punch works great, or you can carefully use a needle for smaller holes). Thread some string or ribbon through the hole, or if you prefer a seamless look, you can use a small piece of clear tape to attach a loop of string. Hang your beautiful suncatcher in a sunny window, or use suction cup hooks for a secure display.