Hey there, baking buddies! Remember those long, sunny summer days filled with backyard BBQs, sparklers after dark, and the smell of freshly cut grass? For me, those memories are always tied to delicious treats, especially around holidays like the Fourth of July! And what better way to celebrate than with a cake that’s as vibrant and fun as the fireworks themselves?
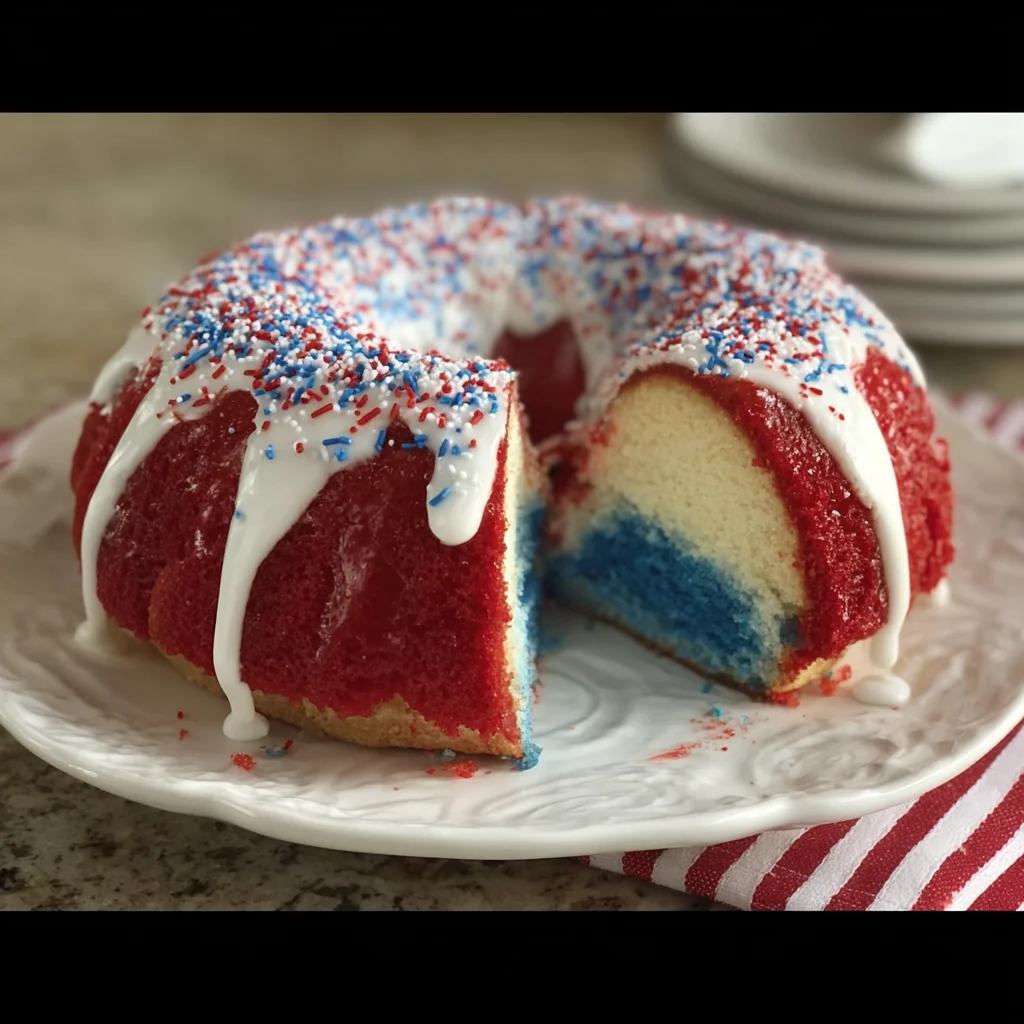
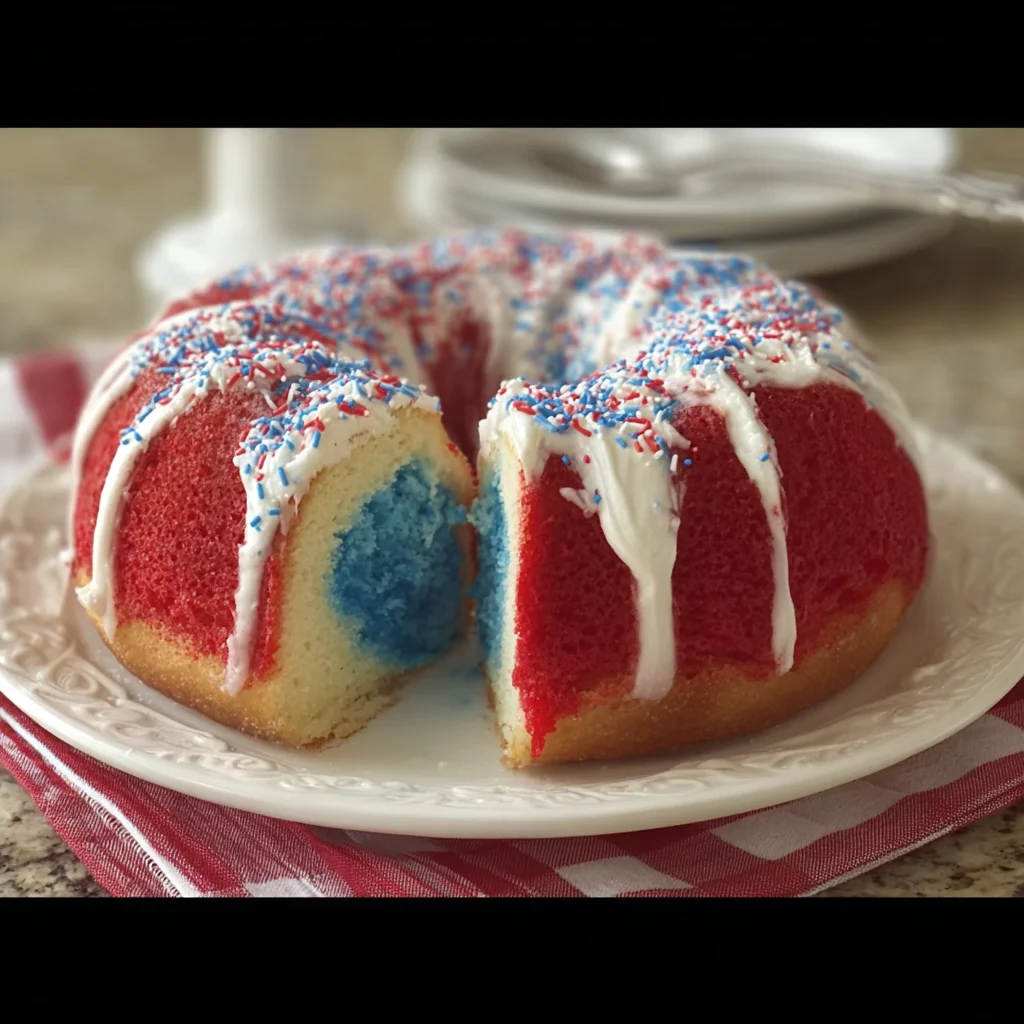
This Firecracker Red, White, & Blue Cake is the absolute perfect centerpiece for your patriotic gatherings. It looks incredibly impressive, but here’s the secret – it’s SO easy! We’re talking simple ingredients, minimal fuss, and maximum patriotic cheer. It’s a recipe you’ll want to make year after year.
Why You’ll Love This Recipe
- Fast: Starts with a box mix, so you’re halfway there already! Quick to prep and bake.
- Easy: Seriously, if you can mix cake batter and add food coloring, you can make this cake.
- Giftable: While maybe not literally gifting a whole cake, it’s perfect to bring to a potluck or party!
- Crowd-pleasing: Who can resist a slice of colorful, festive cake?
Ingredients
Gather ’round! Here’s what you’ll need to whip up this dazzling dessert:
- 1 box white cake mix: Your trusty shortcut! Make sure you have the water, oil, and egg whites it calls for on the box instructions too.
- Red food coloring: Grab a good quality liquid or gel color to get those vibrant reds.
- Blue food coloring: Same goes for the blue – you want it bright and bold!
- 1 container white frosting: store-bought is totally fine and easy, but if you have a favorite homemade buttercream, go for it!
- Red, white, and blue sprinkles or pop rocks: This is where the “firecracker” fun comes in! Sprinkles are classic, but pop rocks add a literal pop!
- Optional: whipped topping or extra frosting for decorating: If you want to get fancy with swirls or borders, have a little extra on hand.
How to Make It
Alright, let’s get baking! Don’t worry, I’ll walk you through every step. It’s a breeze!
- First things first, get your oven ready. You want to preheat it to 350°F (175°C). While it’s heating up, take your 13×9-inch pan (or two round cake pans if you prefer!) and grease and flour it really well. This helps prevent sticking and ensures your beautiful cake comes out cleanly.
- Now, grab that box of white cake mix. Follow the directions on the box exactly as they tell you for making the batter. Usually, this involves mixing the mix with water, oil, and egg whites. Get it all smooth and combined.
- Okay, here’s where the magic happens! Divide that beautiful white batter evenly into three separate bowls. You can just eyeball it or use a measuring cup for precision if you like.
- Leave the first bowl just as it is – this will be your white layer. In the second bowl, add your red food coloring. Start with a few drops or a small amount of gel and stir it in until you get a nice, vibrant red color. Add more if you need to! Do the same thing with the third bowl, adding blue food coloring until you have a lovely blue batter.
- Now it’s time to get creative! Pour spoonfuls of the colored batter into your prepared pan, alternating the colors as you go. You can make random dollops all over, or try to layer them in stripes. If you want that cool marbled effect, gently swirl a knife or a skewer through the batter just once or twice. Don’t overmix, or the colors will blend too much! If you want distinct stripes, just layer the colors carefully and leave them be.
- Pop that pan into your preheated oven! Bake it according to the times listed on your cake mix box for the pan size you used. For a 13×9 pan, it’s usually somewhere around 28-32 minutes. You’ll know it’s done when a toothpick inserted into the very center comes out clean, with no wet batter clinging to it.
- Once it’s baked, take the cake out of the oven and let it cool in the pan for about 10-15 minutes before carefully inverting it onto a wire rack to cool completely. This step is crucial! Frosting a warm cake is a messy business, and you’ll end up with melted frosting everywhere. Patience, my friend!
- Once the cake is completely cool, it’s frosting time! Spread that lovely white frosting all over the top and sides (or just the top if you’re making a sheet cake). Get it as smooth or as rustic as you like.
- Finally, the fun part! Sprinkle your red, white, and blue sprinkles or pop rocks all over the frosted top. Be generous! This is your chance to make it look extra festive.
Substitutions & Additions
Want to mix things up or don’t have exactly what the recipe calls for? No problem! Here are a few ideas:
- Cake Mix: While white works best for vibrant colors, you could try vanilla cake mix. I wouldn’t recommend chocolate or darker mixes, as they’ll hide the beautiful colors!
- Frosting: Use a cream cheese frosting for a tangy twist, or even a whipped cream topping if you’re serving it right away. Just make sure it’s white!
- Colors: Get creative! This technique works for any holiday or theme. Think green for St. Paddy’s Day, pastels for Easter, or spooky colors for Halloween.
- Decorations: Besides sprinkles and pop rocks, try red and blue candies, fresh berries (strawberries, blueberries), or even little edible stars.
Tips for Success
Just a couple of little pointers to make sure your cake turns out perfect every time!
- Don’t overmix the batter: Follow the cake mix instructions, and stop mixing as soon as everything is combined. Overmixing can lead to a tougher cake.
- Use good food coloring: Gel food coloring often gives more vibrant colors than liquid, but either works. Add a little at a time until you get the shade you want.
- Don’t over-swirl: If you’re going for a marbled effect, one or two gentle swirls with a knife are all you need. Too much swirling will just mix the colors into a muddy mess.
- Cool completely: I know I said it before, but seriously, wait for that cake to be totally cool before frosting. Trust me on this!
- Prep Ahead: You can actually mix and color the batters a few hours ahead of time if you keep them covered in the fridge. Just give them a quick gentle stir before spooning them into the pan.
How to Store It
If by some miracle you have leftovers of this delicious cake, here’s how to keep it fresh:
Store any leftover cake in an airtight container at room temperature for 2-3 days. If it’s a very hot or humid day, or if your frosting contains dairy that needs refrigeration, you might want to pop it in the fridge. Just be aware that refrigerated cake can sometimes dry out a little faster.
FAQs
Got questions? I’ve got some answers!
Can I use different sized pans?
Absolutely! Just adjust the baking time according to the cake mix box instructions for your specific pan size (like cupcakes, bundt pan, or layer cakes). You might need to divide the batter into more than three bowls for layer cakes depending on how many layers you want!
What if I don’t have food coloring?
Then it will be a lovely, simple white cake! You can still add the patriotic sprinkles and frosting for a festive touch.
Can I make this cake ahead of time?
Yes! You can bake the cake a day in advance, let it cool completely, wrap it tightly in plastic wrap, and store it at room temperature. Frost and decorate it the day you plan to serve it for the freshest look.
Why did my colors look muddy?
Most likely, the batters were swirled too much! Gentle swirls (just 1-2 passes with a knife) or just layering the colors without swirling will help keep them distinct.

Easy Firecracker Red, White & Blue Cake
Ingredients
Equipment
Method
- Step 1: Preheat oven to 350°F (175°C). Grease and flour a 13x9-inch pan or two round cake pans.
- Step 2: Prepare cake batter according to the box instructions, using water, oil, and egg whites as specified.
- Step 3: Divide the batter evenly into three separate bowls.
- Step 4: Leave the first bowl white. Add red food coloring to the second bowl and stir until vibrant red. Add blue food coloring to the third bowl and stir until vibrant blue.
- Step 5: Pour spoonfuls of the colored batter into the prepared pan, alternating colors. Gently swirl with a knife or skewer once or twice for a marbled effect, or leave as layers for distinct stripes. Do not overmix.
- Step 6: Bake according to the cake mix box instructions for your pan size (approx. 28-32 minutes for a 13x9 pan). The cake is done when a toothpick inserted into the center comes out clean.
- Step 7: Let the cake cool in the pan for about 10-15 minutes before inverting it onto a wire rack to cool completely.
- Step 8: Once the cake is completely cool, spread white frosting all over the top and sides.
- Step 9: Generously sprinkle red, white, and blue sprinkles or pop rocks over the frosted cake.