Hey there, friend! Remember those mornings rushing out the door, grabbing whatever you could find for breakfast? Or maybe you just crave something wholesome and delicious that doesn’t require a sit-down fork-and-knife situation? Well, let me tell you about these little gems: Homemade Granola Cups! They’re truly a game-changer for busy weeks or even just a relaxed weekend treat. They bring back that cozy feeling of a hearty breakfast, but in the most convenient, pop-able form imaginable. And the best part? They are so ridiculously easy, quick to make, and seriously memorable. You’ll wonder where they’ve been all your life!
Why You’ll Love This Recipe
- Fast
- Easy
- Giftable
- Crowd-pleasing
Ingredients
Gathering your ingredients for these granola cups is a breeze. You likely have most of them in your pantry right now!
- 1/4 cup applesauce or mashed banana: This is our magical binder! It helps hold everything together without needing oil or butter. Use whichever you prefer or have on hand.
- 1/4 cup honey or agave: For that perfect touch of sweetness and another bit of binding power. Honey gives a classic flavor, while agave is great if you prefer a vegan option.
- 1/2 tsp pure vanilla extract: Vanilla just makes everything taste better, right? It adds a lovely warmth.
- 1/2 tsp cinnamon: This spice is a classic for a reason! It pairs beautifully with oats and fruit.
- 1/4 tsp salt: Just a pinch to balance out the sweetness and bring all the flavors forward.
- 1 1/4 cup rolled oats: The star of the show! Make sure they are rolled oats (sometimes called old-fashioned oats) for the best texture. Quick oats can get a little mushy.
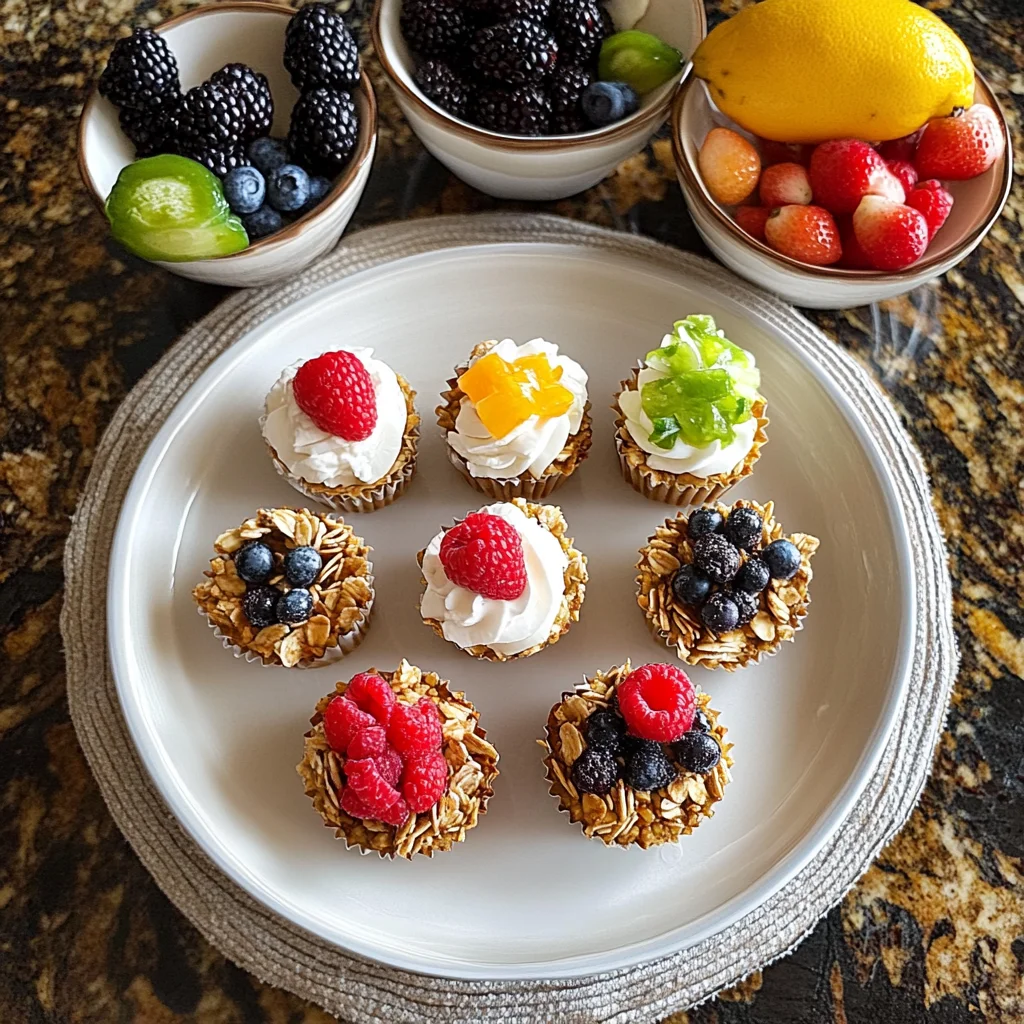
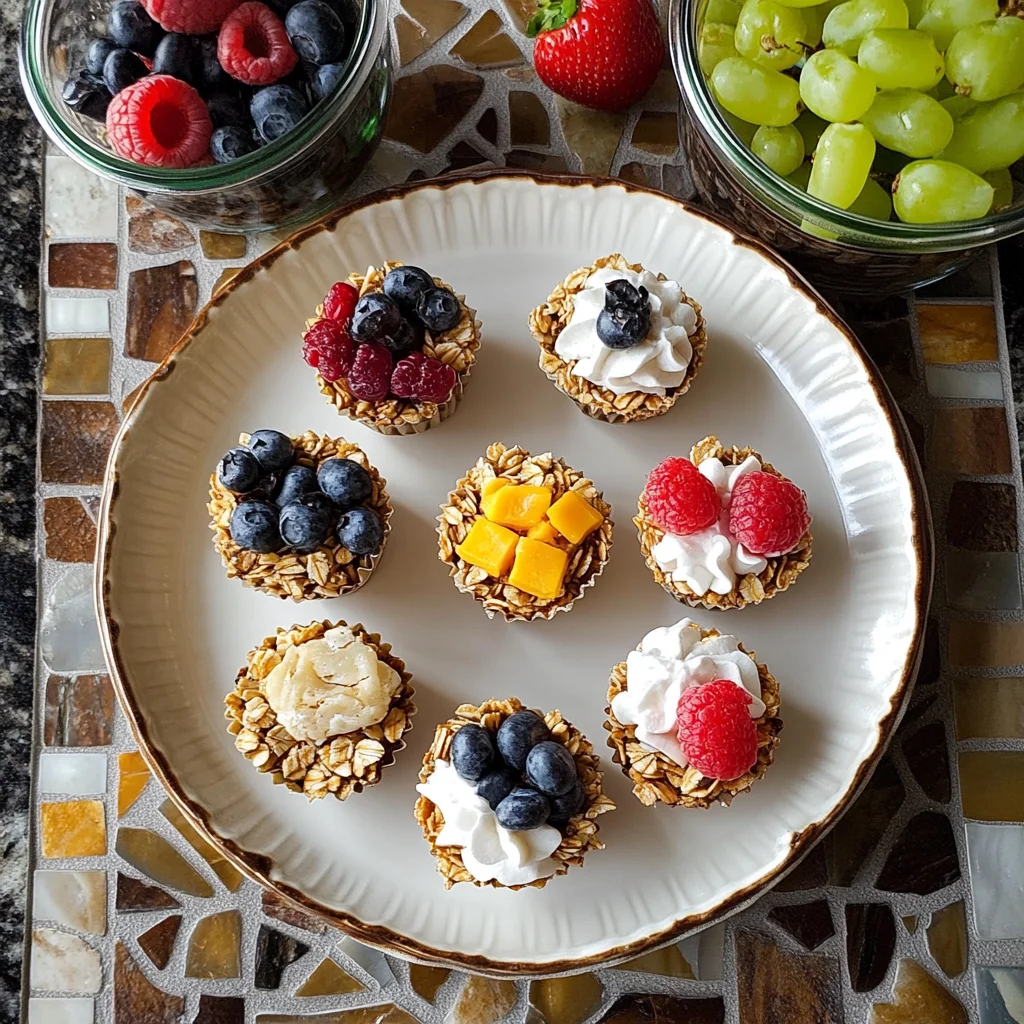
- yogurt or fresh fruit (for serving): This is optional, but highly recommended! Think of the cups as mini granola bowls, ready to be filled.
How to Make It
Ready? Let’s whip up a batch of these delightful granola cups. It’s honestly as easy as mixing, pressing, and baking!
1. First things first, let’s get our muffin tin ready. You’ll want to generously grease a standard muffin tin or a mini muffin tin. This step is key to getting those cups out cleanly later on. You can use cooking spray or a little butter or oil. Set it aside for a moment.
2. In a medium bowl, grab your whisk. Add the applesauce (or mashed banana), your choice of honey or agave, and the pure vanilla extract. Give it a good whisk until everything is nicely combined and looks smooth.
3. Now, it’s time for the dry ingredients! Add your rolled oats, cinnamon, and salt into the bowl with the wet mixture. Grab a spoon or a spatula and stir everything together really well. You want to make sure the oats are completely coated in the sweet, sticky mixture. Keep mixing until it’s all evenly combined.
4. Scoop the granola mixture into your prepared muffin cups. For a standard tin, this recipe makes about 6 cups. For a mini tin, it will make more, maybe 12-18 depending on the size. This is the important part: press the mixture firmly into the bottom and up the sides of each cup. You want to create a sturdy little bowl shape. I like to use the back of a spoon or even a small glass to really pack it in.
5. Time to preheat! Get your oven going to 330°F (165°C).
6. Once your oven is preheated, pop the muffin tin in and bake for about 12 minutes. You’ll notice the edges start to look lightly golden brown.
7. Carefully take the hot tin out of the oven. You might notice the sides of the granola cups have puffed up a little. While they are still warm, use the back of a spoon again to gently press the sides back down into the muffin tins, reshaping that cup shape.
8. This is a super important step to prevent crumbling! Let the granola cups sit in the muffin tin for at least 10 minutes before you even think about trying to take them out. They need this time to firm up as they cool. Patience is a virtue here!
9. Once they’ve cooled slightly in the tin, you can carefully run a knife around the edges if needed and gently lift them out. Now they’re ready! Serve them right away with a dollop of your favorite yogurt and some fresh berries or sliced fruit, or let them cool completely to store for later.
Substitutions & Additions
This recipe is wonderfully forgiving and easy to customize! Feel free to play around and make them your own:
- Nuts & Seeds: Stir in a few tablespoons of chopped nuts (like almonds, walnuts, or pecans) or seeds (chia seeds, flax seeds, sunflower seeds) along with the oats for extra crunch and nutrition.
- Dried Fruit: Want some chewy goodness? Add a handful of dried cranberries, raisins, chopped apricots, or blueberries to the mix.
- Chocolate: A tablespoon or two of mini chocolate chips stirred in at the end can be a delightful addition, especially if you have a sweet tooth!
- Spices: Feeling adventurous? Try a pinch of nutmeg, cardamom, or even a little ginger along with the cinnamon.
- Binder Swap: While applesauce and mashed banana work great, you could experiment with pumpkin puree or sweet potato puree for a different flavor profile.
Tips for Success
Making these granola cups is pretty straightforward, but a couple of tips can ensure they turn out perfectly every time:
- Grease, Grease, Grease! Don’t skimp on greasing that muffin tin. This is the number one reason they might stick.
- Press Firmly: Really take the time to press the mixture into the bottom and up the sides. The firmer you pack it, the sturdier the cup will be. Using the bottom of a small glass or spice jar works wonders.
- Cooling is Crucial: I know it’s tempting, but resisting the urge to pop them out immediately after baking is key. The 10 minutes in the hot tin helps them set properly and prevents crumbling.
- Don’t Overbake: Keep an eye on them. They should be lightly golden, especially around the edges, but you don’t want them to get too dark or they can become hard.
- Prep Ahead: You can easily mix the dry ingredients ahead of time and keep them in a jar. Then, just whisk the wet ingredients and combine when you’re ready to bake!
How to Store It
These granola cups are perfect for making ahead! Once they are completely cooled, you can store them in a few ways:
Keep them in an airtight container at room temperature for up to 3-4 days. They stay nice and crisp this way.
For longer storage, you can pop them in the fridge for up to a week.
They also freeze beautifully! Place them in a single layer on a baking sheet to freeze solid, then transfer them to a freezer-safe bag or container. They’ll keep in the freezer for up to 3 months. Just thaw them at room temperature for about 30 minutes before serving.
FAQs
Here are a few common questions you might have about these granola cups:
Can I use quick oats instead of rolled oats?
Rolled oats are recommended for the best texture and structure in these cups. Quick oats are cut smaller and can result in a more mushy texture that might not hold its shape as well.
Are these granola cups gluten-free?
If you use certified gluten-free rolled oats, this recipe is naturally gluten-free. Make sure all your other ingredients are also certified if needed.
Why did my granola cups crumble when I took them out?
This is usually because they didn’t cool in the muffin tin long enough. Make sure you leave them in the tin for at least 10 minutes after baking to allow them to set properly before trying to remove them.
Can I make this recipe vegan?
Absolutely! Use mashed banana or applesauce as the binder and agave or maple syrup as the sweetener. Ensure you use certified vegan rolled oats if needed.
Easy Grab-and-Go Granola Cups for Busy Mornings
Ingredients
Equipment
Method
- Step 1: Generously grease a standard or mini muffin tin using cooking spray, butter, or oil. Set aside.
- Step 2: In a medium bowl, whisk together the applesauce (or mashed banana), honey (or agave), and vanilla extract until nicely combined.
- Step 3: Add the rolled oats, cinnamon, and salt to the wet mixture. Stir everything together thoroughly with a spoon or spatula until the oats are completely coated.
- Step 4: Scoop the granola mixture into the prepared muffin cups. For a standard tin, this makes about 6 cups; for a mini tin, it makes 12-18. Press the mixture firmly into the bottom and up the sides of each cup to create a sturdy bowl shape, using the back of a spoon or a small glass.
- Step 5: Preheat your oven to 330°F (165°C).
- Step 6: Bake for about 12 minutes, or until the edges are lightly golden brown.
- Step 7: Carefully remove the hot tin from the oven. While still warm, use the back of a spoon to gently press the puffed-up sides back down into the tin to reshape the cups.
- Step 8: Let the granola cups cool completely in the muffin tin for at least 10 minutes. This crucial step helps them firm up and prevents crumbling.
- Step 9: Once slightly cooled, carefully run a knife around the edges if needed and gently lift them out. Serve immediately with yogurt or fresh fruit, or let them cool completely to store.