

Oh gosh, remember those desserts that just scream fun and celebration? Maybe it was a birthday party treat or just something special grandma whipped up. Well, this Pink M&M Snickers Cheesecake is about to become that dessert for you! It’s vibrant, it’s creamy, it’s packed with everyone’s favorite chocolate bar, and honestly, it’s so easy, you’ll wonder why you didn’t make it sooner. Get ready to make some sweet memories with this stunning, no-bake wonder!
Why You’ll Love This Recipe
- Fast – No oven required means less time waiting!
- Easy – Seriously simple steps, perfect for beginners.
- Giftable – Who wouldn’t want a slice (or a whole cake!) of this?
- Crowd-pleasing – Snickers, M&M’s, and cheesecake? A guaranteed hit!
Ingredients
Here’s what you’ll need to whip up this dreamy cheesecake. Gather everything first, it makes the process so much smoother!
- Graham cracker crumbs or crushed Oreos: Your choice for the base! Graham crackers give it that classic cheesecake feel, while Oreos make it extra decadent.
- Unsalted butter, melted: The glue for our delicious crust.
- 3 (8 oz / 226g each) packages cream cheese, softened: Make sure this is softened to room temperature! It’s the key to a smooth, lump-free filling. Take it out of the fridge an hour or two ahead of time.
- 1 cup powdered sugar: Sweetens the deal and helps with that silky texture.
- 1 teaspoon vanilla extract: Just a touch to enhance all those lovely flavors.
- ½ cup heavy cream: Gets whipped into fluffy goodness to lighten the filling.
- 2 cups semi-sweet chocolate chips, melted and cooled: Provides that classic chocolate cheesecake flavor. Make sure it’s cooled slightly after melting so it doesn’t “shock” your cream cheese.
- 1 cup chopped Snickers bars: The star of the show! Chop them into bite-sized pieces.
- Pink food coloring (gel or liquid): To give it that beautiful pink hue. Gel works best for vibrant color without adding extra liquid.
- Whipped cream (Optional): For topping! Store-bought or homemade, totally up to you.
- Chopped Snickers bars (Optional): More candy bar goodness for garnish!
- M&M’s (Optional): To really lean into the fun pink theme and for extra crunch!
How to Make It
Alright, let’s get this cheesecake party started! Follow these simple steps, and you’ll have a gorgeous dessert ready to chill.
1. Crust Time: In a medium bowl, combine your graham cracker crumbs (or crushed Oreos!) with the melted butter. Stir until everything is evenly moistened, like wet sand. Pour this mixture into the bottom of a 9 or 10-inch springform pan. Use the bottom of a glass or a flat measuring cup to press it down really firmly. You want a nice, compact crust. Pop this in the fridge for at least 30 minutes while you make the filling.
2. Melt That Chocolate: Place your semi-sweet chocolate chips in a microwave-safe bowl. Heat them in 30-second intervals, stirring well after each one, until they are mostly melted and smooth. Alternatively, you can use a double boiler on the stove. Let the melted chocolate cool slightly at room temperature while you move on.
3. Cheesecake Base: In a large mixing bowl (or the bowl of your stand mixer), beat the softened cream cheese with the powdered sugar and vanilla extract until it’s super smooth and there are no lumps. Now, gradually pour in the slightly cooled melted chocolate while mixing on low speed until it’s fully combined. Gently fold in the chopped Snickers bars with a spatula.
4. Pretty in Pink: This is where the magic happens! Take out a smaller bowl and scoop some of your cheesecake filling into it – maybe about a quarter or a third of the total. Add a few drops of pink food coloring to this smaller portion. Start with a little and add more until you get the shade of pink you like. Now, gradually add this colored filling back into the main bowl of filling, gently swirling it or folding it in just enough to get a marbled effect, or mix it fully if you want a uniform pink color. It’s totally up to your artistic vision!
5. Lighten Up: In a separate clean bowl, whip the heavy cream until stiff peaks form. This means when you lift the whisk, the peaks stand up straight. Now, gently fold this whipped cream into your pink cheesecake filling. Use a spatula and a light hand so you don’t deflate that lovely airiness you just created.
6. Assemble & Chill: Pour the gorgeous pink filling over the chilled crust in your springform pan. Use an offset spatula or the back of a spoon to smooth the top evenly. Cover the pan tightly with plastic wrap – make sure the plastic isn’t touching the surface of the cheesecake directly if you can help it, maybe tent it slightly or use a lid if your pan has one. Pop the whole thing back in the refrigerator for at least 4 hours, or even better, overnight. It needs this time to set up properly!
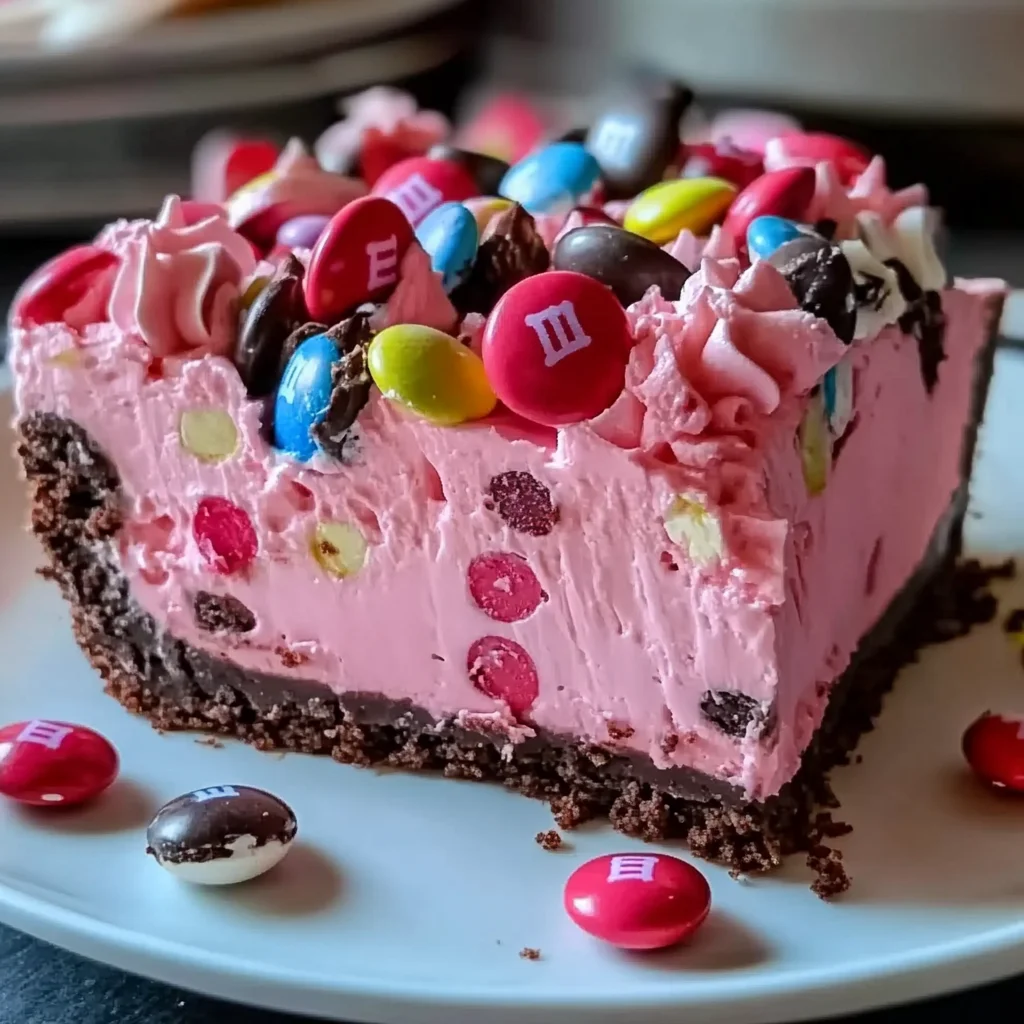
7. Decorate & Serve: Once your cheesecake is nice and firm, carefully remove the sides of the springform pan. Now for the fun part – decorating! Pipe or dollop whipped cream around the edge, sprinkle with extra chopped Snickers pieces, and dot with pink or colorful M&M’s. Slice with a sharp knife (running it under hot water and wiping it clean between slices helps!) and serve up a smile!
Substitutions & Additions
Want to get creative? Here are a few ideas to make this cheesecake your own:
- Different Candy Bar: Swap Snickers for Twix, Milky Way, Butterfinger, or whatever chocolate bar you love! Chop ’em up the same way.
- Crust Variations: Try using shortbread cookies, Nutter Butters, or even pretzels (for a sweet and salty twist!) instead of graham crackers or Oreos.
- Chocolate Type: Dark chocolate instead of semi-sweet would give it a richer, less sweet flavor. White chocolate could work too, but you might need to adjust the sugar slightly.
- Add Caramel or Peanut Butter: Swirl a little melted caramel sauce or warm peanut butter into the filling just before adding it to the crust.
- Other Mix-ins: Throw in some chocolate chips, nuts (if not using Snickers with peanuts), or even mini marshmallows.
- Different Colors: Use blue, green, or any color food coloring to match a specific theme or holiday!
Tips for Success
Making a no-bake cheesecake is pretty straightforward, but a few little things can make all the difference:
- Softened Cream Cheese is Key: I cannot stress this enough! Cold cream cheese will give you lumps, and you won’t get that smooth, luxurious filling.
- Don’t Overheat Chocolate: Melt it gently and stir constantly. Overheating can make it seize or become grainy. Let it cool slightly before adding it to the cream cheese mixture.
- Fold Gently: When adding the whipped cream and Snickers (and when swirling the color!), use a gentle folding motion with a spatula. This keeps the filling light and fluffy.
- Chill, Chill, Chill: The refrigeration time isn’t optional! It’s essential for the cheesecake to set up properly so you can slice it cleanly. An overnight chill is always best if you have the time.
- Use a Springform Pan: While you could make this in a regular pie plate, a springform pan makes it so much easier to remove the cheesecake for that beautiful presentation.
How to Store It
Store any leftover cheesecake in the springform pan covered tightly with plastic wrap, or transfer slices to an airtight container. Keep it in the refrigerator. It should stay delicious for 3-4 days. For longer storage, you can freeze slices wrapped well in plastic wrap and then foil. Thaw in the refrigerator.
FAQs
Can I make this cheesecake ahead of time?
Absolutely! This is the perfect make-ahead dessert. It needs at least 4 hours to chill, but making it a day or even two in advance works wonderfully and ensures it’s perfectly set.
Do I have to use a springform pan?
A springform pan is highly recommended for easy removal and presentation. If you don’t have one, you could use a regular pie plate or an 8×8 inch baking dish, but you’ll have to scoop the cheesecake out instead of lifting it out whole.
What if my chocolate gets thick or seizes after melting?
This usually happens if it gets too hot or a tiny bit of water gets into it. Try stirring in a teaspoon or two of vegetable oil or melted shortening, or even a little bit of the warm heavy cream (if you reserved a tiny bit before whipping). Stir vigorously until it smooths out. If it’s really stubborn, you might need to start over with fresh chocolate.
Why is my cheesecake filling not setting?
The most common reasons are not chilling it long enough, or the cream cheese wasn’t softened properly which can affect the emulsion with the chocolate. Make sure it gets that full chilling time, ideally overnight!

Pretty in Pink: Easy No-Bake M&M Snickers Cheesecake
Ingredients
Equipment
Method
- Step 1: Crust Time: In a medium bowl, combine your graham cracker crumbs (or crushed Oreos!) with the melted butter. Stir until everything is evenly moistened, like wet sand. Pour this mixture into the bottom of a 9 or 10-inch springform pan. Use the bottom of a glass or a flat measuring cup to press it down really firmly. You want a nice, compact crust. Pop this in the fridge for at least 30 minutes while you make the filling.
- Step 2: Melt That Chocolate: Place your semi-sweet chocolate chips in a microwave-safe bowl. Heat them in 30-second intervals, stirring well after each one, until they are mostly melted and smooth. Alternatively, you can use a double boiler on the stove. Let the melted chocolate cool slightly at room temperature while you move on.
- Step 3: Cheesecake Base: In a large mixing bowl (or the bowl of your stand mixer), beat the softened cream cheese with the powdered sugar and vanilla extract until it's super smooth and there are no lumps. Now, gradually pour in the slightly cooled melted chocolate while mixing on low speed until it's fully combined. Gently fold in the chopped Snickers bars with a spatula.
- Step 4: Pretty in Pink: This is where the magic happens! Take out a smaller bowl and scoop some of your cheesecake filling into it – maybe about a quarter or a third of the total. Add a few drops of pink food coloring to this smaller portion. Start with a little and add more until you get the shade of pink you like. Now, gradually add this colored filling back into the main bowl of filling, gently swirling it or folding it in just enough to get a marbled effect, or mix it fully if you want a uniform pink color. It's totally up to your artistic vision!
- Step 5: Lighten Up: In a separate clean bowl, whip the heavy cream until stiff peaks form. This means when you lift the whisk, the peaks stand up straight. Now, gently fold this whipped cream into your pink cheesecake filling. Use a spatula and a light hand so you don't deflate that lovely airiness you just created.
- Step 6: Assemble & Chill: Pour the gorgeous pink filling over the chilled crust in your springform pan. Use an offset spatula or the back of a spoon to smooth the top evenly. Cover the pan tightly with plastic wrap – make sure the plastic isn't touching the surface of the cheesecake directly if you can help it, maybe tent it slightly or use a lid if your pan has one. Pop the whole thing back in the refrigerator for at least 4 hours, or even better, overnight. It needs this time to set up properly!
- Step 7: Decorate & Serve: Once your cheesecake is nice and firm, carefully remove the sides of the springform pan. Now for the fun part – decorating! Pipe or dollop whipped cream around the edge, sprinkle with extra chopped Snickers pieces, and dot with pink or colorful M&M's. Slice with a sharp knife (running it under hot water and wiping it clean between slices helps!) and serve up a smile!


