Oh, friend, there’s just something magical about autumn, isn’t there? The crisp air, the vibrant leaves, the smell of pumpkin spice wafting from the kitchen… It instantly brings back memories of hayrides, apple picking, and gathering with loved ones. As the days get shorter and the evenings grow cozier, I find myself wanting to infuse every corner of my home with that comforting fall feeling. And guess what? I’ve got the perfect, utterly adorable project that will do just that!
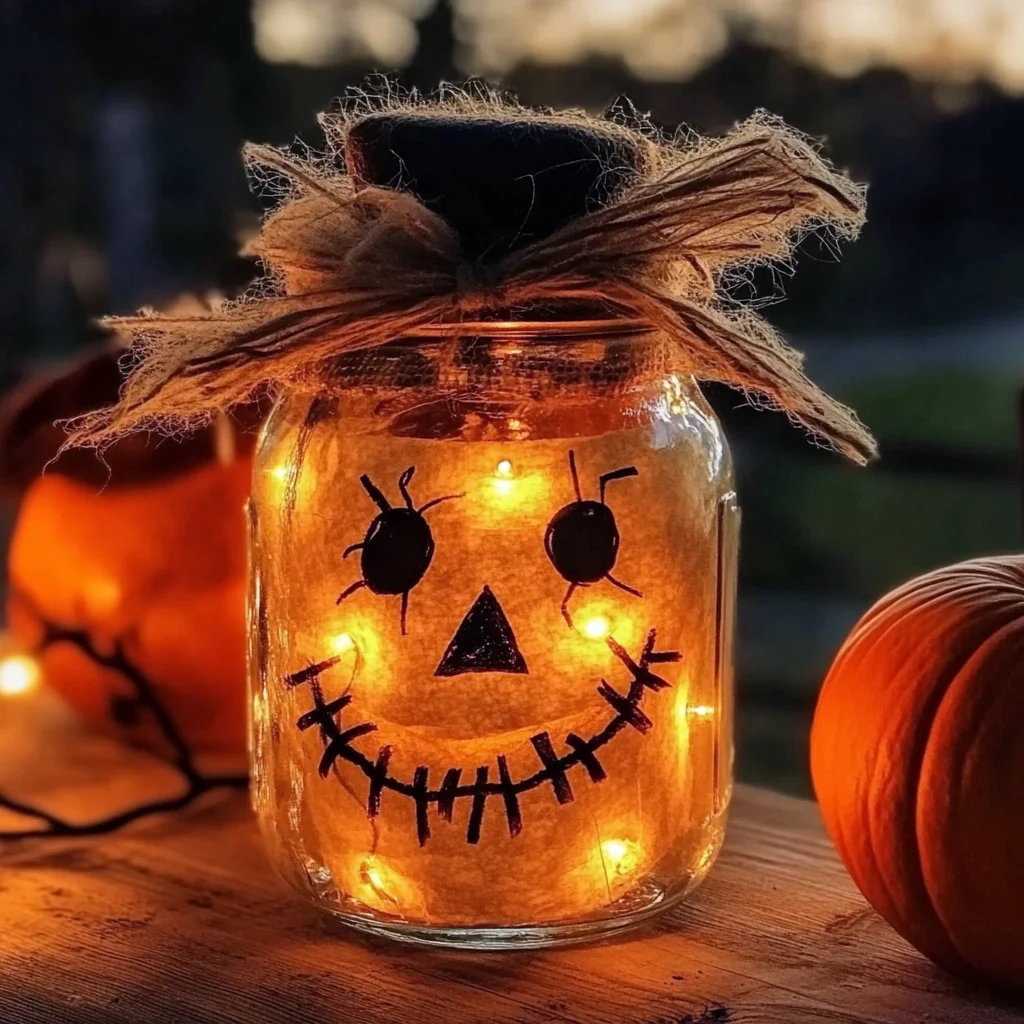
Today, we’re diving into making the cutest Light-Up Scarecrow Mason Jars. Seriously, these little guys are so easy, so quick, and they add such a warm, inviting glow to any space. Whether you’re decorating for a Halloween party, a Thanksgiving feast, or just want to brighten up your mantel, these charming scarecrows are an absolute delight. You’ll be amazed at how simple it is to transform a plain old mason jar into a centerpiece that captures the very essence of fall!
Why You’ll Love Light-Up Scarecrow Mason Jars
- Fast: You can whip one of these up in under an hour (plus drying time!).
- Easy: No complicated crafting skills needed – just a love for autumn and a hot glue gun!
- Giftable: These make the sweetest hostess gifts or thoughtful presents for friends and family.
- Crowd-pleasing: Everyone, young and old, will adore these friendly glowing scarecrows.
Ingredients
Gather your crafting buddies and let’s get these simple supplies ready! You probably have most of these lying around, especially if you’re a fellow craft enthusiast like me.
- 1 clean mason jar (any size): The star of our show! Wide-mouth jars are a bit easier to work with, but any size will do.
- Orange or amber tissue paper (or paint): This is what gives our scarecrow that classic pumpkin-orange hue. If you don’t have tissue paper, acrylic craft paint works beautifully too!
- Mod Podge or clear-drying glue: Our magical adhesive and sealant. It dries clear and helps everything stick together seamlessly.
- Black construction paper or vinyl (for scarecrow face): For those charming eyes, nose, and a sweet stitched smile. Vinyl is great if you have a cutting machine, but good old scissors and construction paper are just perfect.
- Burlap scraps or raffia (for “hair” and scarf): This adds that rustic, textured scarecrow vibe. Think natural fibers!
- Twine or ribbon: To tie around the neck for a little extra flair or to secure the “hair.”
- Battery-operated tea light or fairy lights: The secret to our glowing scarecrows! Safety first, always use battery-operated lights.
- Hot glue gun: Your best friend for quick and secure attachments. Just be careful with those fingers!
- Optional: cinnamon sticks, dried star anise, or buttons for décor: These little extras really elevate your scarecrow’s personality. Get creative!
How to Make Light-Up Scarecrow Mason Jars
Alright, let’s get our hands a little sticky and bring these adorable scarecrows to life! You’ll see just how simple these steps are.
- Prep Your Jar: First things first, grab your clean mason jar. If you’re using tissue paper, you’ll want to tear it into small, manageable pieces. Think about 1-inch squares or random smaller shapes. Now, brush a layer of Mod Podge onto a section of your jar. Place your tissue paper pieces onto the wet Mod Podge, overlapping them slightly, and then brush another thin layer of Mod Podge over the top of the tissue paper to seal it. Continue this all around the jar until it’s completely covered. If you’re using paint, simply paint your jar orange and let it dry. Don’t worry if it looks a little messy right now; it’ll all dry clear and beautiful! Let your jar dry completely – this is super important for a smooth finish!
- Craft the Face: While your jar is drying, grab your black construction paper or vinyl. Cut out two simple circles or ovals for eyes, a small triangle for a nose, and a long, curved strip for a stitched smile. Once your jar is dry, carefully arrange these pieces on the jar to create your scarecrow’s face. When you’re happy with the placement, use a dab of Mod Podge or clear-drying glue to secure each piece in place. I sometimes use a fine-tipped black marker to add little “stitch” lines to the mouth after it’s glued, just for extra character!
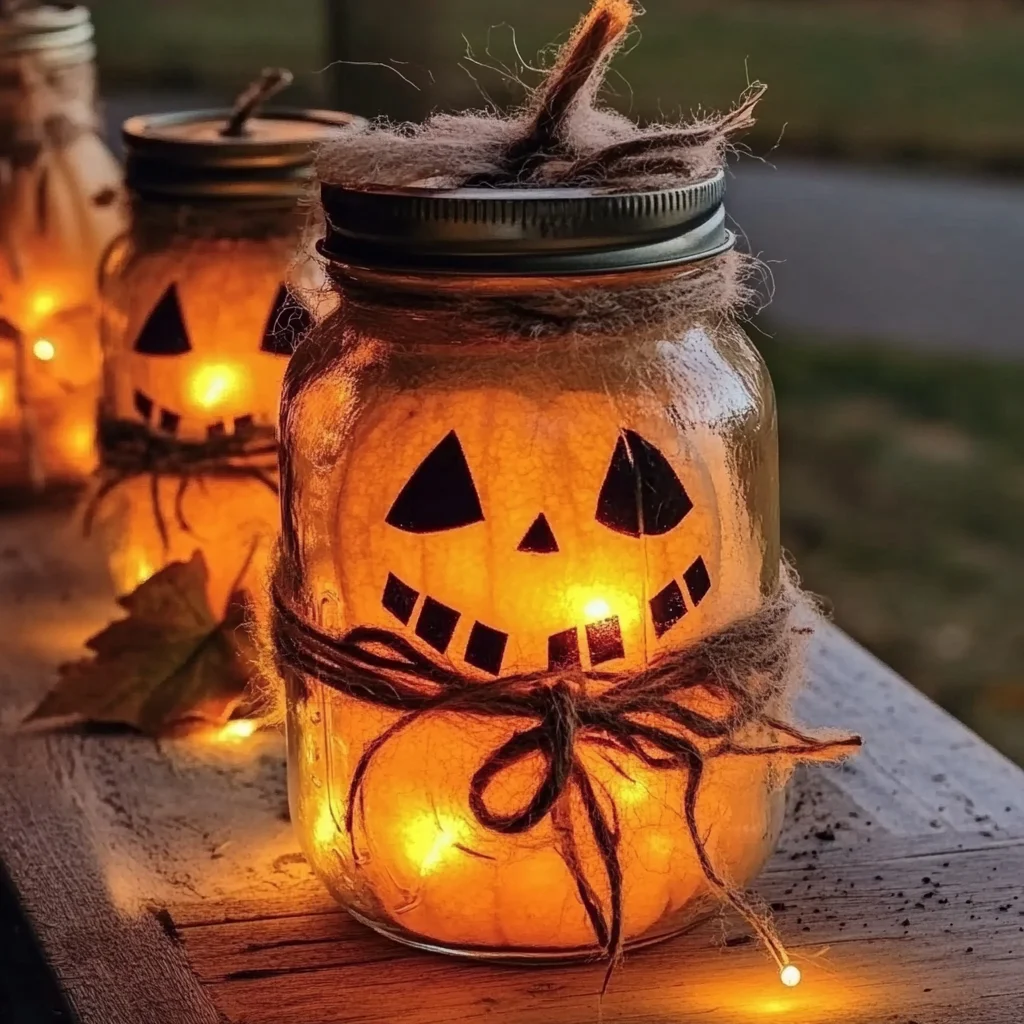
- Add Some Hair & a Hat: Now for the fun, rustic details! Take a strip of burlap and wrap it around the rim of your jar lid, securing it with hot glue to create a little hat band. Next, gather a small tuft of raffia or straw – this is your scarecrow’s hair! Hot glue it to the top of the lid, letting it peek out from under your burlap band. You can also glue some raffia around the rim of the jar itself for more “hair.”
- Accessorize Your Friend: Time for the finishing touches! Tie a piece of twine or a thin strip of burlap ribbon around the neck of your jar like a cozy scarf. This is also where you can get creative with optional fall embellishments. I love hot gluing a small cinnamon stick to the side or a dried star anise for a lovely scent and added rustic charm. Little buttons make adorable patches on the burlap scarf too!
- Light It Up: The grand finale! Carefully place your battery-operated tea light or fairy lights inside the finished mason jar. Turn them on and watch your adorable scarecrow come to life with a warm, inviting glow. Position it on your kitchen counter, a bookshelf, or as a welcoming light on your porch (just make sure it’s protected from the elements!).
Substitutions & Additions
One of the best things about DIY crafts is making them your own! Here are a few ideas to get those creative juices flowing:
- Color Swap: Instead of orange, try yellow or a light brown tissue paper for a different harvest vibe.
- Face Details: Don’t have black paper? Use a permanent marker directly on the dried Mod Podged jar, or try black acrylic paint. Googly eyes can also add a playful touch!
- Hair Alternatives: If burlap or raffia aren’t handy, use natural-colored yarn, thin strips of brown paper bags, or even dried grass from your yard (just make sure it’s clean!).
- Scarf Style: Use flannel fabric scraps, plaid ribbon, or even a piece of an old shirt for a different scarf look.
- Extra Embellishments: Think tiny fake leaves, acorns, small pinecones, or even a tiny fabric pumpkin or sunflower hot-glued to the “scarf” or hat. For a touch of sparkle, a little glitter mixed into the final Mod Podge layer can be fun.
- Scented Fun: Beyond cinnamon sticks, a drop of fall essential oil (like frankincense or clove) on a cotton ball placed inside the jar (away from the lights) can add a lovely aroma.
Tips for Success
Making these scarecrow jars is generally a breeze, but a few little pointers can make your crafting even smoother!
- Patience is Key for Drying: I know it’s tempting to rush, but letting each layer of Mod Podge dry completely before adding the next step (especially the face) prevents smudges and ensures a smooth, durable finish. I usually give it at least 20-30 minutes between layers, or even longer if it’s humid.
- Smooth Mod Podge Application: Apply Mod Podge in thin, even layers to avoid globs or bubbles. A foam brush works wonderfully for this!
- Secure Those Details: Use your hot glue gun liberally (but carefully!) to ensure all your burlap, raffia, and embellishments are firmly attached. You don’t want your scarecrow losing its hat mid-season!
- Kid-Friendly Fun: This is a fantastic project to do with kids! Let them tear the tissue paper, choose the face shapes, and even help with the Mod Podge (with supervision). Just handle the hot glue gun yourself. It’s a wonderful way to spend an afternoon and encourage their creativity. If you’re looking for more delightful fall creations to make with the family, be sure to check out all our recipes here!
- Go Beyond Jars: This same scarecrow decorating technique can be applied to other glass items too, like old wine bottles or even small glass vases, creating a whole family of fall-themed decorations.
How to Store Light-Up Scarecrow Mason Jars
These charming scarecrows are built to last and can be enjoyed for many autumns to come! To keep them looking their best:
- Keep Them Dry: Since Mod Podge is water-soluble (before it’s fully cured and sealed), it’s best to keep your scarecrows indoors or in a covered area if placed outside to protect them from rain and heavy dew.
- Dust Gently: If they get dusty, a quick wipe with a dry, soft cloth or a gentle pass with a duster will do the trick.
- Seasonal Storage: When the fall season ends, gently wrap each jar in tissue paper or newspaper and store them in a sturdy box. Keep them in a cool, dry place like a closet or attic. They’ll be ready to bring out and glow again next year!
- Battery Removal: Always remove the batteries from the tea lights or fairy lights before storing them for an extended period to prevent corrosion.
FAQs
Got a few lingering questions? Let’s clear them up!
Can I use real candles in my scarecrow mason jar?
No, absolutely not! For safety, always stick to battery-operated tea lights or fairy lights. Real flames inside a decorated jar can be a fire hazard, especially with paper and fabric elements.
Is Mod Podge safe for kids to use?
Yes, Mod Podge is non-toxic and generally safe for kids. Just make sure they don’t ingest it, and supervise younger children. The hot glue gun, however, should only be handled by adults or older, supervised children.
My Mod Podge looks cloudy after drying. What happened?
This usually happens if the layers were applied too thickly or if the environment is very humid. Don’t worry, it often clears up completely as it continues to dry. Next time, try applying thinner layers and ensuring adequate drying time in a well-ventilated area. If you’re craving some delicious comfort food while you wait for your Mod Podge to dry, you might love our Classic Salisbury Steak with Mushroom Gravy!
Can I wash these jars?
Because of the Mod Podge and decorations, these jars are not meant to be washed like regular dishes. They are decorative items. If you want to clean the inside of the jar before decorating, make sure it’s completely dry before starting. For another sweet treat to enjoy on a cozy autumn evening, I highly recommend our easy pumpkin cinnamon rolls – they’re a perfect pairing with your new fall decor!
I hope you have the best time making these charming Light-Up Scarecrow Mason Jars! They truly add a touch of whimsy and warmth to any space, making your home feel extra inviting for the fall season. Happy crafting, friends!
For more delicious recipes and creative inspiration, follow Crispy Kitchens on Pinterest!

Light-Up Scarecrow Mason Jars
Ingredients
Equipment
Method
- Step 1: Prep Your Jar: Grab your clean mason jar. If using tissue paper, tear it into small, manageable pieces (about 1-inch squares or random smaller shapes). Brush a layer of Mod Podge onto a section of your jar. Place tissue paper pieces onto the wet Mod Podge, overlapping slightly, then brush another thin layer of Mod Podge over the top to seal. Continue until the jar is completely covered. If using paint, simply paint your jar orange and let it dry. Let your jar dry completely before proceeding.
- Step 2: Craft the Face: While your jar is drying, cut out two simple circles or ovals for eyes, a small triangle for a nose, and a long, curved strip for a stitched smile from black construction paper or vinyl. Once your jar is dry, carefully arrange these pieces on the jar to create your scarecrow’s face. Secure each piece with a dab of Mod Podge or clear-drying glue. Optionally, use a fine-tipped black marker to add stitch lines to the mouth.
- Step 3: Add Some Hair & a Hat: Take a strip of burlap and wrap it around the rim of your jar lid, securing it with hot glue to create a hat band. Gather a small tuft of raffia or straw for hair and hot glue it to the top of the lid, letting it peek out from under the burlap band. You can also glue some raffia around the rim of the jar itself for more "hair."
- Step 4: Accessorize Your Friend: Tie a piece of twine or a thin strip of burlap ribbon around the neck of your jar like a cozy scarf. Hot glue optional fall embellishments like a small cinnamon stick, dried star anise, or little buttons to the scarf or hat.
- Step 5: Light It Up: Carefully place your battery-operated tea light or fairy lights inside the finished mason jar. Turn them on to illuminate your adorable scarecrow. Position it on your kitchen counter, a bookshelf, or a protected spot on your porch.