Hey there, fellow foodies! Can you believe it’s almost time for spooky season? I just adore everything about fall – the crisp air, cozy sweaters, and of course, all the fun Halloween festivities. When I think back to my childhood Halloweens, it’s always a mix of trick-or-treating adventures and the special treats my mom would whip up. This year, I’m beyond excited to share a recipe that perfectly captures that nostalgic, fun-filled spirit: our incredibly easy and utterly adorable Mummy Cheesecake!
This isn’t just any cheesecake; it’s a showstopper that tastes as amazing as it looks, and trust me, it’s way simpler to make than you might think. Whether you’re hosting a big Halloween bash or just want a festive treat for a cozy movie night in, this Mummy Cheesecake is guaranteed to bring smiles and maybe a few happy “boos!”
Why You’ll Love Mummy Cheesecake
- Fast: With a simple crust and an even simpler filling, this recipe comes together in a flash.
- Easy: No fancy techniques here, just straightforward steps for a delicious result. Even beginner bakers can nail this!
- Giftable: A beautifully decorated cheesecake makes a fantastic hostess gift or a sweet surprise for friends.
- Crowd-pleasing: Who doesn’t love cheesecake? This festive twist is always a hit with kids and adults alike.
Ingredients

Gathering your ingredients is the first step to any delicious adventure! Here’s what you’ll need for our hauntingly good Mummy Cheesecake:
- 1½ cups Graham Cracker Crumbs: This forms the perfect crunchy base. You can buy them pre-crushed for convenience or crush a sleeve of graham crackers yourself in a food processor or by hand in a bag with a rolling pin.
- ¼ cup Unsalted Butter, melted: Our golden binder for the graham cracker crumbs. Make sure it’s fully melted so it mixes evenly.
- 24 oz (680g) Cream Cheese, softened: The star of our show! Make sure your cream cheese is completely at room temperature. This is crucial for a smooth, lump-free cheesecake batter.
- 1 cup Granulated Sugar: Just the right amount of sweetness to balance the tang of the cream cheese.
- 3 large Eggs: These help set the cheesecake and give it that classic creamy texture. Again, room temperature is best for even mixing.
- 1 teaspoon Vanilla Extract: A splash of vanilla always enhances the flavor of baked goods. Don’t skip it!
- ½ cup White Chocolate Chips: Our secret weapon for those iconic mummy “bandages.” White chocolate melts beautifully and provides a lovely contrast.
- Candy Eyes, for decoration: These are the absolute cutest! You can find them in most baking aisles, especially around Halloween. They truly bring our little mummies to life!
How to Make Mummy Cheesecake
Alright, let’s get baking! Don’t worry, I’ll walk you through each step, making sure your Mummy Cheesecake comes out perfectly.
The Crust: Building a Solid Foundation
- First things first, let’s get the oven ready. Preheat your oven to 325°F (160°C). While it’s heating up, grab a 9-inch springform pan and give it a good grease. You can use butter, cooking spray, or even line the bottom with parchment paper for extra easy removal.
- In a medium bowl, combine your graham cracker crumbs and the melted butter. Give it a good stir until all the crumbs are moistened.
- Now, take that mixture and press it firmly into the bottom of your prepared springform pan. I like to use the bottom of a flat glass or a measuring cup to really compact it evenly. A sturdy crust is a happy crust!
The Creamy Cheesecake Batter: Smooth Operator
- In a large mixing bowl, using an electric mixer (or a strong arm and a whisk!), beat the softened cream cheese and granulated sugar together until it’s wonderfully smooth and creamy. Make sure there are no lumps left!
- Next, add the eggs one at a time, mixing just until each egg is incorporated. Don’t overmix here! Overmixing eggs can add too much air, which can cause cracks in your cheesecake. Finally, stir in the vanilla extract.
- Carefully pour your velvety cheesecake batter evenly over the graham cracker crust. Give the pan a gentle shake or tap it lightly on the counter a couple of times to release any air bubbles and smooth out the top.
Baking & Cooling: The Patience Game
- Pop your cheesecake into the preheated oven and bake for 50-55 minutes. You’re looking for the edges to be set, but the center should still have a slight jiggle when you gently shake the pan. This slight jiggle means it’s perfectly baked and will become firm as it cools.
- Once baked, remove the cheesecake from the oven and let it cool completely on a wire rack at room temperature. This gradual cooling helps prevent cracks. Once it’s fully cooled, cover it loosely with plastic wrap and transfer it to the refrigerator for at least 4 hours, or even better, overnight. Trust me, a well-chilled cheesecake is the best cheesecake!
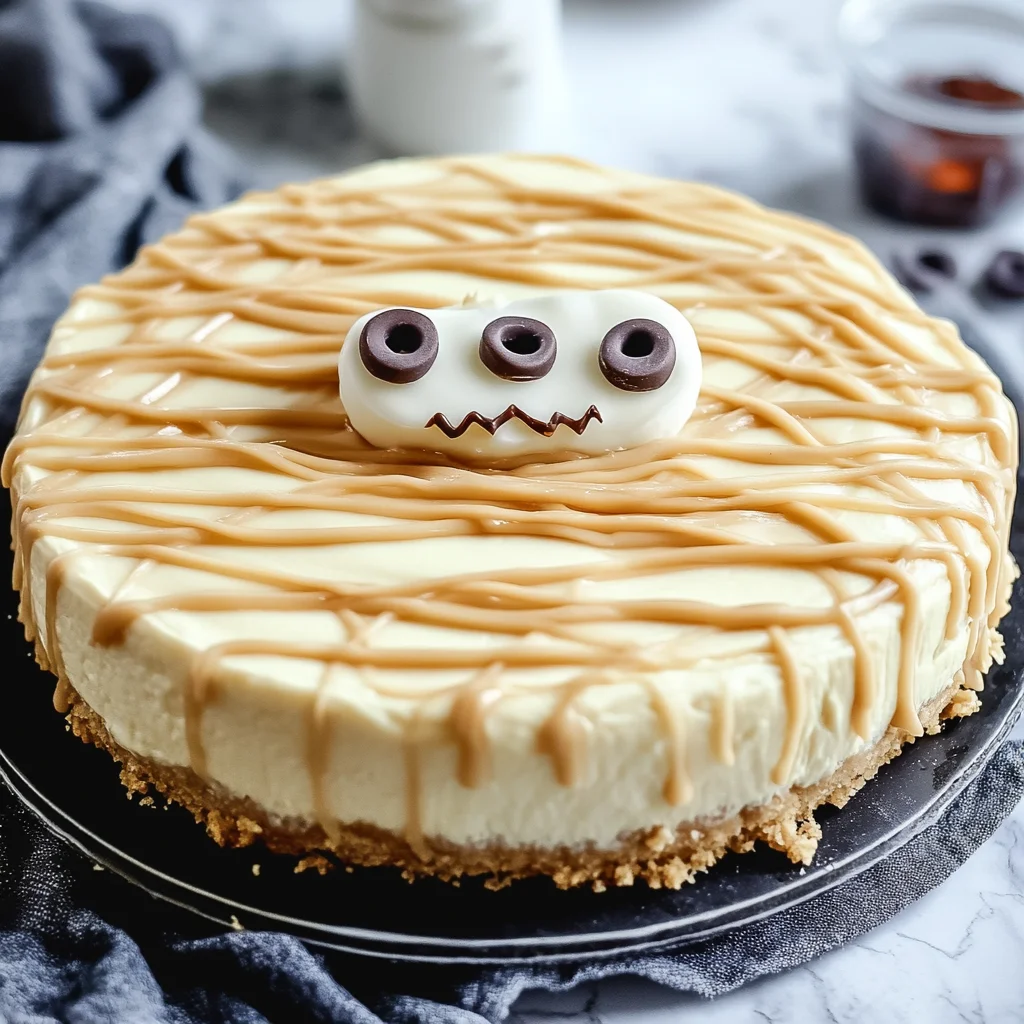
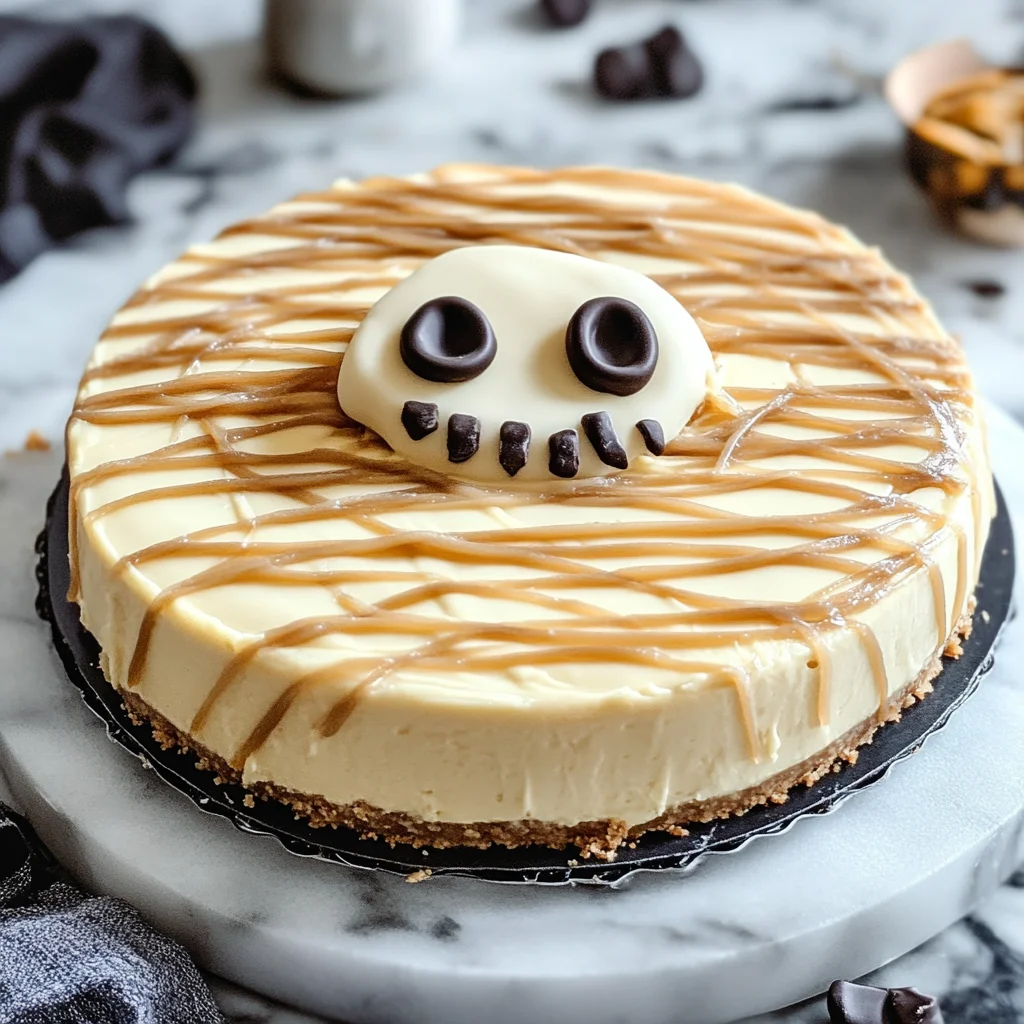
Decorating: Bringing Your Mummy to Life!
- Now for the fun part – turning your delicious cheesecake into an adorable mummy! Melt your white chocolate chips. You can do this in a microwave-safe bowl in 30-second intervals, stirring after each, or in a double boiler until smooth.
- Drizzle the melted white chocolate over the chilled cheesecake in a crisscross pattern, creating those mummy “bandages.” Don’t worry about perfection; rustic and haphazard looks even more authentic!
- Before the chocolate fully sets, arrange your candy eyes on the cheesecake. Place two close together at the top to create your mummy’s face. Serve immediately and enjoy the “oohs” and “aahs!”
Substitutions & Additions
Feeling creative? That’s the spirit! Here are a few ways you can customize your Mummy Cheesecake:
- Crust Variations: Instead of graham crackers, try an Oreo crust (just swap graham crumbs for crushed Oreos and use slightly less butter) or a shortbread cookie crust for a different flavor profile.
- Chocolate Choices: If white chocolate isn’t your favorite, you can use melted milk chocolate or dark chocolate for the bandages. Just be aware the contrast won’t be as stark. For an extra chocolatey treat, you might also love our easy chocolate chip cheesecake bars, which are perfect for sharing at parties!
- Spice it Up: For a fall-themed twist, add ½ teaspoon of pumpkin pie spice or a pinch of cinnamon to your cream cheese batter.
- Extra Toppings: After the chocolate bandages, you could sprinkle some Halloween sprinkles or finely chopped nuts around the base of the cheesecake for extra texture and festivity.
Tips for Success
Even though this recipe is super easy, a few little tricks can make all the difference:
- Room Temperature Ingredients: I cannot stress this enough for cheesecake! Make sure your cream cheese and eggs are at room temperature. This ensures a smooth batter without lumps and helps everything combine beautifully, preventing overmixing.
- Don’t Overmix: Once you add the eggs, mix only until just combined. Overmixing incorporates too much air, which can lead to cracks in your cheesecake as it cools.
- Cooling is Key: Don’t rush the cooling process! Letting the cheesecake cool slowly on a wire rack, and then chilling it for a minimum of 4 hours (overnight is ideal), is crucial for achieving that firm, creamy texture and preventing cracks.
- Water Bath (Optional, for perfectionists!): If you’re really worried about cracks, you can bake your cheesecake in a water bath. Wrap the outside of your springform pan tightly with heavy-duty foil, place it in a larger roasting pan, and pour hot water into the roasting pan until it comes halfway up the sides of the springform pan. This creates a moist environment that helps prevent cracking.
- Prep Ahead: This cheesecake is fantastic for making a day or two in advance! It gives it plenty of time to chill and firm up, meaning less stress on party day.
How to Store Mummy Cheesecake
Once your Mummy Cheesecake is made (and if there’s any left!), you’ll want to store it properly to keep it fresh and delicious.
- Refrigerator: Cover the cheesecake tightly with plastic wrap or aluminum foil and store it in the refrigerator for up to 4-5 days. It actually tastes even better the day after it’s made, as the flavors have time to meld.
- Freezer: Yes, you can freeze cheesecake! If you want to store it for longer, wrap the cooled and undecorated cheesecake (before adding the white chocolate bandages and candy eyes) tightly in several layers of plastic wrap, then a layer of aluminum foil. It can be frozen for up to 1-2 months. Thaw it in the refrigerator overnight before decorating and serving.
FAQs
Q: Can I use low-fat cream cheese?
A: While you technically can, I highly recommend using full-fat cream cheese for the best flavor and texture. Low-fat versions can sometimes result in a less creamy and more watery cheesecake.
Q: My cheesecake cracked! What did I do wrong?
A: Don’t worry, cracks are common! They usually happen from overmixing the batter (introducing too much air) or from sudden temperature changes during cooling. It still tastes amazing, and for this Mummy Cheesecake, the white chocolate “bandages” will cover any imperfections right up!
Q: Can I make this a no-bake cheesecake?
A: This specific recipe is designed for baking, but if you’re looking for a genuinely no-bake option, check out our no-bake Oreo cheesecake! It’s another fantastic easy dessert. For this Mummy Cheesecake, the baked filling gives it that classic dense, creamy texture.
Q: Where can I find candy eyes?
A: Candy eyes are typically found in the baking aisle of most grocery stores, especially during the fall and Halloween season. You can also find them easily online!
There you have it, folks! A simple, spooky, and utterly delicious Mummy Cheesecake recipe that’s sure to be a hit. Get ready to impress your friends and family with this creepy-cute treat. Happy Halloween baking!
And if you’re looking for even more delightful dessert inspiration, or maybe some savory dishes to balance out all the sweets, be sure to check out our full collection of recipes here at Crispy Kitchens!
For more delicious recipes and kitchen inspiration, be sure to follow us on Pinterest!
Mummy Cheesecake
Ingredients
Equipment
Method
- Step 1: The Crust. Preheat your oven to 325°F (160°C). Grease a 9-inch springform pan. In a medium bowl, combine graham cracker crumbs and melted butter, stirring until moistened. Press firmly into the bottom of the prepared springform pan.
- Step 2: The Creamy Cheesecake Batter. In a large mixing bowl, beat the softened cream cheese and granulated sugar together until smooth and creamy. Add the eggs one at a time, mixing just until each egg is incorporated. Stir in the vanilla extract. Pour the cheesecake batter evenly over the graham cracker crust. Gently shake or tap the pan to release air bubbles.
- Step 3: Baking & Cooling. Bake for 50-55 minutes, until the edges are set but the center still has a slight jiggle. Remove from oven and let cool completely on a wire rack at room temperature. Once fully cooled, cover loosely with plastic wrap and transfer to the refrigerator for at least 4 hours, or overnight, to chill.
- Step 4: Decorating. Melt white chocolate chips in a microwave-safe bowl (30-second intervals, stirring) or a double boiler until smooth. Drizzle the melted white chocolate over the chilled cheesecake in a crisscross pattern to create mummy “bandages.” Before the chocolate fully sets, arrange candy eyes at the top to form the mummy's face. Serve immediately.