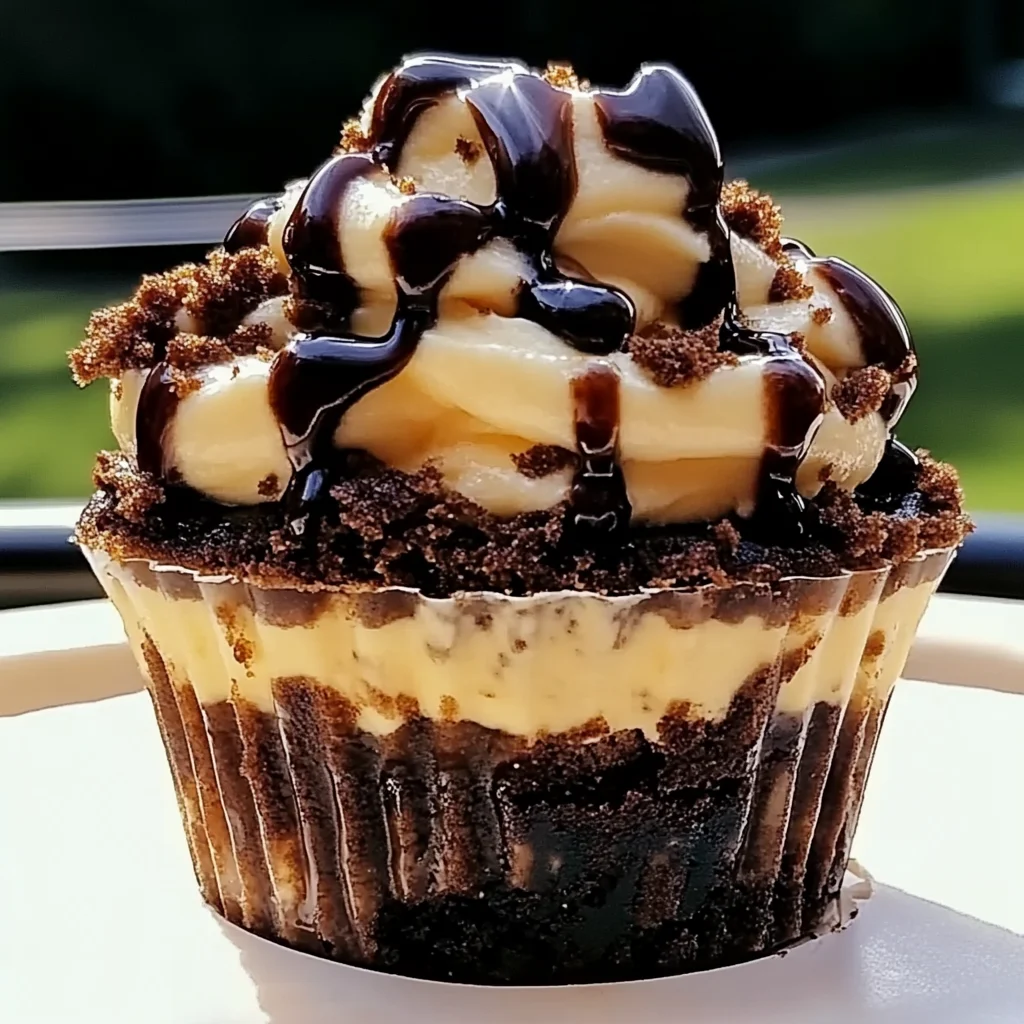
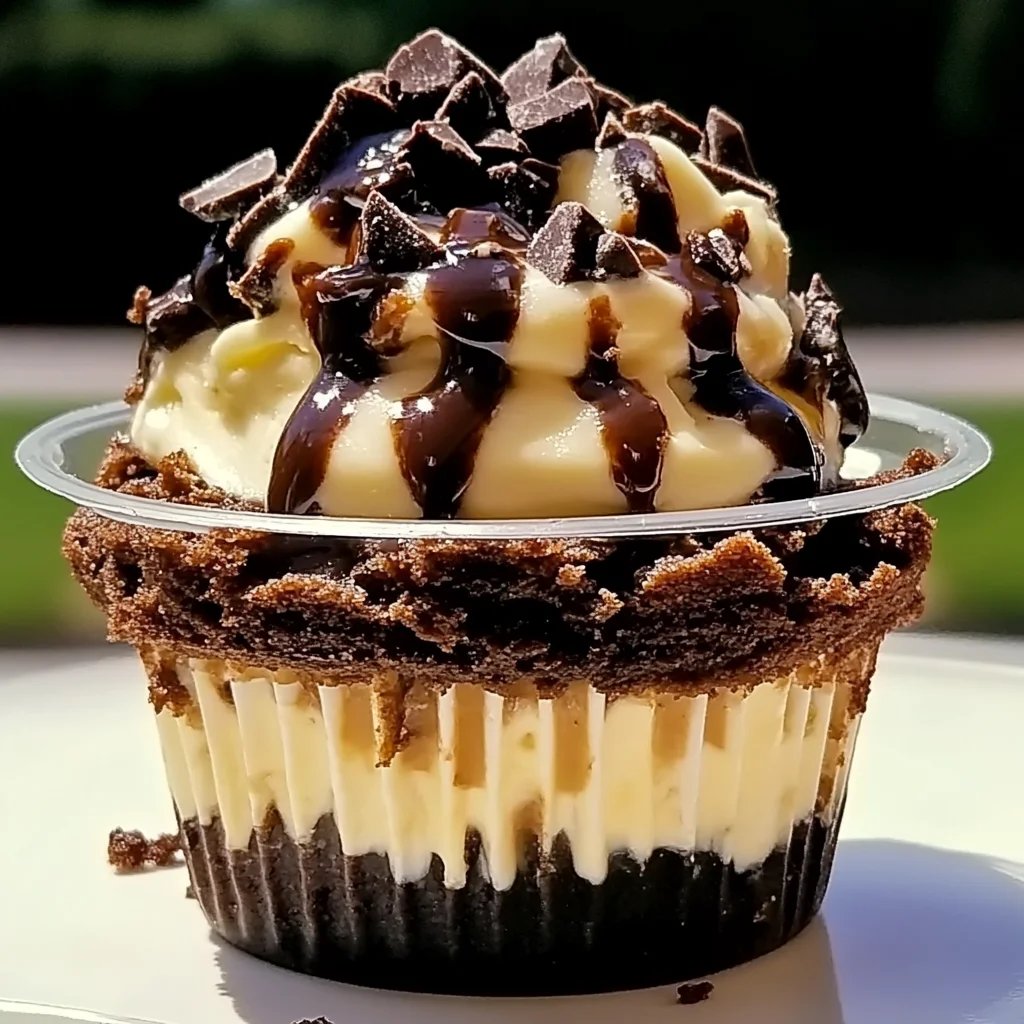
Oh, friend, do you ever get that craving for something incredibly rich, deeply chocolatey, and wonderfully creamy all at once? The kind of dessert that makes you close your eyes and just savor every single bite? That’s exactly where these Loaded Brownie Cheesecake Cups come in! They transport me straight back to my grandma’s kitchen, where every sweet treat felt like a hug. But unlike those long baking projects, these beauties are shockingly easy, super quick to put together, and require no oven time at all. Get ready to impress everyone (or just treat yourself!) with this memorable, irresistible dessert.
Why You’ll Love Loaded Brownie Cheesecake Cups
- Fast: Seriously, you’ll be digging into these in no time. Perfect for last-minute cravings or unexpected guests!
- Easy: No baking required, just simple mixing and layering. If you can use a spoon, you can make these.
- Giftable: Packaged in cute individual cups, they make delightful gifts or party favors.
- Crowd-pleasing: Who doesn’t love brownies AND cheesecake? It’s a guaranteed hit every single time.
Ingredients

Here’s what you’ll need to whip up these incredible cheesecake cups. Don’t worry, these are all easy-to-find goodies!
- 2 cups fudgy brownies, crumbled: This is our glorious base! You can totally grab a box of your favorite store-bought brownies, or if you’re feeling ambitious, bake a batch from scratch and let them cool completely.
- 1 ½ cups cream cheese, softened: The star of our creamy filling! Make sure it’s properly softened at room temperature; it makes a world of difference for a smooth, lump-free cheesecake.
- ½ cup powdered sugar: Also known as confectioners’ sugar. It dissolves beautifully, giving us that silky-smooth sweetness without any grainy texture.
- 1 teaspoon vanilla extract: A classic flavor enhancer that brings out the best in our cream cheese. Don’t skip it!
- 1 cup heavy whipping cream, whipped to stiff peaks: This is what gives our cheesecake that light, airy, cloud-like texture. You’ll whip it up yourself for maximum fluffiness!
- Chocolate ganache: For that rich, glossy chocolate drizzle. You can buy this pre-made or whip up your own with chocolate chips and heavy cream.
- Caramel sauce: Because chocolate and caramel are a match made in heaven, right? Store-bought is perfectly fine here!
- Extra brownie crumbs: For a little extra texture and a beautiful finish on top.
How to Make Loaded Brownie Cheesecake Cup
Let’s get to the fun part! You’re just a few simple steps away from dessert heaven.
Step 1: Prepare Your Dreamy Cheesecake Filling
First things first, grab a comfy mixing bowl. You’ll want to add your softened cream cheese, powdered sugar, and vanilla extract. Now, beat these together until the mixture is beautifully smooth and creamy. Seriously, keep beating until there are absolutely no lumps left – this is key for that perfect cheesecake texture! In a separate bowl, whip your heavy cream until it forms lovely stiff peaks. Then, very gently, fold that whipped cream into your cream cheese mixture. Be delicate here; you want to keep all that wonderful air you just whipped in. Don’t overmix, just fold until it’s just combined and looks like a fluffy cloud.
Step 2: Layer Up the Deliciousness
Now for the assembly! Take your serving cups – these can be cute mason jars, clear dessert glasses, or even small bowls. Spoon about a quarter of your crumbled fudgy brownies into the bottom of each cup. Press them down just a little bit to create a nice, even base. Next, spoon or pipe a generous layer of your velvety cheesecake filling over the brownies. If you’re feeling fancy, a piping bag makes for super neat layers, but a spoon works perfectly fine too! After the cheesecake, it’s time for the decadent drizzles. Grab your chocolate ganache and caramel sauce and give each cup a good swirl over the cheesecake layer. You can repeat these layers, starting with more brownies, then cheesecake, then drizzles, until your cups are gloriously full.
Step 3: Finish with Flair and Chill Out!
To really take these over the top, sprinkle some extra brownie crumbs on top of each cup. A final flourish of chocolate ganache and caramel sauce makes them look absolutely irresistible. Once assembled, it’s time for the hardest part: waiting! Pop your Loaded Brownie Cheesecake Cups into the refrigerator for at least 1 hour. This chilling time isn’t just to make them cold; it allows the cheesecake to set up beautifully and all those amazing flavors to meld together perfectly. Trust me, it’s worth the wait! If you’re looking for another no-bake dessert that benefits from a good chill, you might love these Easy Chocolate Chip Cheesecake Bars!
Substitutions & Additions
One of the best things about these cheesecake cups is how easily you can customize them! Feel free to play around and make them your own.
- Different Crust: Instead of brownies, try crushed Oreo cookies, graham cracker crumbs, or even shortbread cookies for your base!
- Cheesecake Flavors: Add a touch of espresso powder to the cream cheese for a mocha twist, or a hint of almond extract for a nutty flavor. Lemon zest would also be absolutely delightful for a bright, tangy kick.
- Extra Toppings: The sky’s the limit here! Think chopped nuts (pecans, walnuts), mini chocolate chips, sprinkles, fresh berries, or even chopped up candy bars.
- Sauce Swaps: A raspberry coulis or a white chocolate drizzle would be fantastic alternatives to (or additions with!) the chocolate and caramel.
- Adult Version: For a grown-up treat, a tiny splash of coffee liqueur or a nutty liqueur could be folded into the cheesecake mixture.
Tips for Success
- Softened Cream Cheese is a Must: I really can’t stress this enough! Cold cream cheese will give you a lumpy filling. If you forget to take it out, you can gently soften it in the microwave for 10-15 seconds.
- Don’t Overmix: When folding in the whipped cream, less is more. Overmixing can deflate the cream, making your cheesecake less airy.
- Chill Time is Crucial: Patience is a virtue, especially with no-bake desserts! The chilling time allows everything to firm up and the flavors to deepen.
- Make Ahead: These are fantastic for making a day or two in advance. Just cover them tightly and keep them in the fridge. This makes entertaining so much easier! Speaking of make-ahead desserts, have you seen our Caramel Brownie Cheesecake? It’s another stunner!
- Portion Control (or lack thereof!): Using individual cups is perfect for portioning and serving, but let’s be real, you might just want a bigger cup for yourself!
How to Store Loaded Brownie Cheesecake Cup
Once you’ve assembled these delightful cups, you’ll want to keep them fresh. Simply cover each cup tightly with plastic wrap or transfer them to an airtight container. They’ll stay wonderfully fresh and delicious in the refrigerator for up to 3-4 days. While technically you could freeze them, the texture of the cheesecake might change a little upon thawing, becoming a bit grainier. For the best experience, I recommend enjoying them chilled from the fridge!
FAQs
- Q: Can I use a boxed brownie mix?
A: Absolutely! That’s part of what makes this recipe so quick and easy. Just bake them according to package directions, let them cool completely, and then crumble away! - Q: How long do I need to whip the heavy cream?
A: Whip until it’s light, fluffy, and holds stiff peaks. This usually takes 2-5 minutes with a hand mixer, depending on its power. You’ll know it’s ready when you lift the beaters and the cream stands up firmly. - Q: Can I make one large cheesecake instead of individual cups?
A: Yes, you can! Use an 8×8 inch or 9×9 inch pan. Layer the brownies, then the cheesecake filling, and top with drizzles. You might need to adjust chilling time to ensure it’s fully set. - Q: What if my ganache hardens too much?
A: Gently warm it in the microwave in short 10-second bursts, stirring in between, until it’s a pourable consistency again. Be careful not to overheat it!
Follow us on Pinterest for more delicious recipes and kitchen inspiration!
Decadent No-Bake Loaded Brownie Cheesecake Cups
Ingredients
Equipment
Method
- Step 1: In a mixing bowl, beat softened cream cheese, powdered sugar, and vanilla extract until smooth and creamy with no lumps. In a separate bowl, whip heavy cream until it forms stiff peaks. Gently fold the whipped cream into the cream cheese mixture until just combined and fluffy.
- Step 2: Spoon a quarter of the crumbled brownies into the bottom of each serving cup and press gently to form a base. Spoon or pipe a generous layer of cheesecake filling over the brownies. Drizzle chocolate ganache and caramel sauce over the cheesecake layer. Repeat the layers until the cups are full.
- Step 3: Garnish the top of each cup with extra brownie crumbs, chocolate ganache, and caramel sauce. Refrigerate the Loaded Brownie Cheesecake Cups for at least 1 hour to allow the cheesecake to set and flavors to meld. Serve chilled.