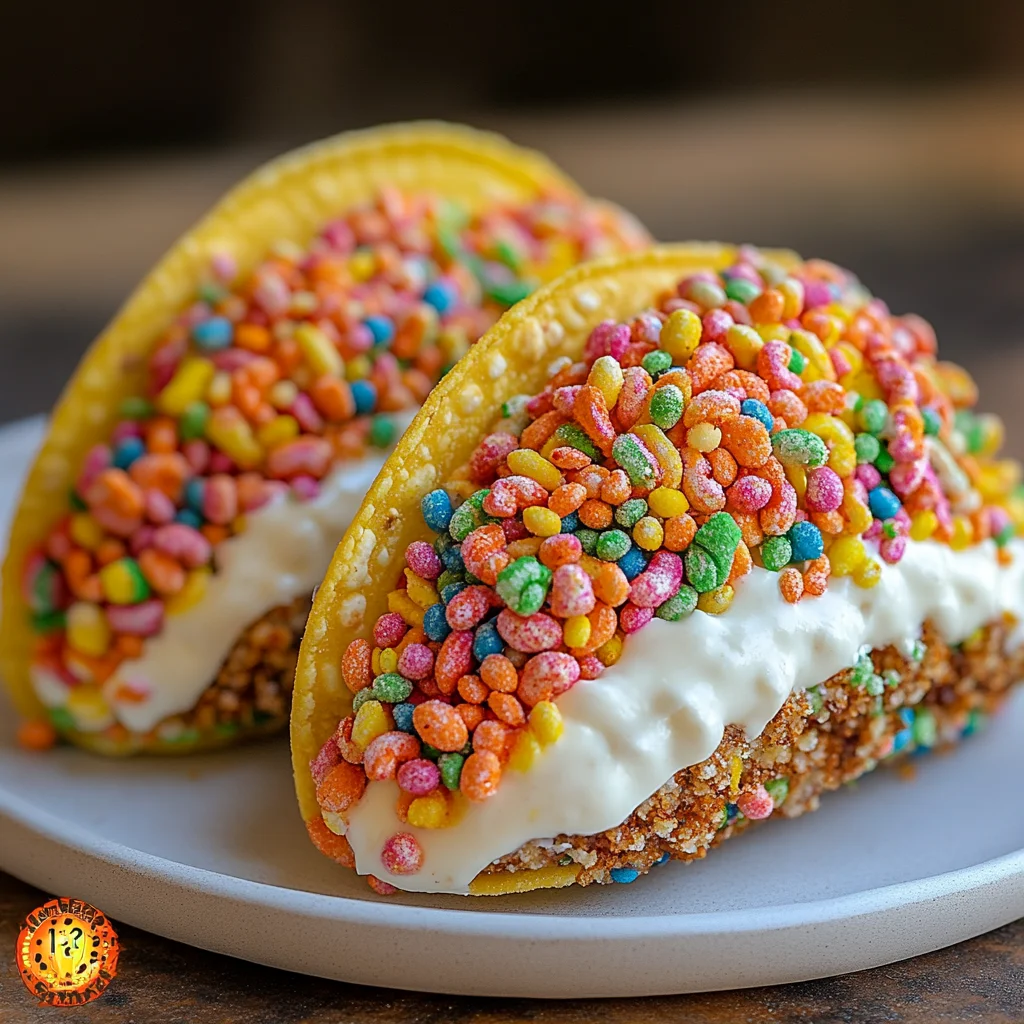
Oh, friend, do you ever get a craving for something that just screams childhood joy, but with a grown-up twist? Something that’s vibrant, fun, and utterly delicious? Well, buckle up, because today we’re diving into a recipe that does exactly that: Fruity Pebbles Cheesecake Tacos! Remember those mornings spent with a bowl of colorful cereal, watching cartoons? This recipe captures that magic, transforming it into an unforgettable, no-bake dessert that’s unbelievably easy, super quick, and will leave everyone asking for more. It’s like a party in your mouth, and trust me, you’re going to love bringing this playful treat to life in your own kitchen!
Why You’ll Love Fruity Pebbles Cheesecake Tacos
- Fast: Seriously, these come together in a flash, with minimal active time.
- Easy: No baking required for the shells or the filling – just mix, chill, and enjoy!
- Giftable: Pack these up in a cute box, and you’ve got the happiest homemade gift ever.
- Crowd-pleasing: Kids and adults alike are completely charmed by the vibrant colors and creamy, fruity flavor.
Ingredients

Gathering your ingredients for these delightful tacos is a breeze. Here’s what you’ll need to make this colorful confection come to life:
- Fruity Cereal: The star of our show! Any brand of fruity rice cereal will work beautifully. This is what gives us that iconic flavor and incredible crunch.
- Unsalted Butter, melted: This binds our cereal shells together, giving them that perfectly crisp-chewy texture.
- Cream Cheese, softened: Make sure it’s at room temperature! This is key for a super smooth, lump-free cheesecake filling.
- Powdered Sugar, sifted: Our sweetener for the creamy filling. Sifting ensures no pesky lumps, giving you that silky texture we all dream of.
- Pure Vanilla Extract: A splash of vanilla enhances all those sweet, creamy flavors. Don’t skip it!
- Whipped Cream: This is what makes our cheesecake filling wonderfully light and airy. You can use store-bought or whip your own fresh cream for an extra special touch.
- Additional Fruity Cereal: For that final flourish of color and crunch on top!
How to Make Fruity Pebbles Cheesecake Tacos
Ready to get started? This process is as fun as it is simple. Just follow these steps, and you’ll be enjoying these colorful creations in no time!
First things first, let’s get those vibrant shells ready. In a spacious mixing bowl, gently combine your 3 cups of colorful fruity cereal with ½ cup of melted unsalted butter. Give it a good stir until every single piece of cereal is beautifully coated. This ensures your shells will hold together perfectly.
Next, it’s time to shape them! Press the cereal mixture firmly into small taco-shaped molds or even a muffin tin. If you’re using a muffin tin, you can create a “taco” shape by pressing the mixture over the inverted cups or using aluminum foil to create a ridge for the taco shape. The key here is to compact the mixture tightly. The firmer you press, the sturdier your shells will be. Once shaped, pop them into the refrigerator for at least 30 minutes. This chilling time is crucial for them to set up and become wonderfully firm.
While your shells are chilling, let’s whip up that dreamy cheesecake filling! In a clean mixing bowl, grab your softened cream cheese. Using a hand mixer, beat it until it’s wonderfully light and fluffy. Now, gradually add in the ½ cup of sifted powdered sugar and 1 teaspoon of pure vanilla extract. Keep blending until the mixture is completely smooth and irresistible. If you love no-bake treats, you might also enjoy making Easy No-Bake Caramel Pretzel Bars or a delightful Easy Peanut Butter Cup Dump Cake – they’re just as simple and delicious!
Now for the final touch on the filling: the whipped cream. Using a spatula, gently fold the whipped cream into your cream cheese mixture. The goal here is to keep that light and airy texture, so be delicate! You’re creating a cloud of creamy, sweet deliciousness.
Once your cereal shells are perfectly firm and set, carefully remove them from their molds. They should pop out easily if they were pressed firmly enough. Then, generously spoon that luscious cheesecake filling into each colorful shell. You can be as liberal as you like – I say, the more filling, the better!
To finish, sprinkle a little extra fruity cereal over the top of your filled shells. This adds another pop of color and a delightful textural contrast. Serve them up right away for a slightly softer, more melt-in-your-mouth shell, or pop them back in the fridge for a bit longer if you prefer a firmer, crispier shell. Either way, they’re a treat!

Substitutions & Additions
One of the best things about these Fruity Pebbles Cheesecake Tacos is how versatile they are! Here are some fun ideas to switch things up:
- Cereal Swaps: Not a Fruity Pebbles fan? No problem! Try Cinnamon Toast Crunch for a warming, spiced flavor, or even Cocoa Puffs for a chocolatey twist.
- Cheesecake Filling Variations:
- Add a teaspoon of lemon zest for a bright, citrusy kick.
- Mix in mini chocolate chips or sprinkles for extra fun.
- A tiny dash of almond extract can add a subtle, sophisticated note.
- Garnishes Galore:
- Drizzle with white chocolate or milk chocolate.
- Add a dollop of extra whipped cream on top before serving.
- Sprinkle with chopped nuts for added crunch.
- A fresh berry or two can add a nice touch of tartness and color.
- Make it Boozy: For an adult version, you could add a tablespoon of a fruity liqueur (like raspberry or orange) to the cream cheese mixture.
Tips for Success
Even though this recipe is super easy, a few insider tips can make them truly spectacular!
- Softened Cream Cheese is Key: I can’t stress this enough! If your cream cheese isn’t soft, you’ll end up with lumps in your filling. Plan ahead and let it sit out for at least an hour.
- Press Those Shells: The firmer you press the cereal mixture into the molds, the less likely they are to crumble when you fill them. Really get in there and compact them.
- Chill Time Matters: Don’t rush the chilling process for the shells. That 30 minutes (or more!) in the fridge is what helps them solidify and hold their shape.
- Gentle Folding: When you’re folding in the whipped cream, be super gentle. This keeps the cheesecake filling light and fluffy. Over-mixing will deflate it.
- Prep Ahead: You can make the cereal shells a day in advance and store them in an airtight container at room temperature. The cheesecake filling can also be made a day ahead and stored in the refrigerator. Just give it a quick whisk before filling the shells. Looking for another dessert that you can prepare ahead? Our Berrylicious Strawberry Crunch Cheesecake is a dream!
How to Store Fruity Pebbles Cheesecake Tacos
If by some miracle you have any leftover (which is unlikely, let’s be real!), here’s how to keep them fresh and delicious:
- Refrigeration: These cheesecake tacos should be stored in an airtight container in the refrigerator. The cheesecake filling contains dairy, so chilling is essential.
- Shelf Life: When properly stored, they will stay fresh for up to 3-4 days. The cereal shells might soften slightly over time, but they’ll still be incredibly tasty!
- Best Enjoyed Fresh: While they store well, I find they are at their absolute best within the first 24 hours when the cereal shells are at their crispiest.
FAQs
Q: Can I use a different kind of cereal for the shells?
A: Absolutely! While Fruity Pebbles gives that classic colorful look, you can certainly experiment with other cereals like Cinnamon Toast Crunch, Rice Krispies (for a classic crispy treat feel), or even Cocoa Puffs for a chocolatey twist.
Q: Do I really need specific taco molds?
A: Not at all! While taco molds are super convenient, you can easily use the back of a muffin tin. Just press the cereal mixture over the inverted cups to create a taco shape. You can also form small bowls by pressing the mixture into the regular muffin cups.
Q: Can I make these dairy-free or gluten-free?
A: To make them dairy-free, you would need dairy-free cream cheese, butter alternatives, and a plant-based whipped cream. For gluten-free, ensure your fruity cereal is certified gluten-free, as many cereals contain gluten. All other ingredients are typically naturally gluten-free.
Q: How long does it take for the shells to set?
A: A minimum of 30 minutes in the refrigerator is recommended for the shells to firm up properly. If you have more time, an hour or even longer will make them even sturdier.
For more delicious recipes and kitchen fun, be sure to follow us on Pinterest!
Easy No-Bake Fruity Pebbles Cheesecake Tacos!
Ingredients
Equipment
Method
- Step 1: In a spacious mixing bowl, combine 3 cups of colorful fruity cereal with ½ cup of melted unsalted butter. Stir until every piece of cereal is coated.
- Step 2: Press the cereal mixture firmly into small taco-shaped molds or a muffin tin (by pressing over inverted cups or using aluminum foil to create a ridge). Compact tightly. Refrigerate for at least 30 minutes to set.
- Step 3: While shells chill, prepare the filling. In a clean mixing bowl, beat softened cream cheese with a hand mixer until light and fluffy. Gradually add ½ cup of sifted powdered sugar and 1 teaspoon of pure vanilla extract. Blend until completely smooth.
- Step 4: Gently fold the whipped cream into the cream cheese mixture using a spatula, being delicate to keep the light and airy texture.
- Step 5: Once your cereal shells are perfectly firm, carefully remove them from their molds. Generously spoon the luscious cheesecake filling into each colorful shell.
- Step 6: To finish, sprinkle a little extra fruity cereal over the top of your filled shells. Serve immediately for a softer shell, or refrigerate longer for a firmer, crispier shell.