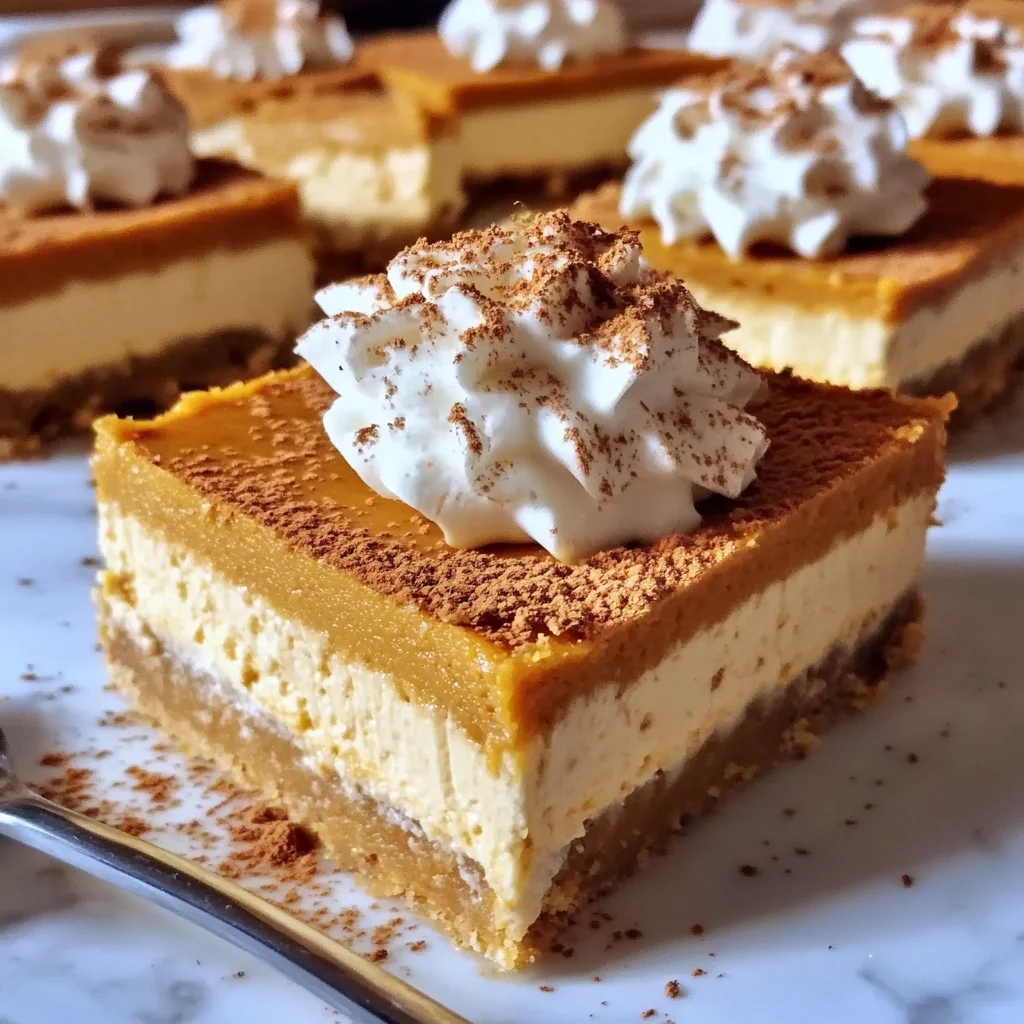
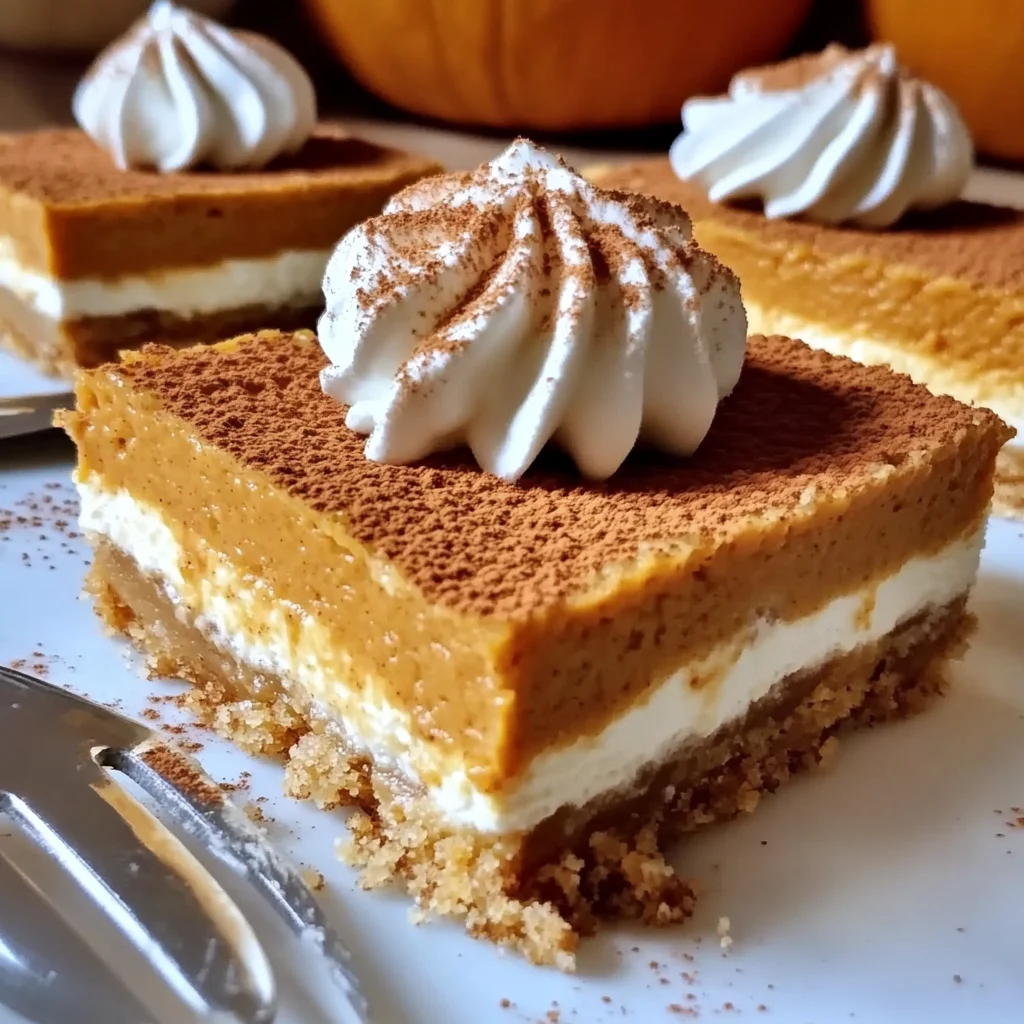
There’s just something truly magical about autumn, isn’t there? The crisp air, the cozy sweaters, and that unmistakable scent of pumpkin spice drifting through the kitchen. For me, it immediately brings back sweet memories of bustling holiday gatherings, laughter with family, and a table laden with delicious treats. But let’s be real, sometimes you want that incredible taste of homemade pumpkin pie and luscious cheesecake without spending all day in the kitchen. That’s where these magical No-Bake Pumpkin Pie Cheesecake Bars come in!
Imagine the rich, spiced flavor of your favorite pumpkin pie combined with the tangy sweetness of a classic cheesecake, all sitting on a perfectly buttery graham cracker crust. Now, imagine doing all of that without ever turning on your oven. Yep, you heard me right! These bars are not only incredibly easy and quick to whip up, but they’re also an absolute showstopper. They’re the perfect make-ahead dessert for Thanksgiving, Christmas, or any fall day when you’re simply craving that comforting pumpkin goodness. Trust me, once you try these, they’ll become a cherished part of your seasonal baking (or rather, no-baking!) traditions.
Why You’ll Love No-Bake Pumpkin Pie Cheesecake Bars
- Fast: Seriously quick prep time means more time enjoying the season, not slaving in the kitchen.
- Easy: No oven required! Just mix, layer, and chill – it’s really that simple.
- Giftable: These bars are beautiful and delicious, making them a perfect, thoughtful homemade gift for friends, neighbors, or hostesses.
- Crowd-pleasing: The irresistible blend of pumpkin pie and creamy cheesecake ensures everyone will be asking you for the recipe!
Ingredients
Gathering your ingredients is the first delightful step to creating these dreamy bars! Here’s what you’ll need to grab from your pantry and fridge:
- 12 full graham cracker sheets, crushed into fine crumbs: You can buy pre-crushed crumbs, or do it yourself in a food processor or by hand with a sturdy bag and a rolling pin. The finer the crumbs, the better for a solid, even crust!
- 8 tbsp (1 stick) unsalted butter, melted: This is the glue that holds your delicious crust together and adds that wonderful buttery flavor.
- 24 oz (3 blocks) cream cheese, softened: Make sure it’s completely softened to room temperature for a super smooth, lump-free cheesecake layer. This is crucial for texture!
- 3 tbsp granulated sugar: Just enough sweetness to balance the tanginess of the cream cheese layer.
- 3 tbsp milk: Helps achieve that perfect creamy consistency in the cheesecake layer.
- 1 tsp vanilla extract: A classic flavor enhancer that truly makes everything better!
- 8 oz frozen whipped topping, thawed: Think Cool Whip! This is your secret weapon for that light, airy cheesecake texture.
- 30 oz pumpkin puree (not pie filling): Double-check the label on this one! You want pure pumpkin, not the pre-spiced pumpkin pie filling, which will throw off the flavor balance.
- 2 cups milk: For blending with the pumpkin and instant pudding mix.
- 10.2 oz instant vanilla pudding mix (two 5.1 oz boxes): This is what thickens your pumpkin layer and adds extra vanilla goodness. Be absolutely sure it’s instant pudding and not “cook-and-serve”!
- 2 tsp ground cinnamon: Essential for that warm, inviting pumpkin spice flavor.
- 2 tsp pumpkin pie spice: The ultimate flavor booster for all things pumpkin!
How to Make No-Bake Pumpkin Pie Cheesecake Bars
Alright, let’s get those hands a little messy (in the best way possible!) and create these irresistible bars. You’ll be amazed at how quickly these come together!
- Crust Time! In a medium bowl, combine your finely crushed graham cracker crumbs with the melted butter. Stir them together until everything is uniformly moistened, like wet sand. Now, press this mixture firmly into the bottom of a greased 9×13-inch pan. I like to use the bottom of a flat-bottomed measuring cup to really get it packed down tight – it helps prevent crumbling when you slice it later! Pop that crust into the fridge while you get the fillings ready.
- Creamy Dreamy Layer: In a separate, larger bowl, it’s time for the cream cheese magic. Beat together the softened cream cheese, granulated sugar, 3 tablespoons of milk, and vanilla extract until the mixture is beautifully smooth and there are no lumps in sight. Next, gently fold in the thawed whipped topping. You want to be delicate here to keep that airy, light texture. Once combined, spread this luscious cream cheese mixture evenly over your chilled graham cracker crust.
- Pumpkin Perfection: Grab another bowl (or wash out your cream cheese one if you’re trying to minimize dishes, which I always am!). Whisk together the pumpkin puree, the remaining 2 cups of milk, both boxes of instant vanilla pudding mix, ground cinnamon, and pumpkin pie spice. Keep whisking until the mixture starts to thicken. It’ll become wonderfully rich and smooth. Carefully, oh so carefully, spread this spiced pumpkin layer over your cream cheese layer. Take your time to get it even!
- Chill Out! Now comes the hardest part – waiting! Cover your pan tightly with plastic wrap and refrigerate for a minimum of 4 hours. But honestly, if you can wait, letting it chill overnight is truly best. This gives all the layers plenty of time to set up perfectly, making for clean slices and a truly firm, delicious bar. While you wait, why not check out some other amazing no-bake treats, like these delightful no-bake lemon cheesecake bars for another refreshing twist? Or if you’re feeling a bit more adventurous with dessert bars, my chocolate chip cheesecake bars are always a hit!
- Serve it Up! Once fully chilled, use a sharp knife to slice your bars into squares. You can garnish with a dollop of extra whipped cream and a sprinkle of cinnamon or pumpkin pie spice if you’re feeling fancy!
Substitutions & Additions
One of the joys of cooking (and no-baking!) is making a recipe truly your own. Here are some fun ways to switch things up or add a little extra flair:
- Crust Variations: Instead of classic graham crackers, try crushed gingersnap cookies or Biscoff cookies for an extra layer of warm spice that pairs beautifully with pumpkin! For a gluten-free option, simply use gluten-free graham crackers.
- Bolder Spice Profile: If you love an even more intense spice, feel free to add a pinch of ground ginger, nutmeg, or cloves to your pumpkin layer along with the cinnamon and pumpkin pie spice.
- Toppings Galore: Before serving, consider a drizzle of decadent caramel sauce, a sprinkle of chopped pecans or walnuts, or even mini chocolate chips for an extra textural and flavor treat. A dollop of fresh whipped cream is always a classic and welcome finish!
- Make it Mini: Instead of a 9×13 pan, you can press the crust mixture into a muffin tin lined with paper liners for individual no-bake pumpkin cheesecake cups. Adjust chilling time slightly.
Tips for Success
Even though this recipe is incredibly easy, a few little tricks can make it absolutely perfect every single time:
- Softened Cream Cheese is Key: I cannot stress this enough! If your cream cheese isn’t soft and at room temperature, you’ll end up with stubborn lumps in your cheesecake layer, and nobody wants that. Take it out of the fridge at least an hour before you plan to start mixing.
- Don’t Rush the Chill Time: Seriously, that 4-hour minimum (or preferably overnight!) is crucial. It allows all the layers to set properly, ensuring clean, beautiful slices. If you try to cut too early, it might be a bit soft and messy. Patience is a virtue here!
- Fold Whip Topping Gently: When incorporating the thawed whipped topping into the cream cheese mixture, be gentle. You want to keep as much air in it as possible for that light, fluffy texture that makes these bars so delightful.
- Grease Your Pan (or Parchment It): Even though it’s no-bake, greasing the pan (or better yet, lining it with parchment paper leaving an overhang on the sides) makes it so much easier to lift out the entire slab for neat slicing.
- Pumpkin Puree vs. Pie Filling: This is a common mistake and one to watch out for! Make absolutely sure your can says “100% Pure Pumpkin” and NOT “Pumpkin Pie Filling.” Pie filling already has spices and sugar, which will throw off the carefully balanced flavors of this recipe. If you’re looking for other ways to use up that extra pumpkin puree, you might also enjoy making these delicious pumpkin cinnamon rolls for breakfast!
How to Store No-Bake Pumpkin Pie Cheesecake Bars
These bars are so good, they might not last long, but it’s always good to know how to keep them fresh and ready for when that craving hits!
- Refrigeration: Store any leftover bars in an airtight container in the refrigerator for up to 3-4 days. They actually taste even better the next day as the flavors meld!
- Freezing: For longer storage, you can absolutely freeze individual slices! Place them on a baking sheet to freeze solid, then wrap each bar tightly in plastic wrap, and then aluminum foil to prevent freezer burn. Store in a freezer-safe bag or container for up to 1-2 months. Thaw them in the refrigerator before serving for the best texture.
FAQs
Got questions about these delightful No-Bake Pumpkin Pie Cheesecake Bars? I’ve got answers!
Q: Can I use a different type of crust?
A: Absolutely! Vanilla wafers, shortbread cookies, or even chocolate cookies (like Oreos, filling removed) would make a delicious alternative. Just be sure to crush them finely and combine with melted butter as instructed.
Q: My pumpkin layer didn’t set. What went wrong?
A: The most common reason for a pumpkin layer not setting is using “cook and serve” pudding mix instead of “instant” pudding mix. Only instant pudding has the necessary gelling agents to set properly without heat. Also, ensure you gave it enough chill time – at least 4 hours, but overnight is ideal!
Q: Can I make these dairy-free?
A: With a few thoughtful substitutions, yes! Look for dairy-free cream cheese alternatives, plant-based milk (like almond or oat milk), and a dairy-free whipped topping. Most graham crackers are dairy-free, but it’s always a good idea to double-check the label.
Q: Can I make these ahead for a holiday gathering?
A: Yes, absolutely! These bars are perfect for making 1-2 days in advance. In fact, the flavors often meld and deepen beautifully with a little extra time in the fridge, making them even more delicious and convenient for entertaining.
For more mouth-watering recipes and behind-the-scenes glimpses, follow us on Pinterest!

No-Bake Pumpkin Pie Cheesecake Bars
Ingredients
Equipment
Method
- Step 1: Crust Time! In a medium bowl, combine the finely crushed graham cracker crumbs with the melted butter. Stir until uniformly moistened. Press this mixture firmly into the bottom of a greased 9x13-inch pan. Use the bottom of a flat-bottomed measuring cup to pack it down tight. Pop the crust into the fridge while you prepare the fillings.
- Step 2: Creamy Dreamy Layer: In a separate, larger bowl, beat together the softened cream cheese, granulated sugar, 3 tablespoons of milk, and vanilla extract until beautifully smooth and lump-free. Gently fold in the thawed whipped topping to maintain an airy, light texture. Spread this luscious cream cheese mixture evenly over your chilled graham cracker crust.
- Step 3: Pumpkin Perfection: In another bowl, whisk together the pumpkin puree, the remaining 2 cups of milk, both boxes of instant vanilla pudding mix, ground cinnamon, and pumpkin pie spice. Whisk until the mixture starts to thicken, becoming rich and smooth. Carefully spread this spiced pumpkin layer evenly over your cream cheese layer.
- Step 4: Chill Out! Cover your pan tightly with plastic wrap and refrigerate for a minimum of 4 hours. For best results, let it chill overnight. This allows all layers to set up perfectly for clean slices and a firm bar.
- Step 5: Serve it Up! Once fully chilled, use a sharp knife to slice your bars into squares. Garnish with a dollop of extra whipped cream and a sprinkle of cinnamon or pumpkin pie spice if desired.