There’s something undeniably comforting about a dessert that instantly brings back memories of childhood afternoons and cozy family gatherings. For me, that nostalgia hits sweetly with every bite of Nutter Butter Pie. This creamy, peanut buttery delight wrapped in a crunchy cookie crust is one of those recipes that’s as easy to make as it is to love. Whether you’re craving a quick sweet fix or planning a dessert that’ll have everyone asking for seconds, this no-bake pie is a total winner in my book.
What I adore about this Nutter Butter Pie is how it manages to feel indulgent and homemade without any fuss or oven time. It’s perfect for those warm summer days when you want a cool treat, or even as a fun surprise for a last-minute dinner party. Plus, it’s a pie that practically makes itself while you sip your coffee or catch up on your favorite show. Trust me, once you try it, you’ll understand why it’s a beloved classic for peanut butter fans everywhere.
Why You’ll Love Nutter Butter Pie
- Fast: Ready in just minutes with simple steps and no baking required.
- Easy: Uses just a handful of ingredients you might already have on hand.
- Giftable: This pie makes for a thoughtful and delicious homemade gift.
- Crowd-pleasing: The rich peanut butter flavor and creamy texture win over all ages.
Ingredients
Before you start, let’s take a quick look at what you’ll need. The ingredient list is straightforward, which makes this recipe even more approachable:
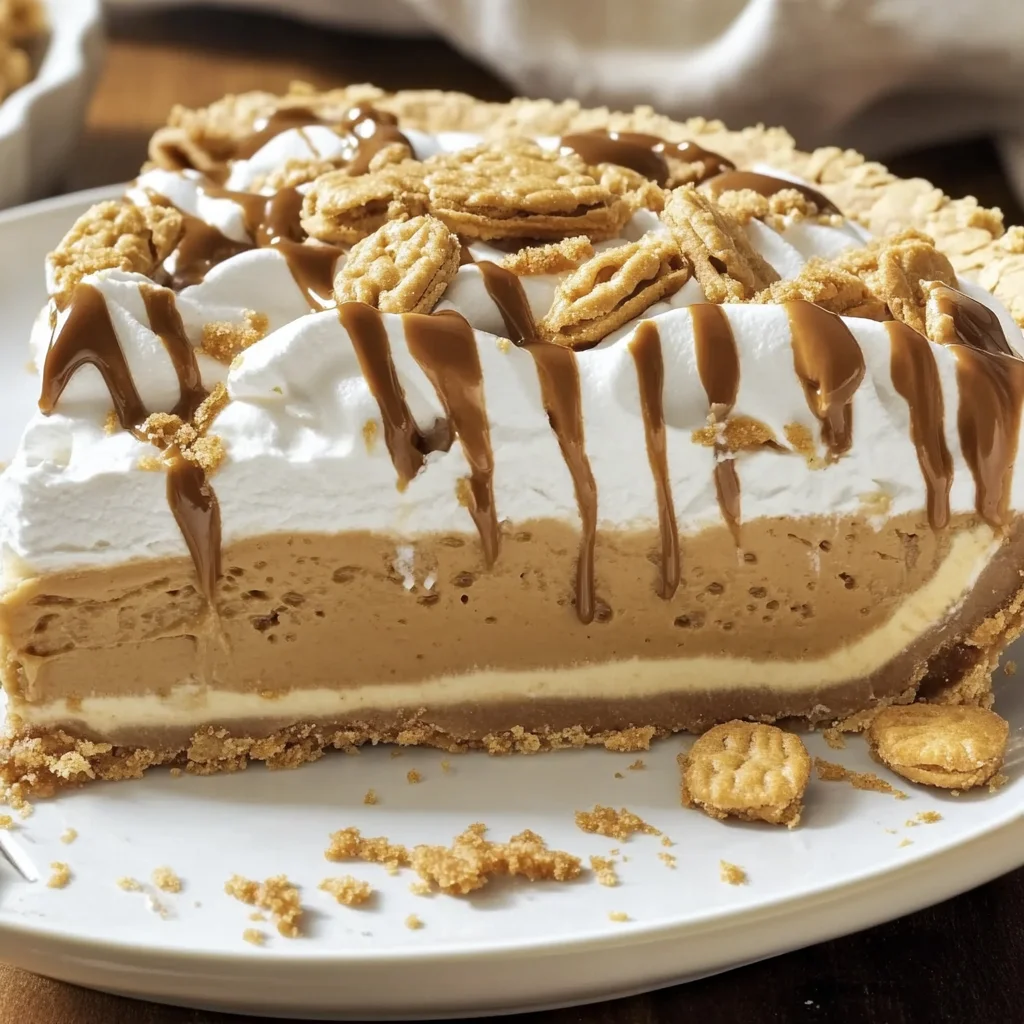
- Nutter Butter bars: These iconic peanut butter sandwich cookies provide a perfect crunchy crust and garnish. Crushing them fresh ensures the pie has that irresistible cookie texture.
- Butter: Melted butter binds the cookie crumbs together into a firm crust that holds up well.
- Cream cheese: Softened cream cheese adds a tangy creaminess and helps the filling hold its shape.
- Creamy peanut butter: The star of the show! Divided between the filling and drizzled topping, it delivers that rich peanut flavor.
- Granulated sugar: Just the right amount to balance the peanut butter’s savory notes with sweetness.
- Frozen whipped topping or whipped cream: This is folded into the filling for lightness and also used for a decorative topping.
One of the things I love about this pie is how you can easily swap ingredients based on what you have or prefer. For example, if you’re a fan of homemade whipped cream, it’s a great substitute for the frozen whipped topping and adds a fresh touch to the pie.
How to Make Nutter Butter Pie
Ready to dive in? Let me walk you through each step so you feel confident making this creamy delight from start to finish.
1. Prepare the crust
First, crush the entire 16-ounce package of Nutter Butter cookies. I like to put them in a large resealable bag and use a rolling pin to break them down into fine crumbs, but leaving a few slightly bigger pieces adds a nice texture. Be sure to reserve about 1/4 cup of the crumbs for garnish later.
Next, pour the melted butter into the remaining crushed cookies and mix until all the crumbs are coated evenly. This will help the crust stick together and hold its shape once pressed into the pan.
Press this mixture firmly into the bottom and up the sides of a 9-inch pie pan. You want an even, compact crust that will support the filling beautifully. I find using the bottom of a flat measuring cup helps get a nice, smooth finish. Once done, set the crust aside while you prepare the filling.
2. Make the filling
In a large mixing bowl, beat the softened cream cheese, 1 cup of creamy peanut butter, and granulated sugar together. Use a hand mixer or stand mixer on medium speed until the mixture becomes smooth and fluffy—this usually takes about 3-5 minutes. The sugar dissolves and the peanut butter blends in perfectly, creating a luscious base.
Gently fold in the thawed whipped topping or whipped cream using a spatula. The key here is to fold rather than stir vigorously—this keeps the filling airy and light, preventing it from deflating.
3. Assemble the pie
Spread the peanut butter filling evenly over the prepared Nutter Butter crust. Take your time here and smooth the top with a spatula to create a nice flat surface for the toppings.
4. Add toppings
Now comes the fun part! Warm the reserved 1/4 cup of peanut butter in the microwave in 15-second intervals until it’s pourable but not hot. Drizzle it over the pie in a decorative crosshatch or swirl pattern. This not only adds extra peanut butter flavor but also makes the pie look irresistible.
Sprinkle the reserved cookie crumbs around the edges for a pretty border. If you want to go the extra mile, pipe or dollop small swirls of whipped cream on top using a piping bag or simply a spoon. It adds a lovely finishing touch and a bit of creaminess to each bite.
5. Chill
Refrigerate the pie for at least 6 hours, preferably overnight. This chilling time allows the filling to set properly, making it easier to slice and giving the flavors time to meld together. When you’re ready to serve, cut into generous slices and enjoy the perfect balance of crunchy crust and silky filling.
If you’re looking for more no-bake dessert ideas, you might enjoy the No-Bake Peanut Butter Brownie Cookies for a different but equally delightful peanut butter treat.
Substitutions & Additions
Don’t worry if you don’t have all the exact ingredients on hand or if you want to customize this pie to your taste. Here are some friendly swaps and creative additions to try:
- Crust alternative: Use chocolate graham crackers or even Oreo cookies crushed for a chocolatey twist on the crust.
- Peanut butter options: Swap creamy peanut butter for natural or crunchy peanut butter if you prefer more texture.
- Dairy substitutes: For a lighter filling, try using Greek yogurt mixed with cream cheese or coconut cream for a dairy-free version.
- Sweetener variations: Use brown sugar or honey instead of granulated sugar to add a deeper sweetness.
- Extra mix-ins: Fold in mini chocolate chips, chopped peanuts, or even a swirl of Nutella to amp up the flavor complexity.
- Topping upgrades: Garnish with chopped Reese’s Pieces, a drizzle of melted chocolate, or a sprinkle of sea salt for a gourmet touch.
When I’m entertaining, I sometimes serve this pie alongside a refreshing citrus chicken dish, like the Creamy Lemon Chicken, which provides a perfect balance of savory and sweet flavors for the meal.
Tips for Success
To make sure your Nutter Butter Pie turns out perfectly every time, here are some helpful tips I’ve learned along the way:
- Softening cream cheese: Leave it out at room temperature for about 30 minutes before mixing. This makes it easier to blend and prevents lumps.
- Crushing cookies: Use a food processor for a fine, even crumb, or a rolling pin if you prefer a more rustic texture. Just don’t crush the reserved crumbs for garnish too finely.
- Folding whipped topping: Be gentle when folding to keep the filling light and fluffy instead of dense.
- Pressing crust: Don’t skip firmly pressing the crust; it helps keep it from crumbling when you slice the pie.
- Chill time: Patience is key! The longer the pie chills, the better it sets and the more the flavors marry.
- Prep ahead: This pie is a fantastic make-ahead dessert. You can prepare it the night before and have it ready to impress guests the next day.
If you’re looking for more easy, no-bake desserts to add to your repertoire, be sure to check out the recipe collection for inspiration that’s just as simple and satisfying.
How to Store Nutter Butter Pie
Storing your Nutter Butter Pie properly will keep it fresh and delicious for days. Because it’s a no-bake, refrigerated dessert, it’s best kept in the fridge:
- Cover the pie tightly with plastic wrap or keep it in an airtight container to prevent it from absorbing any fridge odors.
- The pie will stay fresh for up to 4-5 days refrigerated, making it a great option for entertaining over several days.
- If you want to prepare it further in advance, the pie can be frozen for up to 1 month. Just thaw it overnight in the fridge before serving to maintain that creamy texture.
When you’re ready to serve leftovers, let the pie sit at room temperature for 10-15 minutes to soften slightly for the best eating experience.
FAQs
Can I use peanut butter powder instead of creamy peanut butter?
Yes! You can substitute peanut butter powder mixed with a bit of water or milk to rehydrate it. It may change the texture slightly, but the flavor will still shine.
Is it possible to make this pie vegan?
Absolutely. Use a dairy-free cream cheese alternative, coconut whipped topping, and vegan butter substitutes for the crust. Just double-check that your cookies are vegan-friendly or choose a suitable cookie crust alternative.
Can I make individual servings instead of one large pie?
Definitely! This filling works great in small jars or mini tart shells for portable, single-serving treats. Just adjust the crust and filling amounts accordingly.
How can I prevent the crust from getting soggy?
Press the crust firmly and chill it well before adding the filling. You can also try brushing the crust with a thin layer of melted chocolate to create a moisture barrier.
With its rich peanut butter flavor, creamy texture, and crunchy cookie crust, this Nutter Butter Pie is a surefire way to impress friends and family without spending hours in the kitchen. It pairs wonderfully with other crowd-pleasers and easy weeknight treats, so don’t hesitate to explore more recipes like the easy no-bake peanut butter pie or the decadent Nutella stuffed cookie pie for your next dessert adventure.
Thanks for stopping by the kitchen today! If you make this pie, I’d love to hear how it turns out for you. Happy baking (or should I say, no-baking)!
Don’t forget to follow me on Pinterest for more delicious recipes and kitchen inspiration!

Deliciously Creamy Nutter Butter Pie
Ingredients
Equipment
Method
- Step 1: Crush the entire 16-ounce package of Nutter Butter cookies using a rolling pin or food processor. Reserve about 1/4 cup of the crumbs for garnish.
- Step 2: Mix melted butter into the remaining crushed cookies until evenly coated. Press the mixture firmly into the bottom and up the sides of a 9-inch pie pan to form the crust. Set aside.
- Step 3: In a large mixing bowl, beat softened cream cheese, 1 cup peanut butter, and granulated sugar with a mixer on medium speed until smooth and fluffy, about 3–5 minutes.
- Step 4: Gently fold in the thawed whipped topping or whipped cream using a spatula, keeping the mixture light and airy.
- Step 5: Spread the peanut butter filling evenly over the prepared crust and smooth the top with a spatula.
- Step 6: Warm the reserved 1/4 cup peanut butter in the microwave in 15-second intervals until pourable but not hot. Drizzle it decoratively over the pie.
- Step 7: Sprinkle reserved cookie crumbs around the edges. Optionally, pipe or dollop whipped cream swirls on top for garnish.
- Step 8: Refrigerate the pie for at least 6 hours or overnight to allow it to set properly before slicing and serving.