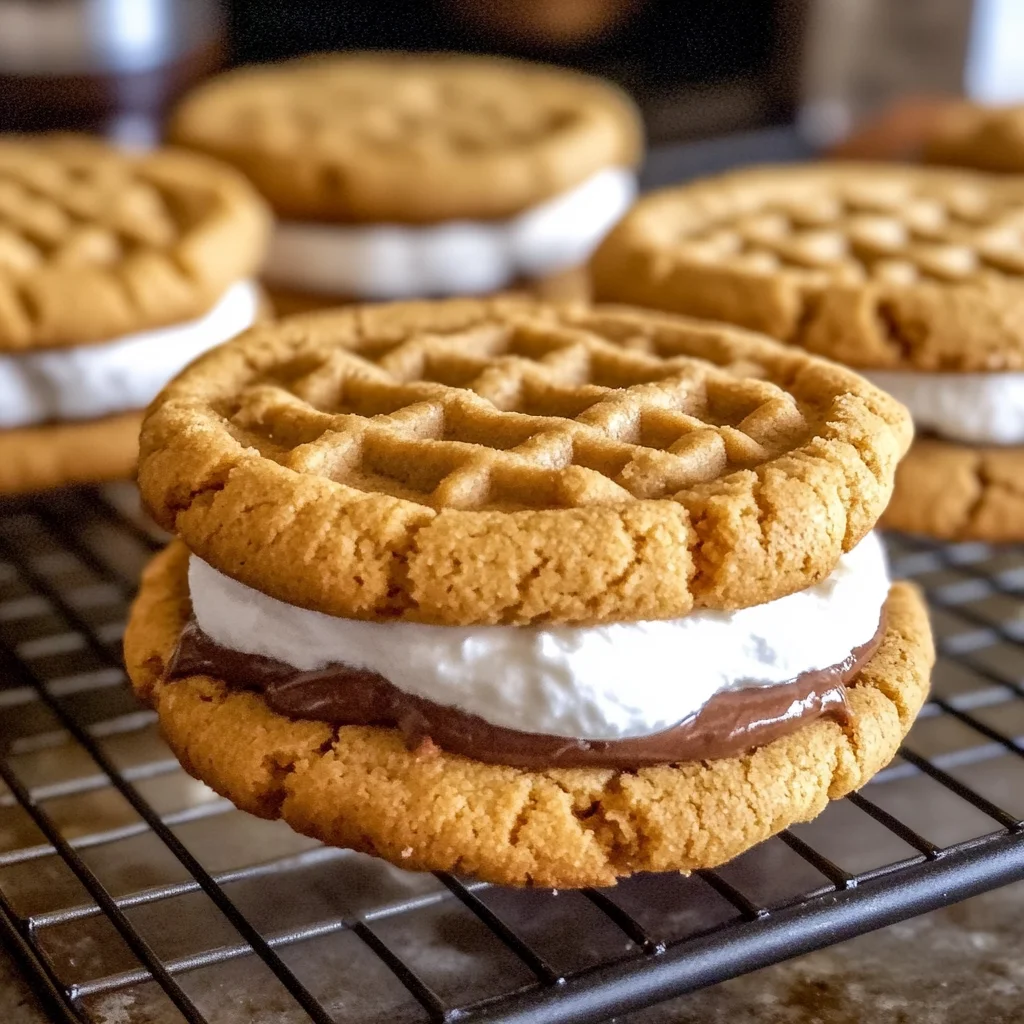
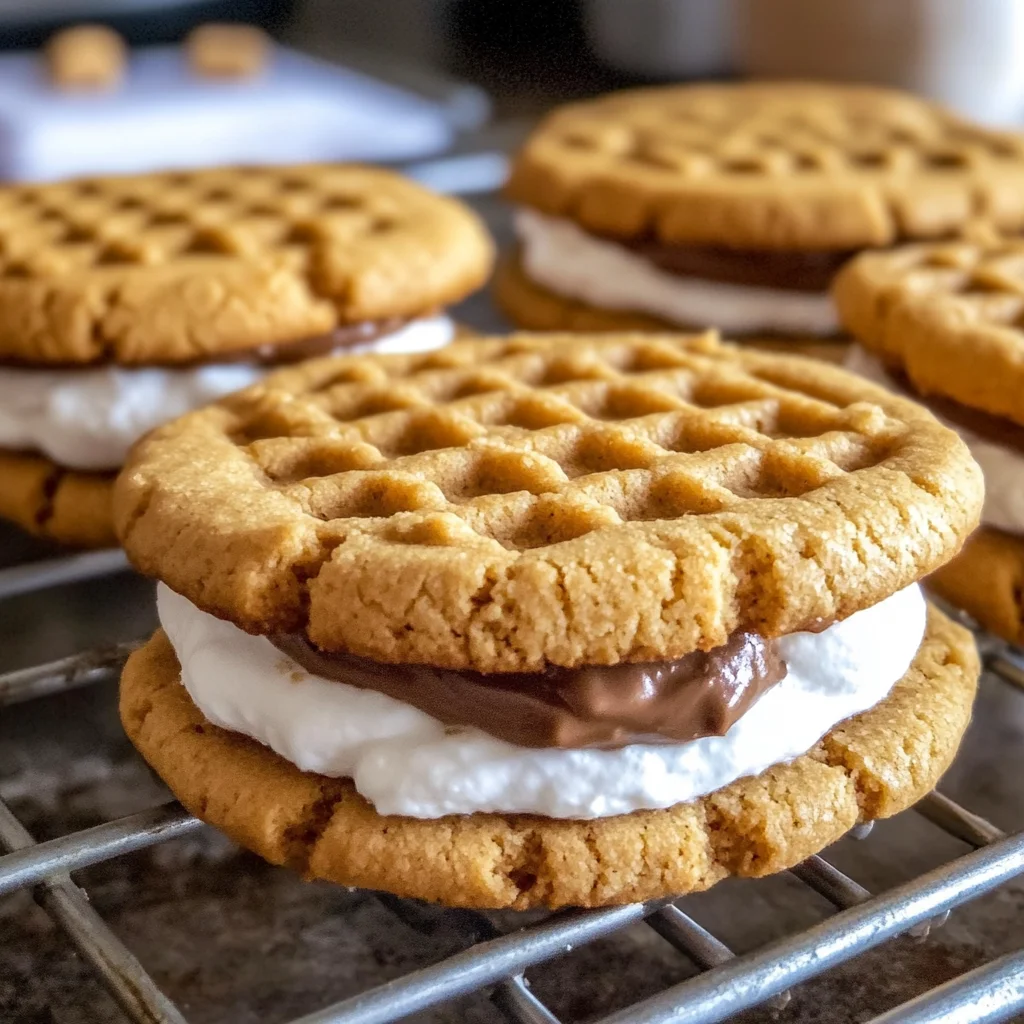
Okay, close your eyes for a second. Can you smell it? That warm, slightly toasted marshmallow? The rich chocolate melting just so? The snap of a graham cracker? Ahhh, the magic of s’mores! Now, imagine taking all that goodness and stuffing it between two soft, chewy, classic peanut butter cookies. Yep, you heard me right. We’re making Peanut Butter S’mores Sandwich Cookies today, and let me tell you, they are pure happiness in cookie form.
This recipe brings together two absolute legends in the dessert world: the humble, perfect peanut butter cookie and the iconic, campfire s’more. The result? A cookie that’s incredibly easy to make, surprisingly quick to assemble (especially once you’ve baked the cookies!), and utterly unforgettable. Seriously, these disappear faster than you can say “pass the marshmallows.” They’re perfect for parties, lunchboxes, or just a Tuesday afternoon treat because, well, why not?
Why You’ll Love This Recipe
These aren’t just cookies; they’re an experience! Here’s why I keep coming back to this recipe:
- Fast: The cookie dough comes together in minutes, and the assembly is surprisingly quick.
- Easy: You don’t need any fancy skills or equipment. If you can stir and watch a broiler for 10 seconds, you got this!
- Giftable: Wrap a few of these up, and you’ve got the perfect homemade gift that everyone will adore.
- Crowd-pleasing: I have never met anyone who didn’t immediately fall in love with these. They’re a guaranteed hit!
Ingredients
Let’s gather our goodies! Most of these are probably already hanging out in your pantry.
- Creamy Peanut Butter (1 cup): Use your favorite creamy variety. I find that natural peanut butter that separates can sometimes make the cookies spread more, so a no-stir option is often easiest here.
- Granulated Sugar (½ cup) & Light Brown Sugar, packed (½ cup): The mix gives you that perfect balance of sweetness and moisture for a soft, chewy cookie. Make sure to pack that brown sugar!
- Large Egg (1): Our binder! Helps hold everything together.
- Vanilla Extract (1 tsp): Adds that lovely depth of flavor to the cookies. Don’t skip it!
- Baking Soda (½ tsp): Our leavening agent, helps the cookies rise and get that nice texture.
- Salt (¼ tsp): Just a pinch to balance the sweetness and enhance all those delicious flavors.
- Milk Chocolate Chips (1 cup): Milk chocolate is classic for s’mores, but you could definitely use semi-sweet if you prefer.
- Mini Marshmallows (1 cup): Mini marshmallows are perfect for sandwich cookies – they melt and toast just right without being too bulky.
- Optional: Graham Crackers, crushed (2-3): Crushing a few graham crackers adds that authentic s’mores crunch around the edges. Totally optional, but highly recommended for the full effect!
How to Make It
Alright, let’s get baking! Follow these steps, and you’ll have amazing sandwich cookies in no time.
Step 1: First things first, preheat that oven to 350°F (175°C). While it’s warming up, line a baking sheet with parchment paper. This makes cleanup a breeze and prevents sticking.
Step 2: Grab a medium-sized bowl. Toss in your creamy peanut butter, both granulated and light brown sugars, the egg, vanilla extract, baking soda, and salt. Now, get in there and mix it all up! You can use a spoon, a whisk, or an electric mixer if you like, but make sure it’s all combined until it’s super smooth and looks like perfect cookie dough.
Step 3: Time to make the cookies! Scoop out about 1 tablespoon of dough for each cookie. Roll it gently into a ball between your palms. Place these little balls of deliciousness onto your prepared baking sheet, making sure they have about 2 inches of space between them so they don’t spread into each other.
Step 4: Now for the signature peanut butter cookie look! Grab a fork and gently press down on each dough ball, then press again in the opposite direction to create that classic crisscross pattern. This also helps them bake evenly.
Step 5: Pop that baking sheet into your preheated oven. Bake for about 8 to 10 minutes. You’re looking for the edges to be lightly golden brown. The centers might still look a little soft, and that’s okay! They’ll firm up as they cool.
Step 6: This is important: once they’re out of the oven, leave the cookies right on the baking sheet to cool completely. Trying to move them too soon will cause them to break apart. Patience is a virtue here!
Step 7: While the cookies are cooling, it’s chocolate time! Get your milk chocolate chips ready. You can melt them gently in the microwave (use 30-second bursts, stirring well after each, until smooth) or use a double boiler on the stove. Either way, melt until smooth and glossy.
Step 8: Once the cookies are totally cool, grab half of them. Turn them over so the flat bottom side is facing up. Spread about ½ teaspoon of that yummy melted chocolate onto the center of each of these flat cookie bottoms.
Step 9: Now for the s’mores magic! Sprinkle a generous amount of mini marshmallows evenly over the melted chocolate on each cookie half. Pile them on! I like to cover the chocolate completely.
Step 10: This is where you need to pay close attention! Move your oven rack up to the top position and turn on your broiler. Place the baking sheet with the marshmallow-topped cookies under the broiler. Watch them constantly. This step takes mere seconds, usually 10 to 20 seconds. You’re just looking for those marshmallows to get lightly golden and toasted, like they would over a campfire. They can go from perfect to burnt in an instant, so literally stand there and watch!
Step 11: Immediately after removing them from the broiler (while the marshmallows are still soft and gooey), take the other half of your cooled cookies. Gently press one clean cookie onto each marshmallow-topped cookie, creating a sandwich. The warm marshmallow will help them stick together.
Step 12 (Optional): If you want that extra s’mores flavor and texture, quickly roll the edges of the assembled sandwich cookies in crushed graham crackers while the marshmallow filling is still slightly sticky. It really takes them to the next level!
Step 13: Let the cookies cool completely on the baking sheet again before serving. This allows the chocolate to set a bit and the cookies to firm up completely. It’s hard, I know, but worth it!
Substitutions & Additions
Want to play around with this recipe? Here are a few ideas:
- Chocolate Swap: Not a milk chocolate fan? Use semi-sweet or even dark chocolate chips for a richer filling.
- Nut Butter: While I love peanut butter here, you could potentially try almond butter or sunflower seed butter for a twist or if you need a peanut-free option (just ensure the rest of your ingredients are safe!).
- Cookie Base: Don’t have time to bake? You could theoretically use store-bought peanut butter cookies, but baking them fresh is always best for texture.
- Add Chocolate Drizzle: After they’re assembled and cooled, you could melt a little extra chocolate and drizzle it over the tops for extra prettiness and chocolatey goodness.
- Different Toppings: Instead of graham crackers, try rolling the edges in mini chocolate chips or chopped peanuts.
Tips for Success
Here are a few little nuggets of wisdom I’ve picked up making these:
- Don’t Overmix: Once the dough comes together, stop mixing. Overmixing can lead to tougher cookies.
- Measure Accurately: Especially the flour and leavening agents. Using the “spoon and level” method for dry ingredients is best (spoon the flour into the measuring cup, then level it off with a straight edge).
- Watch the Broiler Like a Hawk: I cannot stress this enough! Marshmallows under a broiler can go from perfect to charcoal in the blink of an eye. Stay right there and watch them intently.
- Cool Completely: Letting the peanut butter cookies cool fully before adding the filling is crucial. Warm cookies will break or melt the chocolate too much before you’re ready.
- Prep Ahead: You can bake the peanut butter cookies a day or two in advance and store them in an airtight container. Then, just do the filling and assembly when you’re ready to serve.
How to Store It
These cookies are best enjoyed fresh, especially when the marshmallow is still a little soft right after cooling. However, you can store them in an airtight container at room temperature for 2-3 days. The marshmallow and chocolate filling will firm up, but they’ll still be delicious. I don’t typically refrigerate them, as it can change the texture of the cookie.
FAQs
Got questions? I’ve got (brief) answers!
Q: Can I use crunchy peanut butter?
A: Creamy is recommended for the cookie texture, but crunchy would work if you don’t mind little peanut chunks in your cookie base!
Q: Can I skip the broiling step?
A: You could, but you won’t get that classic toasted marshmallow flavor and gooey texture. You could just melt the chocolate, add marshmallows, and sandwich, but they won’t stick as well and the marshmallows won’t be toasted.
Q: How long do the marshmallows stay soft?
A: They are softest right after broiling and assembly. They will firm up as they cool and set, but they’ll still be pleasantly chewy inside the cookie.
Q: Can I freeze these?
A: You can freeze the baked peanut butter cookies before filling. I don’t recommend freezing the assembled s’mores cookies, as the marshmallow texture can become strange upon thawing.
There you have it! Your new favorite cookie mashup. Give these Peanut Butter S’mores Sandwich Cookies a try and prepare to fall in love. Happy baking, my friend!

Peanut Butter S'mores Sandwich Cookies
Ingredients
Equipment
Method
- Step 1: Preheat oven to 350°F (175°C). Line a baking sheet with parchment paper.
- Step 2: In a medium-sized bowl, mix creamy peanut butter, granulated sugar, light brown sugar, egg, vanilla extract, baking soda, and salt until smooth and well combined.
- Step 3: Scoop 1 tablespoon of dough, roll into a ball, and place on the prepared baking sheet 2 inches apart.
- Step 4: Gently press a fork onto each dough ball, then press again in the opposite direction to create a crisscross pattern.
- Step 5: Bake for 8 to 10 minutes, or until edges are lightly golden brown. Centers may still look soft.
- Step 6: Leave cookies on the baking sheet to cool completely.
- Step 7: Melt milk chocolate chips in the microwave (30-second bursts, stirring) or using a double boiler until smooth.
- Step 8: Once cookies are cool, turn half of them flat side up. Spread about ½ teaspoon of melted chocolate onto the center of each.
- Step 9: Sprinkle a generous amount of mini marshmallows evenly over the melted chocolate on each cookie half.
- Step 10: Move oven rack to the top position and turn on the broiler. Place the baking sheet with marshmallow-topped cookies under the broiler. Watch constantly (10 to 20 seconds) until marshmallows are lightly golden and toasted. Immediately remove.
- Step 11: Immediately take the other half of the cooled cookies and gently press one onto each marshmallow-topped cookie to create a sandwich.
- Step 12: (Optional) Quickly roll the edges of the assembled sandwich cookies in crushed graham crackers while the marshmallow filling is still slightly sticky.
- Step 13: Let the cookies cool completely on the baking sheet before serving to allow chocolate to set and cookies to firm up.