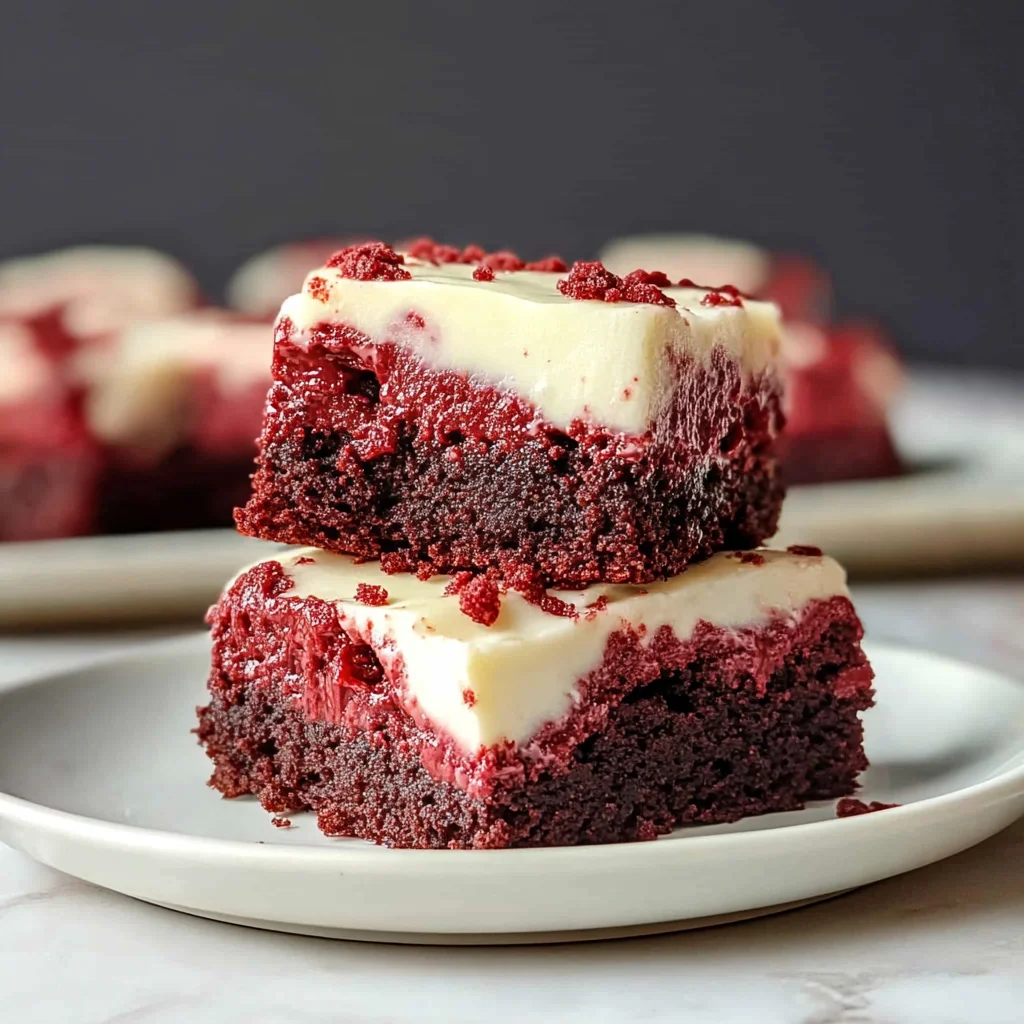
There’s something truly magical about red velvet — that rich, deep red color paired with a subtle hint of cocoa, wrapped up in a silky cream cheese frosting. It always brings back memories of cozy family gatherings, holiday celebrations, or that special dessert someone brought that everyone fought over. If you’re anything like me, you probably grew up loving red velvet cake but sometimes wished it was a bit more portable and a little fudgier. That’s exactly why I adore these Red Velvet Brownies. They combine the best of both worlds: the intense, moist texture of a brownie with the classic red velvet flavor and a luscious cream cheese frosting on top.
What’s even better? They’re pretty quick to whip up and so easy that even if you’re new to baking, you’ll breeze through this recipe. Plus, these brownies make a memorable gift or party treat that’s sure to wow friends, family, and coworkers alike. Trust me, once you try this recipe, you’ll want to bake a batch every chance you get!
Why You’ll Love Red Velvet Brownies
- Fast: You can have these brownies ready in under an hour from start to finish, including baking and frosting.
- Easy: No complicated steps or fancy equipment needed — just simple ingredients and a little mixing.
- Giftable: Their vibrant red color and creamy frosting make them perfect for birthdays, holidays, or just a sweet surprise.
- Crowd-pleasing: Whether you’re serving a crowd or a cozy night in, these brownies always disappear fast.
Ingredients
Before you start, let’s take a look at what you’ll need. The ingredients are straightforward, but each one plays an important role in getting that perfect red velvet brownie texture and flavor.
- Butter (3/4 cup, melted): This adds richness and moisture. You can use regular or dairy-free butter depending on your preference.
- Light brown sugar (3/4 cup): Adds a mild molasses flavor and helps keep the brownies moist.
- Granulated sugar (1 cup): Sweetens the brownies and helps with that lovely texture.
- Eggs (2): These bind everything together and add structure.
- Vanilla extract (1 tbsp): Enhances the overall flavor with a warm, sweet aroma.
- Liquid red food coloring (1/2 tsp): This gives the classic red velvet color. You can adjust slightly if you want a deeper red.
- White vinegar (1 1/2 tsp): This reacts with the cocoa powder and adds the signature tangy undertone.
- Cocoa powder (1/4 cup): Just a bit to provide that subtle chocolate flavor without overpowering the red velvet taste.
- Salt (1/4 tsp): Balances the sweetness and enhances flavor.
- All-purpose flour (1 cup + 3 tbsp): Provides structure to the brownies without making them too dense.
For the frosting, you’ll need:
- Cream cheese (4 oz, room temperature): The star of the frosting — smooth, tangy, and creamy.
- Butter (1/4 cup, softened): Adds richness and helps with texture.
- Vanilla extract (1/2 tsp): For that subtle sweet flavor that ties it all together.
- Pinch of salt: Enhances the cream cheese sweetness.
- Powdered sugar (1 1/2 to 2 cups): Sweetens and thickens the frosting to the perfect spreadable consistency.
- Cornstarch (2 tbsp, optional): Helps thicken the frosting if you’re using dairy-free cream cheese.
How to Make Red Velvet Brownies
Ready to get started? Follow along step-by-step, and soon you’ll smell that incredible aroma filling your kitchen!
- Preheat your oven to 350°F (175°C). Line an 8×8-inch square baking pan with parchment paper, leaving a little overhang on the sides. This makes it super easy to lift the brownies out when they’re done.
- Melt the butter. Pour it into a medium mixing bowl. Add the light brown sugar and granulated sugar. Whisk everything together until the mixture forms a smooth paste that pulls cleanly from the side of the bowl. This step helps create a nice, fudgy texture.
- Add the eggs, vinegar, vanilla extract, and red food coloring. Mix gently but thoroughly until everything is combined into a beautiful red batter.
- Sift together the cocoa powder, salt, and flour. This prevents lumps and ensures an even texture. Add the dry ingredients to the wet mixture and whisk gently until just combined. Don’t overmix here — you want to keep the batter tender.
- Pour the batter into your prepared pan. Use a spatula to scrape every last bit from the bowl so none of that deliciousness goes to waste.
- Bake for 30–40 minutes. Start checking at 30 minutes by inserting a toothpick into the center. You want it to come out with a few moist crumbs but no wet batter. The top should look slightly crinkly — that’s a good sign!
- While the brownies cool completely, prepare the cream cheese frosting. In a medium bowl or stand mixer, beat the cream cheese, softened butter, vanilla extract, and a pinch of salt until smooth and creamy.
- Add the powdered sugar gradually. Beat until you reach your desired frosting consistency. If you’re using dairy-free cream cheese, stir in the cornstarch to help thicken the frosting.
- Refrigerate the frosting until you’re ready to frost. This helps it firm up and makes spreading easier.
- Once the brownies have cooled completely, spread the cream cheese frosting evenly on top. If you want, you can keep the frosted brownies refrigerated or store the frosting separately and frost just before serving.
And voilà! You now have a pan of stunning, fudgy red velvet brownies that look as amazing as they taste.
Substitutions & Additions
One of the things I love most about this recipe is how versatile it is. If you want to switch things up or accommodate dietary needs, here are some ideas:
- Dairy-free options: Use dairy-free butter and cream cheese to make these brownies suitable for lactose-intolerant or vegan friends. Just be sure to add cornstarch to the frosting as noted.
- Chocolate chips or chunks: Stir in a handful of white or dark chocolate chips for extra melty pockets of chocolate throughout your brownies.
- Nutty twist: Add chopped pecans or walnuts to the batter for a nice crunch that pairs beautifully with the creamy frosting.
- Swirled cheesecake effect: Before baking, dollop some extra cream cheese mixture on top of the batter and swirl with a knife for a marbled look and extra creamy bites.
- Flavor boost: Add a teaspoon of espresso powder to the dry ingredients to deepen the chocolate flavor without adding a coffee taste.
- Natural food coloring: If you prefer to avoid artificial dyes, beet juice or powder works wonderfully as a natural red colorant.
If you want to explore more creative brownies, you might enjoy my No Bake Peanut Butter Brownie Cookies for an easy twist that’s equally indulgent but requires no oven time!
Tips for Success
Getting the perfect red velvet brownies can be as simple as following a few handy tips I’ve picked up over the years baking in my own kitchen:
- Don’t overmix the batter. Once you add the flour and cocoa powder, mix just until combined to keep the brownies tender and moist.
- Use room temperature eggs and cream cheese. This helps your batter and frosting come together smoothly without lumps.
- Check your brownies early. Ovens vary, so start checking at 30 minutes to avoid overbaking. The toothpick test should reveal moist crumbs, not wet batter.
- Line your pan with parchment paper. This makes it easy to lift out the brownies without breaking them, perfect if you want neat squares for gifting.
- Cool completely before frosting. If the brownies are still warm, the frosting will melt and slide off.
- For extra fun, try pairing these brownies with a scoop of vanilla ice cream or a drizzle of chocolate ganache. It makes a dessert that feels extra special and indulgent.
If you want to plan ahead, you can bake the brownies a day early and keep them wrapped tightly at room temperature. The cream cheese frosting is best made the same day or kept refrigerated and spread just before serving for the freshest taste.
How to Store Red Velvet Brownies
Once you’ve made your beautiful batch of red velvet brownies, you’ll want to keep them fresh and delicious. Here’s how to store them properly:
- Unfrosted brownies: Wrap well with plastic wrap or store in an airtight container at room temperature for up to 3 days.
- Frosted brownies: Because of the cream cheese frosting, it’s best to store these in the refrigerator. Place them in an airtight container or cover tightly with plastic wrap. They’ll keep well for up to 5 days.
- Freezing: You can freeze unfrosted brownies for up to 3 months. Wrap tightly with plastic wrap and then foil or a freezer bag. Thaw at room temperature before frosting.
- Frosting separately: To keep things simple, you can store the frosting in the fridge in a sealed container and frost brownies just before serving. This also keeps the frosting fresh and prevents it from drying out.
Storing your brownies correctly means you can enjoy that fresh-baked taste for days, perfect for busy weeks or unexpected guests.
FAQs
Can I use cocoa powder other than natural unsweetened?
For authentic red velvet flavor, it’s best to use natural unsweetened cocoa powder because it reacts with the vinegar to create the signature tangy taste. Dutch-processed cocoa is milder and may affect the flavor and color.
What if I don’t have red food coloring?
You can try natural alternatives like beet juice or beet powder for a red tint, but the color will be less vibrant. Otherwise, the brownies will still taste amazing, just with a less classic red velvet look.
Can I make these gluten-free?
Yes! Substitute the all-purpose flour with a gluten-free blend that measures cup-for-cup. Just be sure to check the blend contains xanthan gum or similar binding agents for best results.
Is there a way to make the frosting less sweet?
Absolutely! You can reduce the powdered sugar slightly or add a little more cream cheese and a pinch of salt to balance the sweetness. Taste as you go to find your perfect balance.
If you’re a fan of classic desserts with a twist, you might also love trying my Grandma’s Easy Blackberry White Chocolate Cheesecake — it’s another crowd-pleaser that’s surprisingly simple to make.
And if you’re looking to expand your baking repertoire beyond brownies, don’t miss the treasure trove of recipes at Crispy Kitchens’ recipe collection. You’ll find everything from sweet treats to savory delights!
With these red velvet brownies in your baking arsenal, you’re ready to impress at every gathering or simply treat yourself to a moment of indulgence. Happy baking!
For more delicious recipes and kitchen inspiration, be sure to follow Crispy Kitchens on Pinterest.

Deliciously Decadent Red Velvet Brownies
Ingredients
Equipment
Method
- Step 1: Preheat oven to 350°F (175°C). Line an 8×8-inch square baking pan with parchment paper, leaving an overhang on the sides.
- Step 2: Melt the butter and pour into a medium mixing bowl. Add light brown sugar and granulated sugar. Whisk until smooth and the mixture pulls cleanly from the bowl sides.
- Step 3: Add eggs, white vinegar, vanilla extract, and red food coloring. Mix gently but thoroughly until combined into a red batter.
- Step 4: Sift together cocoa powder, salt, and all-purpose flour. Add to wet mixture and whisk gently until just combined. Avoid overmixing.
- Step 5: Pour batter into prepared pan and smooth the top with a spatula.
- Step 6: Bake for 30–40 minutes. Check at 30 minutes with a toothpick; it should come out with moist crumbs but no wet batter. Look for a slightly crinkly top.
- Step 7: Let brownies cool completely in the pan before frosting.
- Step 8: Prepare frosting by beating cream cheese, softened butter, vanilla extract, and a pinch of salt until smooth and creamy.
- Step 9: Gradually add powdered sugar and beat until desired consistency is reached. Stir in cornstarch if using dairy-free cream cheese for thickening.
- Step 10: Refrigerate frosting until firm enough to spread easily.
- Step 11: Spread frosting evenly over cooled brownies. Refrigerate frosted brownies or store frosting separately and frost just before serving.