Remember those childhood birthday parties, where the cake was more than just a dessert – it was the star of the show, a sweet, unforgettable moment? Or maybe it’s those cozy evenings with friends, gathered around the kitchen island, sharing something truly special. Well, get ready to make new memories, because today, we’re diving into a recipe that’s all of that and more: the most incredible Red Velvet Oreo Cheesecake. It’s got that classic red velvet charm, swirled with creamy cheesecake goodness, and finished with the irresistible crunch of Oreos. And trust me, it’s not nearly as complicated as it looks. In fact, it’s surprisingly easy to whip up, making it perfect for impressing without the stress. Get ready for a dessert that tastes like a dream and is so memorable, your friends will be asking for the recipe for years to come!
Why You’ll Love Red Velvet Oreo Cheesecake
- Fast (to assemble the components!)
- Easy
- Giftable
- Crowd-pleasing
Ingredients
- For the Oreo Crust:
- 2 ½ cups Oreo cookie crumbs: That’s about 25–30 regular Oreos. You can buy them pre-crushed, or just toss them in a food processor or a Ziploc bag and crush with a rolling pin for some kitchen therapy!
- 5 tbsp unsalted butter, melted: This binds the crust together perfectly. Unsalted is key so you control the saltiness.
- For the Red Velvet Cheesecake Layer:
- 16 oz (2 blocks) cream cheese, softened: Make sure it’s really soft, like room temperature for at least an hour. This prevents lumps!
- ¾ cup granulated sugar: Just the right amount of sweetness for that classic cheesecake tang.
- ¼ cup sour cream: Adds a lovely richness and creamy texture, plus a touch of tartness that balances the sweetness.
- 2 large eggs: These are your binders, giving the cheesecake its structure.
- 1 ½ tbsp cocoa powder: For that signature subtle chocolatey red velvet flavor. Don’t skip it!
- 1 ½ tsp vanilla extract: Pure vanilla is always best for a deep flavor.
- 1 tbsp red food coloring: The star for that vibrant red hue! Gel food coloring gives the best results.
- For the Vanilla Cheesecake Layer:
- 16 oz (2 blocks) cream cheese, softened: Again, softened is crucial for a smooth batter.
- ¾ cup granulated sugar: Sweetness balance.
- ¼ cup sour cream: For creamy texture and tang.
- 2 large eggs: Structure.
- 1 ½ tsp vanilla extract: The star flavor for this layer!
- For the Chocolate Ganache Topping:
- ½ cup heavy cream: This creates the silky smooth ganache.
- ¾ cup semi-sweet chocolate chips: A good quality brand will make a difference here.
- For Garnish (Optional):
- Whipped cream: Store-bought or homemade, it’s the perfect fluffy cloud.
- Oreo cookie crumbs: A sprinkle adds extra texture and flavor.
- Whole Oreos: For a dramatic and delicious finishing touch!
How to Make Red Velvet Oreo Cheesecake
Get ready to create some magic! Here’s how we’ll bring this showstopping cheesecake to life, step by delicious step.
1. Make the Oreo Crust:
First things first, preheat your oven to 325°F (163°C). Grab your 9-inch springform pan – it’s a cheesecake’s best friend! Lightly grease it and then line the bottom with a circle of parchment paper. This simple step makes removal a breeze, trust me. In a medium bowl, combine those delicious Oreo cookie crumbs with the melted butter. Stir them until every crumb is coated and it looks like wet sand. Now, press this mixture firmly into the bottom of your prepared pan. Really pack it down to create a sturdy base. Pop it into the preheated oven for 8-10 minutes. Once baked, set it aside to cool completely while you work on the filling. A cool crust is happy crust!
2. Prepare the Red Velvet Layer:
Now for the star of the show! In a large bowl, take your softened cream cheese and granulated sugar and beat them together with an electric mixer until they’re beautifully smooth and creamy. No lumps allowed! Next, gently beat in the sour cream, eggs, cocoa powder, vanilla extract, and that gorgeous red food coloring. Mix just until everything is combined and the color is even – overmixing cheesecake can introduce too much air, which we want to avoid for that dense, smooth texture. Carefully pour this vibrant red batter over your cooled Oreo crust, spreading it into an even layer with a spatula.
3. Prepare the Vanilla Layer:
In a separate clean bowl, we’ll make the classic vanilla layer. Beat the remaining softened cream cheese and granulated sugar until it’s silky smooth. Then, beat in the sour cream, eggs, and vanilla extract until they are fully incorporated. This layer adds a beautiful contrast in both color and flavor. If you’re looking for more delightful no-bake options, you might also love our easy No-Bake Oreo Cheesecake which is just as simple and delicious! Now, here’s where you need a gentle hand: carefully pour this vanilla batter over the red velvet layer. Use a spatula to gently spread it out, ensuring it forms a smooth, even top. You don’t want the layers to completely mix, just settle nicely on top of each other.
4. Bake the Cheesecake:
It’s baking time! Place your springform pan on a baking sheet – this is just a little insurance policy against any drips, though a properly sealed springform pan shouldn’t leak. Bake for 50-60 minutes. You’ll know your cheesecake is ready when the edges are set and slightly puffed, but the very center still has a slight, lovely jiggle when you gently shake the pan. Don’t overbake, or it might crack! Once it’s done, turn off the oven, prop the door open a few inches, and let the cheesecake cool inside the oven for 1 hour. This slow cooling prevents drastic temperature changes that can lead to cracks. After its oven cool-down, transfer it to the refrigerator and chill for at least 6 hours, or ideally, overnight. Patience is key for a perfectly set cheesecake!
5. Make the Chocolate Ganache:
While your cheesecake chills, you can prepare the luscious chocolate ganache topping. In a small saucepan, heat the heavy cream until it’s hot and steamy, but don’t let it boil. Place your semi-sweet chocolate chips in a heatproof bowl. Pour that hot cream right over the chocolate chips and let it sit undisturbed for 2 minutes. This allows the chocolate to melt beautifully. Then, gently stir until the ganache is wonderfully smooth and glossy. Let it cool slightly – you want it pourable but not piping hot – before pouring it evenly over your perfectly chilled cheesecake. Spread it out with a spatula to cover the top.
6. Garnish and Serve:
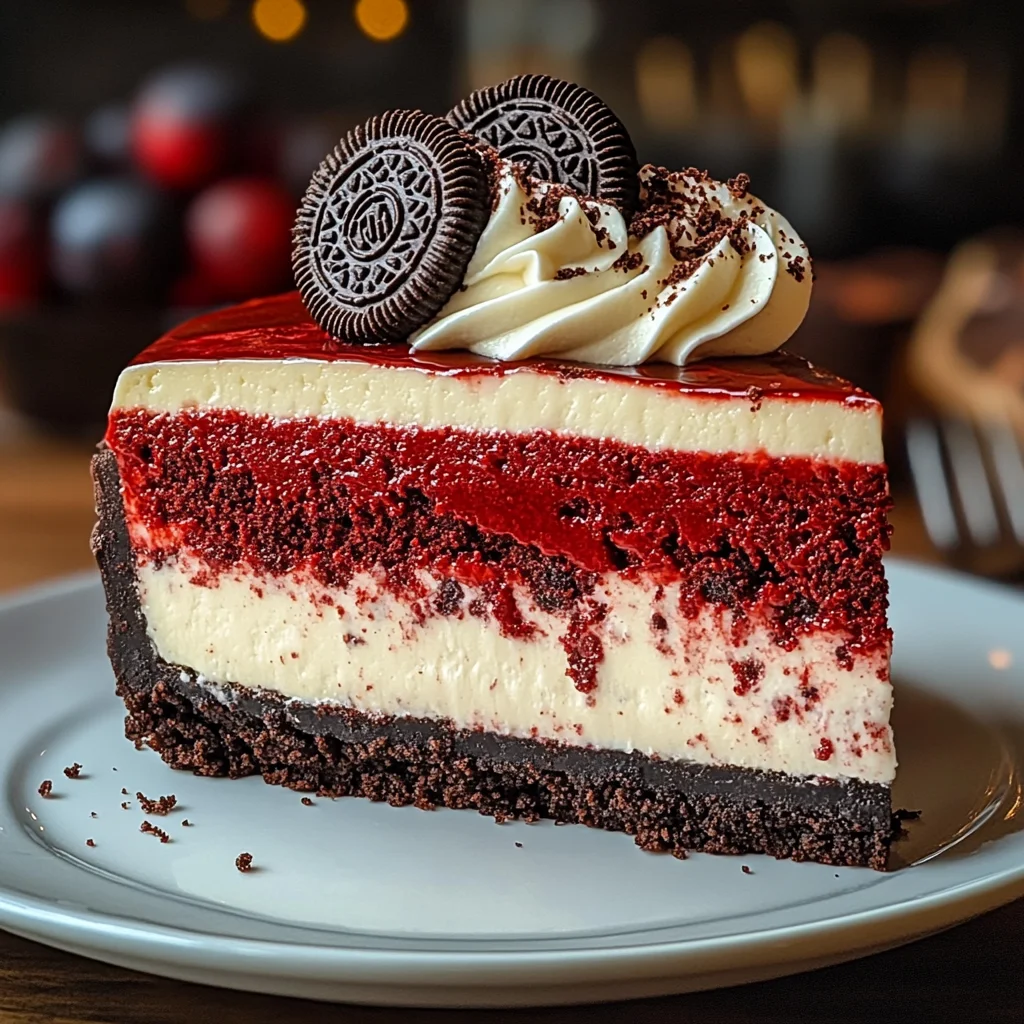
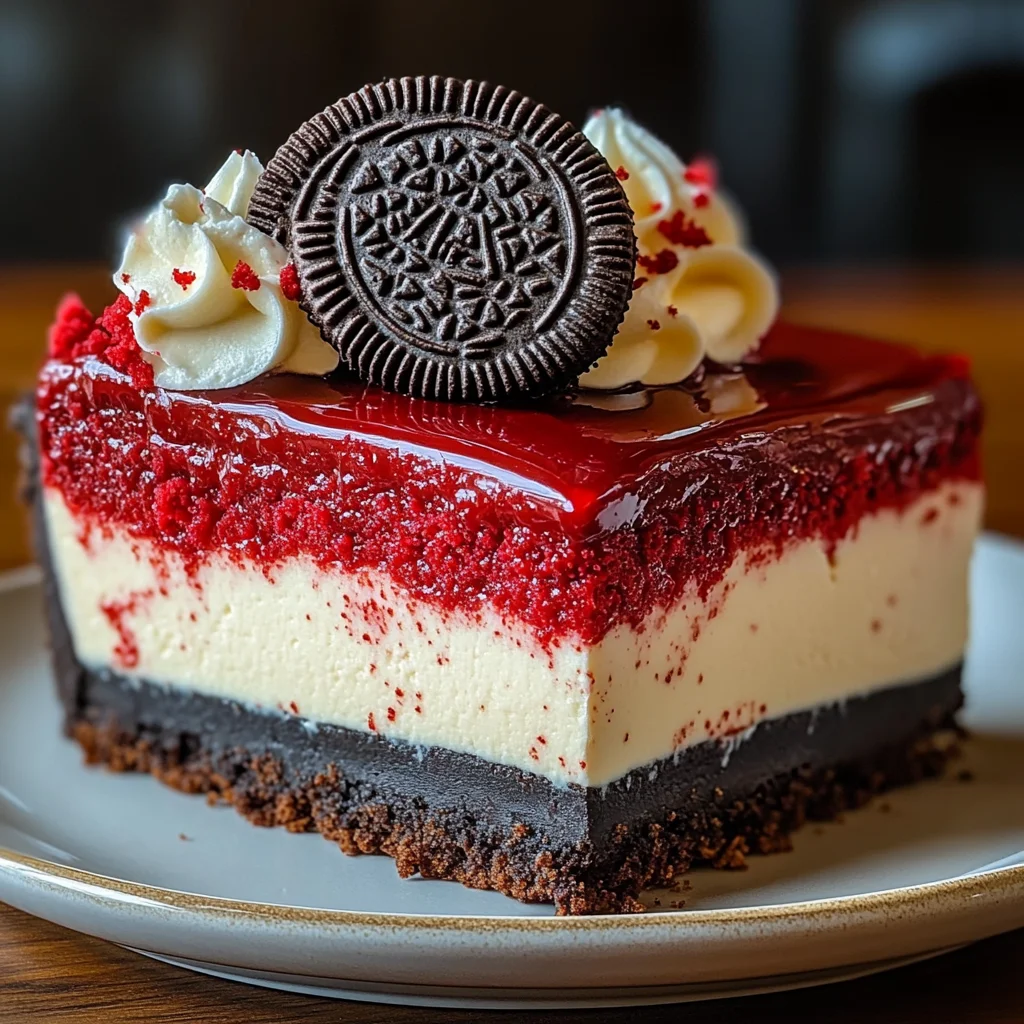
Now for the fun part: making it pretty! Garnish your masterpiece by piping some whipped cream around the edges. I love using a star tip for a professional look, but a simple dollop works too! Sprinkle with extra Oreo crumbs and place a few whole Oreos on top for that undeniable “Oreo” flair. Slice your gorgeous cheesecake with a sharp, warm knife (run it under hot water and wipe dry between slices for clean cuts) and serve chilled. Get ready for applause!
Substitutions & Additions
- Different Cookies: Not an Oreo fan? (Gasp!) You can swap the Oreos for Graham Crackers, Nilla Wafers, or even chocolate wafer cookies for the crust.
- White Chocolate Drizzle: Instead of or in addition to ganache, melt some white chocolate and drizzle it over the top for an extra layer of decadence and visual appeal.
- Cream Cheese Frosting: If ganache isn’t your jam, a classic cream cheese frosting (like the kind you’d find on a classic carrot cake) would be absolutely divine on this red velvet treat.
- Mint Oreos: For a holiday twist or just a refreshing change, use Mint Oreos in the crust and for garnish!
- Espresso Powder: A tiny pinch (¼ teaspoon) of espresso powder in the red velvet layer can deepen the chocolate flavor without making it taste like coffee.
Tips for Success
- Room Temperature Ingredients are Key: This is probably the most important tip! Make sure your cream cheese, eggs, and sour cream are at true room temperature. This ensures a smooth, lump-free batter and helps prevent cracks.
- Don’t Overmix: Mix ingredients just until combined, especially after adding eggs. Overmixing incorporates too much air, which can cause the cheesecake to puff up too much during baking and then crack as it cools.
- Gentle Pouring: When adding the vanilla layer over the red velvet, pour slowly and gently to keep the layers distinct. A spatula can help soften the fall.
- Slow Cooling: The oven cool-down method is a game-changer for preventing cracks. Resist the urge to pull it out too soon!
- Chill Thoroughly: I can’t stress this enough – a properly chilled cheesecake is a firm, delicious cheesecake. Give it ample time in the fridge. Overnight is always best.
- Prep Ahead: You can make the Oreo crust a day in advance and store it at room temperature. The entire cheesecake (without ganache or garnish) can be made 1-2 days ahead and stored in the fridge. Just add the ganache and garnishes before serving! This makes party day so much easier.
- For a fun twist: If you love experimenting with unique desserts, you might even enjoy trying our recipe for Red Velvet Cheesecake Sushi Rolls for a truly playful presentation!
How to Store Red Velvet Oreo Cheesecake
This cheesecake is best stored in the refrigerator. Cover it loosely with plastic wrap or aluminum foil. It will stay fresh and delicious for up to 4-5 days. While you can freeze cheesecake (wrap tightly in plastic wrap, then foil, and freeze for up to 1 month), I find the texture is best when enjoyed fresh from the fridge.
FAQs
Can I use low-fat cream cheese?
For the best texture and flavor, I highly recommend using full-fat cream cheese. Low-fat versions can make the cheesecake less creamy and more prone to cracking.
Why did my cheesecake crack?
Cracks usually happen due to sudden temperature changes. Make sure your ingredients are at room temperature, don’t overmix the batter, and allow the cheesecake to cool slowly in the oven before chilling. Overbaking can also cause cracks.
Can I make this in a different size pan?
You can! For a smaller 8-inch pan, you might want to slightly reduce the ingredients (maybe by 1/4) and adjust baking time. For individual cheesecakes in muffin tins, reduce the baking time significantly (around 20-25 minutes). Always watch for that gentle jiggle in the center.
Can I skip the red food coloring?
Absolutely! If you prefer a more natural look, you can omit the red food coloring. It will still be a delicious chocolatey vanilla cheesecake, just without the iconic red velvet hue.
For more mouth-watering recipes and dessert inspiration, be sure to follow us on Pinterest!

Decadent Red Velvet Oreo Cheesecake: Your New Favorite Showstopper Dessert!
Ingredients
Equipment
Method
- Step 1: Make the Oreo Crust. Preheat your oven to 325°F (163°C). Lightly grease a 9-inch springform pan and line the bottom with parchment paper. In a medium bowl, combine Oreo cookie crumbs with melted butter, stirring until every crumb is coated and looks like wet sand. Press this mixture firmly into the bottom of the prepared pan. Bake for 8-10 minutes. Set aside to cool completely.
- Step 2: Prepare the Red Velvet Layer. In a large bowl, beat softened cream cheese and granulated sugar with an electric mixer until smooth and creamy. Gently beat in sour cream, eggs, cocoa powder, vanilla extract, and red food coloring. Mix just until combined and the color is even, avoiding overmixing. Carefully pour this vibrant red batter over your cooled Oreo crust, spreading it into an even layer with a spatula.
- Step 3: Prepare the Vanilla Layer. In a separate clean bowl, beat the remaining softened cream cheese and granulated sugar until silky smooth. Beat in the sour cream, eggs, and vanilla extract until fully incorporated. Carefully pour this vanilla batter over the red velvet layer. Use a spatula to gently spread it out, ensuring it forms a smooth, even top without fully mixing the layers.
- Step 4: Bake the Cheesecake. Place your springform pan on a baking sheet. Bake for 50-60 minutes, or until the edges are set and slightly puffed, but the very center still has a slight jiggle. Turn off the oven, prop the door open a few inches, and let the cheesecake cool inside the oven for 1 hour. After oven cool-down, transfer to the refrigerator and chill for at least 6 hours, or ideally, overnight.
- Step 5: Make the Chocolate Ganache. In a small saucepan, heat the heavy cream until hot and steamy, but do not boil. Place semi-sweet chocolate chips in a heatproof bowl. Pour the hot cream over the chocolate chips and let it sit undisturbed for 2 minutes. Gently stir until the ganache is wonderfully smooth and glossy. Let it cool slightly until pourable, then pour evenly over your perfectly chilled cheesecake and spread with a spatula.
- Step 6: Garnish and Serve. Garnish your cheesecake by piping some whipped cream around the edges. Sprinkle with extra Oreo crumbs and place a few whole Oreos on top. Slice with a sharp, warm knife (run under hot water and wipe dry between slices for clean cuts) and serve chilled.