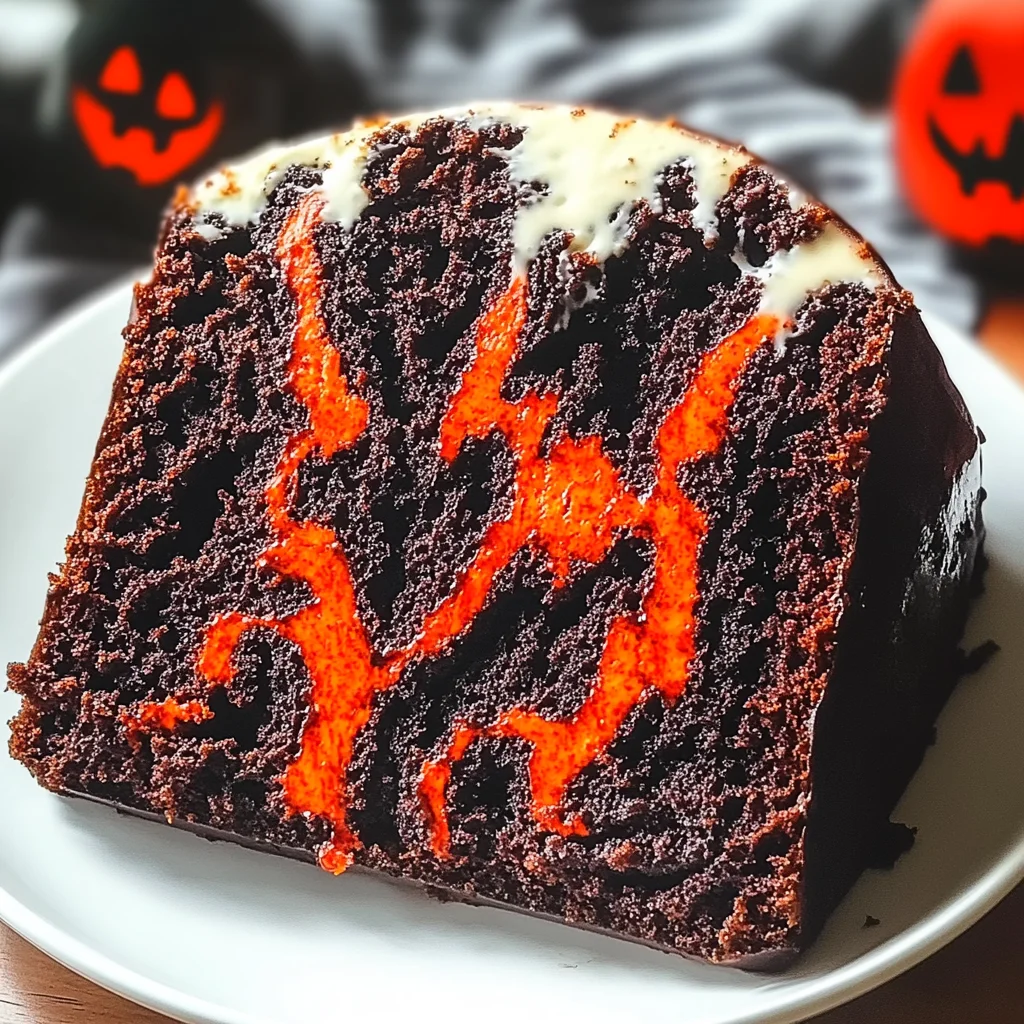
Oh, my sweet friends, there’s just something magical about Halloween, isn’t there? The crisp air, the rustling leaves, the adorable little ghouls and goblins knocking at your door… and of course, the TREATS! While store-bought candy is fun, I’ve always found the most joy in whipping up something special in my own kitchen. This year, I’m absolutely giddy to share a recipe that brings all the festive vibes without any of the fuss: our Spooky Halloween Marble Cake!
Imagine a cake that’s not just moist and delicious, but also a total showstopper with its vibrant orange and mysterious black swirls, perfectly capturing the spirit of the season. And guess what? It looks way more complicated than it actually is! You’re going to be amazed at how quickly you can create this masterpiece. It’s the kind of dessert that makes memories, sparks conversations, and quite frankly, disappears faster than a ghost in the night. If you’re looking for even more delightful recipes to explore, you can always check out our full collection of Crispy Kitchens recipes. So tie on your apron, because we’re about to conjure up some serious Halloween magic!
Why You’ll Love Spooky Halloween Marble Cake
- Fast: Don’t let the fancy look fool you! This cake comes together quicker than you think, leaving you more time for costume planning.
- Easy: No complicated techniques here, just simple steps to a stunning result. It’s perfect for bakers of all levels.
- Giftable: Wrap a slice (or a whole mini cake!) for a neighbor, teacher, or that special someone who loves a homemade treat.
- Crowd-pleasing: Kids and adults alike will gasp at the colors and then swoon over the delicious, tender crumb.
Ingredients
- 2 cups all-purpose flour: The backbone of our cake, giving it structure and a tender crumb.
- 1 ½ teaspoons baking powder: Our leavening agent, helping the cake rise beautifully.
- ½ teaspoon baking soda: Works with the buttermilk to create a light and airy texture.
- ½ teaspoon salt: A pinch to enhance all those lovely flavors. Don’t skip it!
- ½ cup unsalted butter, softened: Make sure it’s truly softened, almost spreadable, for that perfect creamy start.
- 1 ½ cups granulated sugar: For sweetness and a moist texture.
- 3 large eggs: Binds everything together and adds richness. Room temperature eggs blend best!
- 1 teaspoon vanilla extract: The classic flavor enhancer that makes everything taste like a hug.
- 1 cup buttermilk: Key for tenderness and helping the baking soda do its magic. If you don’t have buttermilk, I’ve got a tip for you later!
- ⅓ cup cocoa powder: For that rich chocolatey contrast in our black batter.
- Black food coloring: Gel food coloring works best for intense color without thinning the batter.
- Orange food coloring: Again, go for gel for maximum spooky vibrance!
- ½ cup semi-sweet chocolate chips (optional): A delightful surprise in every bite, if you’re feeling extra indulgent.
How to Make Spooky Halloween Marble Cake
Let’s get baking! This is where the magic happens, and I promise, it’s easier than it looks.
- First things first, preheat your oven to 350°F (175°C). Then, grab your favorite bundt pan or a 9-inch round cake pan. Give it a good grease and flour – this is crucial for an easy release! You don’t want your beautiful cake sticking.
- In a medium bowl, whisk together your dry ingredients: the flour, baking powder, baking soda, and salt. Just a quick whisk to make sure they’re all combined evenly, then set this aside for a moment.
- Now, in a large mixing bowl (or your stand mixer), it’s time to get creamy! Beat the softened butter and granulated sugar together until they’re light and fluffy. This usually takes about 2-3 minutes. Then, add those large eggs one at a time, beating well after each addition. Finish by stirring in that wonderful vanilla extract.
- Here’s where we bring it all together. You’ll alternately add the dry ingredients mixture and the buttermilk to your wet mixture. Start with a third of the dry, mix until just combined, then half the buttermilk, mix, then another third of the dry, the rest of the buttermilk, and finally the last of the dry ingredients. Mix until smooth, but be careful not to overmix!
- Time for the spooky colors! Divide your batter evenly into three separate bowls. Leave one bowl plain – this will be your lovely vanilla base. To the second bowl, add the cocoa powder and your black food coloring. Stir well until you have a deep, mysterious black batter. For the third bowl, add your orange food coloring and mix until it’s vibrant and ready for Halloween!
- Now for the fun part – creating that marble effect! Take alternating dollops of each colored batter and spoon them into your prepared pan. Don’t be shy, just drop them in! Once all the batter is in, gently swirl the colors together with a knife or a skewer. Don’t overdo it, or your colors will blend too much. Just a few graceful swirls are all you need.
- If you’re using them, sprinkle those semi-sweet chocolate chips evenly over the top of the batter. A little extra chocolate never hurt anyone, right?
- Pop your cake into the preheated oven and bake for 40–45 minutes. You’ll know it’s ready when a toothpick inserted into the center comes out clean.
- Once baked, let your gorgeous cake cool in the pan for about 15 minutes. This helps it firm up before you flip it. Then, carefully invert it onto a wire rack to cool completely. Resist the urge to slice it warm – trust me, it’s worth the wait for a perfectly set cake!
Substitutions & Additions
This cake is incredibly versatile! Feel free to play around and make it your own:
- Food Coloring Fun: Not feeling orange and black? Try purple and green for a witchy vibe, or even red and black for a vampy cake!
- Buttermilk Hack: No buttermilk on hand? No problem! You can easily make your own. Just add 1 tablespoon of white vinegar or lemon juice to a measuring cup, then fill the rest of the way to 1 cup with regular milk. Let it sit for 5-10 minutes until it slightly curdles. Voila! Instant buttermilk.
- Flavor Boosts: A tiny bit of orange zest or a splash of almond extract could really elevate the flavor profile.
- Frosting & Glaze: While delicious plain, this cake would be amazing with a simple vanilla glaze, a rich chocolate ganache, or even a creamy cream cheese frosting. For another wonderful treat, you might also enjoy making our Easy Pumpkin Cinnamon Rolls!
- Candy Inclusions: Stir in some Halloween sprinkles, chopped candy corn, or even mini M&M’s into the batter for extra bursts of color and texture.
Tips for Success
- Room Temperature Ingredients: This is a golden rule for baking! Softened butter and room temperature eggs and buttermilk combine much more smoothly, leading to a perfectly emulsified batter and a lighter, airier cake.
- Don’t Overmix: Once you add the dry ingredients, mix just until combined. Overmixing develops the gluten in the flour, which can lead to a tough, dry cake.
- Gel Food Coloring is Your Friend: Liquid food coloring can thin out your batter and give you pastel colors. Gel food coloring provides vibrant, rich hues without affecting the consistency.
- The Swirl Technique: For the best marble effect, use a light hand when swirling. Too much swirling will cause the colors to blend completely. A few gentle S-shaped motions with a knife or skewer are all you need.
- Pan Prep is Key: Don’t skimp on greasing and flouring your pan. For bundt cakes especially, this ensures your beautiful design comes out intact. You could also use baking spray with flour.
- Prep Ahead: You can mix the plain batter up to a day in advance and store it covered in the fridge. Just let it come to room temperature before dividing and coloring. However, I find making it all at once for the best color distribution.
How to Store Spooky Halloween Marble Cake
Once your Spooky Halloween Marble Cake has cooled completely, you’ll want to store it properly to keep it fresh and delicious.
- At Room Temperature: Store your cake in an airtight container at room temperature for up to 3-4 days. If it’s frosted, ensure the frosting can also be kept at room temperature (like a basic buttercream or glaze).
- In the Refrigerator: If your kitchen is particularly warm, or if you’ve used a frosting that requires refrigeration (like cream cheese frosting), you can store the cake in an airtight container in the fridge for up to a week. Just bring it to room temperature for about 30 minutes before serving for the best flavor and texture.
- Freezing: This cake freezes beautifully! Wrap individual slices or the whole cake (if unfrosted) tightly in plastic wrap, then a layer of aluminum foil. It can be frozen for up to 2-3 months. Thaw in the refrigerator overnight or at room temperature for a few hours.
FAQs
Here are a few common questions you might have about making this Spooky Halloween Marble Cake:
Q: Can I use a box cake mix for this recipe?
A: Absolutely! If you’re short on time, you can use a white or vanilla box cake mix. Prepare it according to package directions, then divide the batter and color it as instructed in step 5. This is a fantastic shortcut for a quick, festive treat, much like our other easy dessert Easy Chocolate Covered Strawberry Pie!
Q: What if I don’t have buttermilk?
A: No worries! You can easily make a homemade substitute. Just combine 1 cup of regular milk with 1 tablespoon of white vinegar or lemon juice. Let it sit for 5-10 minutes until it slightly curdles, then use it as directed.
Q: Can I make this as cupcakes instead?
A: Yes, you totally can! Simply follow the instructions, spooning the marbled batter into lined cupcake tins. Bake for about 18-22 minutes, or until a toothpick comes out clean. This recipe should yield about 24 cupcakes.
Q: How do I get really vibrant colors?
A: The secret is using gel food coloring! It’s much more concentrated than liquid food coloring, so you’ll get richer, more intense colors without adding too much liquid to your batter.
Don’t forget to follow us on Pinterest for more delicious recipes and kitchen inspiration!
Spooky Halloween Marble Cake
Ingredients
Equipment
Method
- Step 1: Preheat your oven to 350°F (175°C). Grease and flour your favorite bundt pan or a 9-inch round cake pan.
- Step 2: In a medium bowl, whisk together the flour, baking powder, baking soda, and salt. Set aside.
- Step 3: In a large mixing bowl (or using a stand mixer), beat the softened butter and granulated sugar together until light and fluffy, about 2-3 minutes. Add the large eggs one at a time, beating well after each addition. Stir in the vanilla extract.
- Step 4: Alternately add the dry ingredients mixture and the buttermilk to the wet mixture. Start with a third of the dry, mix until just combined, then half the buttermilk, mix, then another third of the dry, the rest of the buttermilk, and finally the last of the dry ingredients. Mix until smooth, being careful not to overmix.
- Step 5: Divide the batter evenly into three separate bowls. Leave one bowl plain. To the second bowl, add the cocoa powder and black food coloring; stir until deep black. To the third bowl, add orange food coloring and mix until vibrant.
- Step 6: Spoon alternating dollops of each colored batter into your prepared pan. Gently swirl the colors together with a knife or a skewer, but do not overdo it to prevent colors from blending too much.
- Step 7: If using, sprinkle the semi-sweet chocolate chips evenly over the top of the batter.
- Step 8: Bake for 40–45 minutes, or until a toothpick inserted into the center comes out clean.
- Step 9: Let the cake cool in the pan for about 15 minutes. Carefully invert it onto a wire rack to cool completely before slicing and serving.