

There’s something truly enchanting about watching a storm brew—those swirling clouds, the sudden flashes of lightning, and the calming rhythm of raindrops. As a kid, I was fascinated by thunderstorms, often sitting by the window, captivated by nature’s show. What if I told you that you could capture that magic in your own hands, anytime you want? That’s exactly what this Storm in a Jar project lets you do. It’s a fun, simple craft that turns everyday household items into a mesmerizing mini weather event, perfect for kids and adults alike.
This isn’t just any craft—it’s quick, easy, and incredibly satisfying to watch. Whether you’re looking for a rainy day activity, a unique homemade gift, or a calming sensory tool, this Storm in a Jar will become a favorite. Plus, it’s a fantastic way to sneak in a bit of science and wonder while having a cozy afternoon at home. Ready to create your own tiny storm? Let’s dive right in.
Why You’ll Love Storm in a Jar
- Fast: You can whip this up in under 10 minutes with just a few ingredients.
- Easy: No special skills or fancy tools required—just a jar and some household staples.
- Giftable: These jars make charming, thoughtful presents for friends, teachers, or loved ones.
- Crowd-pleasing: Kids, adults, and even science buffs will be amazed by the swirling storm inside.
Ingredients
Before you start, gather the following simple ingredients. I love how accessible this project is—most of these items are probably already in your kitchen or craft drawer!
- Water: The base of your storm, representing the rain and sky.
- Vegetable oil: This creates the distinct layers and movement, mimicking clouds and air.
- Blue food coloring: Adds that classic stormy sky color. You can adjust the shade by adding more or less.
- Glitter (optional): For a magical sparkle that makes your storm extra special, like tiny lightning flickers.
- Small piece of cotton or sponge: This acts as your “clouds,” floating on the oil’s surface.
- Jar with lid: A clean glass jar works best—mason jars are perfect for this.
If you’re a fan of easy, hands-on projects like this, you might also enjoy exploring some other creative kitchen crafts and recipes, like the charming no-bake Oreo cheesecake that’s as delightful to make as it is to eat.
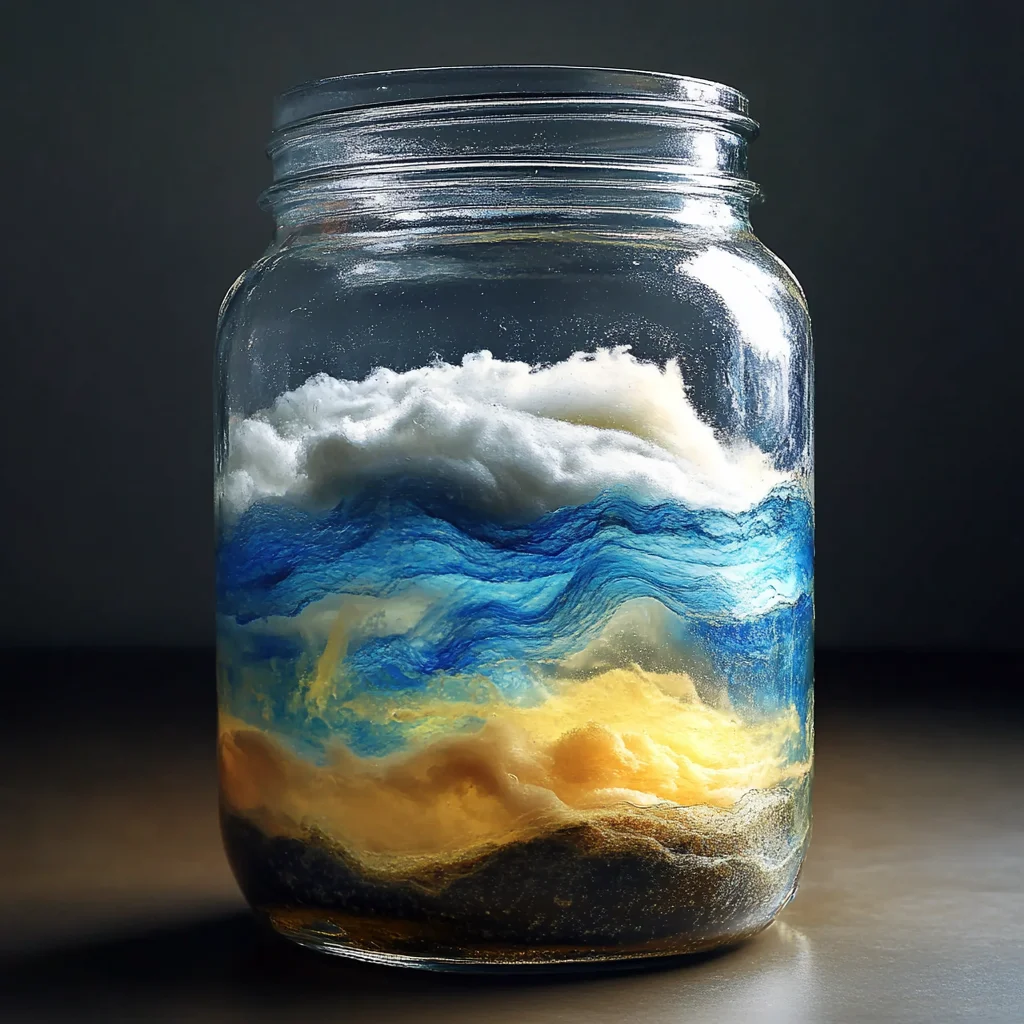
How to Make Storm in a Jar
Now for the fun part! Making your Storm in a Jar is as soothing as watching the storm itself. I always find it relaxing to take my time with each step, imagining the swirling clouds forming right before my eyes.
- Fill the jar halfway with water. Use room temperature water so everything mixes nicely. This will be the “sky” of your storm.
- Pour vegetable oil into the jar until nearly full, leaving some space at the top. The oil will float on top of the water, creating that beautiful layered effect that’s crucial for your storm’s movement.
- Add a few drops of blue food coloring directly into the water. You’ll notice the drops slowly sinking and swirling, simulating rain clouds gathering.
- Optional: Sprinkle in glitter for added sparkle. This little touch makes your storm shimmer and shine, especially when light hits it just right. It’s like capturing a bit of lightning magic.
- Place a small piece of cotton or sponge on top of the oil layer. This represents the clouds floating above the stormy sky. You can gently fluff the cotton to make it look more like fluffy clouds.
- Seal the jar with the lid tightly. Give it a gentle shake to mix the contents. Watch as the blue water swirls through the oil, creating a mesmerizing storm in motion.
- For an enhanced effect, shine a flashlight through the jar in a dark room. This brings out the colors and glitter sparkle, making your storm come alive like a tiny thundercloud.
One of my favorite things about this project is how simple it is yet so captivating. It’s a bit like watching a natural phenomenon in slow motion—perfect for calming anxiety or just taking a mindful moment. If you enjoy fun experiments like this, you might want to check out my recipe for easy rain cloud in a jar experiment, which builds on this idea with a slightly different twist.
Substitutions & Additions
Feel free to customize your Storm in a Jar to suit your taste or whatever you have on hand. Here are some simple swaps and creative ideas I’ve tried myself that might inspire you:
- Oil alternatives: If you don’t have vegetable oil, you can try baby oil or mineral oil for a similar effect. Just be sure it’s clear and safe for handling.
- Food coloring colors: While blue is classic, experimenting with green or purple can create mystical or otherworldly storms. It’s fun to see how different colors mix and move.
- Cloud material: Instead of cotton or sponge, you can use pieces of white tissue paper or wool roving for a different texture.
- Glitter options: Use chunky glitter, star-shaped confetti, or even tiny sequins for a unique sparkle. Just remember to use just a little so it doesn’t overwhelm the swirling effect.
- Jar shapes and sizes: Use different jar sizes or even clear water bottles for a larger or smaller storm. The shape of your container can change how the storm moves and looks.
- Glow-in-the-dark paint: For an evening twist, add a few drops of glow-in-the-dark paint to the water and watch your storm light up after the lights go out.
These little tweaks let you personalize your storm and keep the project fresh and exciting. If you love mixing creativity with kitchen fun, you might also enjoy the no-bake peanut butter brownie cookies recipe—another easy yet impressive treat to try.
Tips for Success
To make sure your Storm in a Jar turns out beautifully every time, here are some helpful tips from my own experiments and happy accidents in the kitchen:
- Use a clear jar: The clearer the glass, the better you’ll see the swirling storm inside. Avoid tinted or frosted jars.
- Don’t overfill: Leave a little space at the top so you can shake and swirl the storm without spills.
- Be gentle when adding food coloring: Drop it slowly onto the water layer to watch it sink and swirl naturally instead of mixing too quickly.
- Seal the lid tightly: This prevents leaks and keeps your storm contained, especially if you plan to gift it or use it as a calming sensory jar.
- Shake gently: Vigorous shaking can blend the layers too much, so a slow swirl is best to keep the storm visually distinct.
- Prep ahead: You can assemble the jars and keep them sealed for a few days. The layers might settle, but a gentle shake will bring your storm back to life.
- Clean the jar well: Make sure your jar is free of grease or soap residue for the oil and water to separate properly.
If you want to impress family and friends with more easy, crowd-pleasing projects, you might also want to try my recipe for Oreo stuffed cinnamon rolls. They’re a sweet surprise that’s just as delightful as watching your storm in action.
How to Store Storm in a Jar
One of the best things about Storm in a Jar is how low maintenance it is. You can keep it on a shelf or desk for days or weeks as a calming decoration or conversation starter. Here’s how to store it so it stays perfect:
- Keep it sealed: Always screw the lid on tightly to prevent leaks and evaporation.
- Store at room temperature: Avoid extreme heat or cold, as this can affect the oil and water layers.
- Shake before use: If the layers settle or separate, a gentle shake will refresh the storm’s swirling action.
- Replace cotton or sponge as needed: If your “cloud” piece gets soggy or discolored over time, simply replace it with a fresh piece.
While the ingredients don’t spoil quickly, I recommend refreshing your storm every few weeks for the best visual effect. This simple upkeep lets you enjoy your mini storm whenever you need a little moment of wonder. And if you’re interested in other long-lasting, easy-to-make treats, my roundup of easy recipes has plenty of inspiration to keep your kitchen buzzing.
FAQs
Can I use any type of oil for the Storm in a Jar?
Vegetable oil is ideal because it’s clear and separates well from water. You can also try baby oil or mineral oil, but avoid colored or scented oils as they might affect the look and smell.
Why does the food coloring not mix evenly in the jar?
Food coloring is water-based, so it sinks and swirls through the water layer but doesn’t mix with the oil. This creates the beautiful storm effect. If you shake too hard, the layers might blend temporarily but will separate again.
Is this safe for kids to make?
Absolutely! This project is great for kids with supervision, especially during the shaking and handling of the jar. Just make sure the lid is tightly closed to avoid spills.
Can I add other materials like small toys or beads inside?
You can experiment with small, lightweight items, but keep in mind that heavy objects will sink and could disrupt the oil-water layers. Glitter or tiny sequins work best for sparkle.
If you enjoy these kinds of fun, at-home science projects and tasty treats, you might want to explore the irresistibly comforting grandma’s secret easy blueberry biscuits, a perfect pairing for a cozy day indoors.
Thanks for joining me in creating your own Storm in a Jar! It’s such a simple project but one that sparks curiosity and brings a little magic to everyday life. Don’t forget to share your creations with friends and family—they’ll love the calming charm and the story behind it.
For more inspiring recipes, crafts, and kitchen fun, be sure to follow me on Pinterest where I share all kinds of cozy ideas to brighten your days.
Storm in a Jar
Ingredients
Equipment
Method
- Step 1: Fill the jar halfway with room temperature water to represent the sky.
- Step 2: Pour vegetable oil into the jar until nearly full, leaving space at the top to allow swirling.
- Step 3: Add a few drops of blue food coloring directly into the water layer and watch the drops slowly sink and swirl.
- Step 4: Optional: Sprinkle in glitter for extra sparkle that mimics lightning flickers.
- Step 5: Place a small piece of cotton or sponge on top of the oil layer to represent clouds; fluff it gently if desired.
- Step 6: Seal the jar tightly with the lid and gently shake to mix the contents, creating a mesmerizing storm in motion.
- Step 7: For enhanced effect, shine a flashlight through the jar in a dark room to highlight colors and glitter sparkle.


