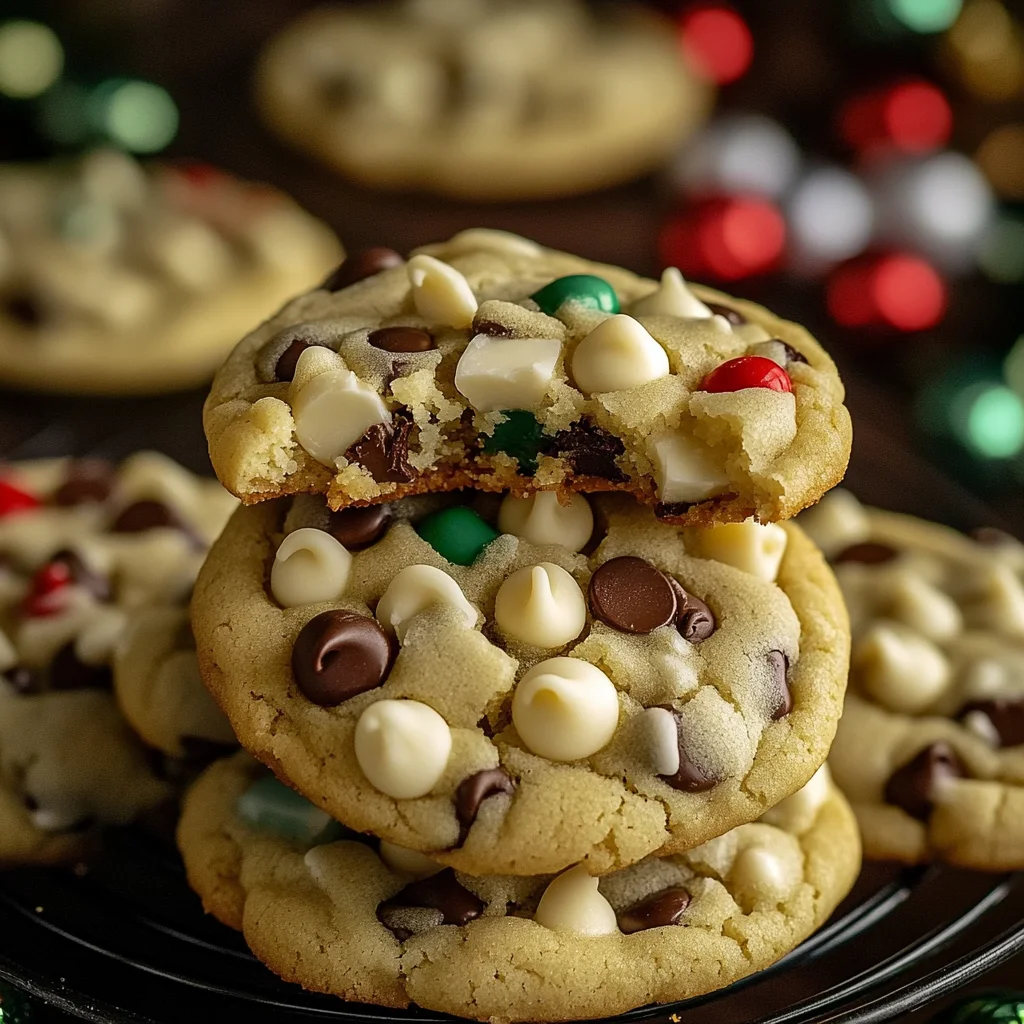
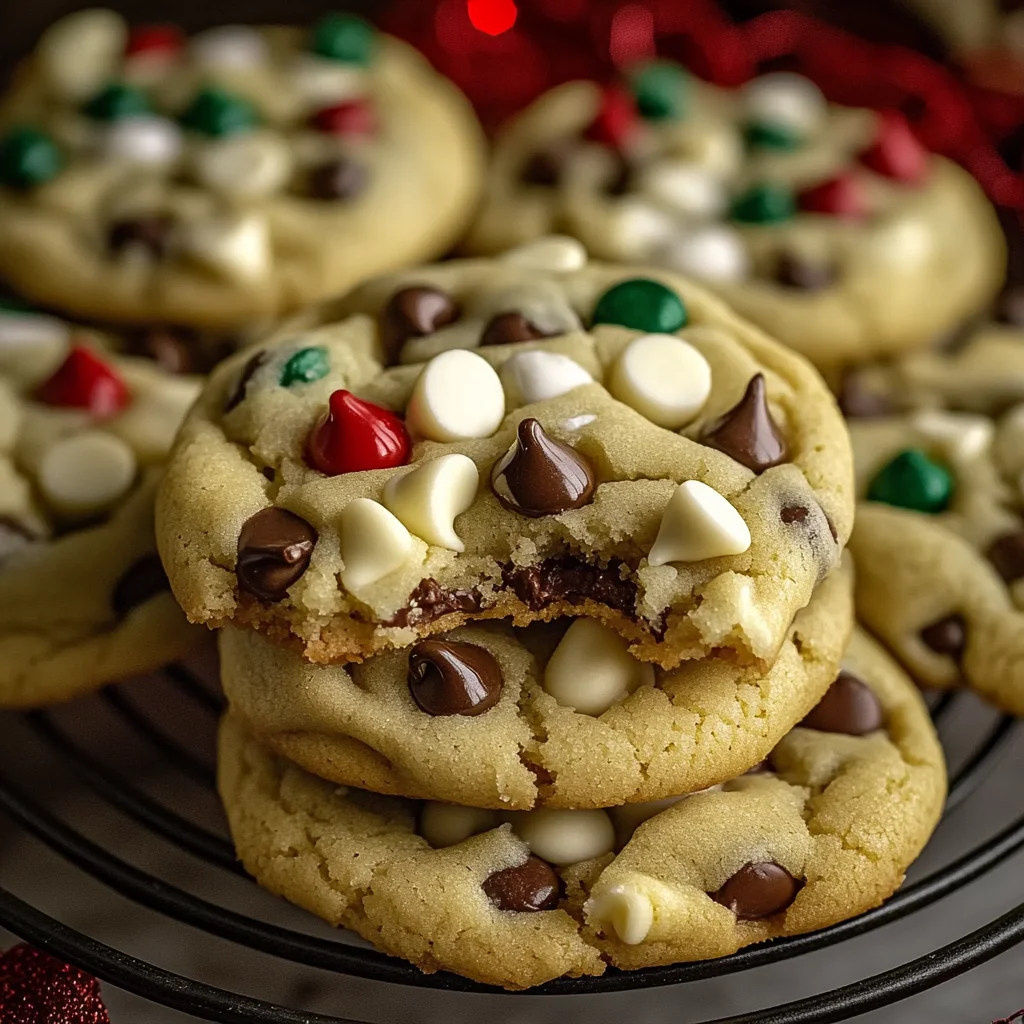
Oh, friend, there’s just something magical about the holidays, isn’t there? The twinkling lights, the cozy sweaters, and that unmistakable scent of freshly baked cookies wafting from the kitchen. It transports me right back to childhood, to days filled with laughter and the pure joy of simple pleasures. And if there’s one thing that truly captures that spirit, it’s a batch of warm, comforting chocolate chip cookies, especially when they’re dressed up for the season!
This recipe for Winter Wonderland Chocolate Chip Christmas Cookies isn’t just a recipe; it’s an invitation to create those same cherished memories in your own home. Imagine biting into a perfectly soft, chewy cookie, bursting with rich chocolate and a delightful pop of festive red and green. It’s truly a little piece of edible holiday cheer. And the best part? These aren’t just memorable; they’re incredibly easy and quick to whip up, leaving you more time for all the other wonderful things the season brings. If you’re looking for even more delightful holiday sweets to share or enjoy, make sure to check out our collection of easy swirled Christmas fudge.
Why You’ll Love Winter Wonderland Chocolate Chip Christmas Cookies
- Fast: From mixing bowl to your plate in no time, perfect for last-minute cravings or unexpected guests.
- Easy: Simple ingredients and straightforward steps mean even beginner bakers can make these perfectly.
- Giftable: Package them up in a cute tin or cellophane bag for a homemade gift that everyone will adore.
- Crowd-Pleasing: Who doesn’t love a good chocolate chip cookie? This festive version is guaranteed to be a hit with everyone.
Ingredients
Gather your ingredients, my baking buddy! Here’s what you’ll need to make these holiday masterpieces:
- 1 cup (2 sticks) unsalted butter, softened: Your trusty base! Make sure it’s nice and soft, not melted, for that perfect creamy texture.
- 1 cup granulated sugar: For that classic sweetness.
- 1 cup light brown sugar, packed: This is key for moisture and that wonderful chewy texture we all love in a good chocolate chip cookie.
- 2 large eggs: These bind everything together and give your cookies structure.
- 2 tsp vanilla extract: Don’t skimp on this! Good quality vanilla makes all the difference. It’s the soul of a truly delicious cookie.
- 3 cups all-purpose flour: The backbone of your cookie.
- 1 tsp baking soda: Our leavening agent for that lovely rise.
- 1/2 tsp baking powder: Works with the baking soda to give your cookies a perfect puff.
- 1/2 tsp salt: Crucial for balancing the sweetness and enhancing all those delicious flavors.
- 1 cup semi-sweet chocolate chips: The classic, beloved chocolatey goodness.
- 1 cup white chocolate chips: Adds a lovely creamy contrast and a “winter wonderland” feel.
- 1 cup red & green candy-coated chocolates (M&M’s or similar): For that festive pop of color and an extra bit of crunch!
How to Make Winter Wonderland Chocolate Chip Christmas Cookies
Let’s get baking! You’ll be amazed at how quickly these come together.
- Get Ready: First things first, preheat your oven to a cozy 350°F (175°C). While it’s warming up, line a baking sheet (or two, if you have them!) with parchment paper. This is my secret to easy cleanup and perfectly non-stick cookies!
- Cream It Up: In a large bowl, grab your softened butter, granulated sugar, and light brown sugar. Beat them together with an electric mixer until they’re beautifully light and fluffy. This can take about 2-3 minutes, so be patient – it’s worth it for the texture!
- Egg-cellent Addition: Now, beat in your eggs one at a time. Make sure each egg is fully incorporated before adding the next. Once they’re all mixed in, stir in that wonderful vanilla extract.
- Dry Mix Magic: In a separate, medium-sized bowl, whisk together your flour, baking soda, baking powder, and salt. Give it a good whisk to ensure everything is evenly distributed.
- Combine & Conquer: Gradually add your dry flour mixture to the wet butter mixture. Mix on low speed, or by hand, until everything is just combined. Be careful not to overmix here – that’s the key to tender cookies!
- Fold in the Festive Fun: Now for the best part! Gently fold in the semi-sweet chocolate chips, white chocolate chips, and those cheerful red & green candy-coated chocolates. You want them distributed throughout the dough, making every bite a colorful surprise.
- Scoop & Bake: Using a cookie scoop (or about 2 tablespoons per cookie), drop mounds of dough onto your prepared baking sheet. Leave a little space between each cookie for them to spread.
- Golden Perfection: Pop your cookies into the preheated oven and bake for 10–12 minutes. You’re looking for edges that are lightly golden, but the centers should still look wonderfully soft and slightly underbaked. Trust me on this – that’s how you get that perfect chew!
- Cool Down: Once they’re out of the oven, let those beautiful cookies cool on the baking sheet for about 5 minutes. They’re still a bit delicate when warm. After that, carefully transfer them to a wire rack to cool completely. Or, you know, eat one warm (I won’t tell!).
Substitutions & Additions
Part of the fun of baking is making a recipe truly your own! Here are some ideas to switch things up:
- Chocolate Variations: Instead of semi-sweet, try dark chocolate chips, milk chocolate chunks, or even a mix of all three! If you’re a fan of mixing up your cookie game, you might also love our pistachio stuffed chocolate chip cookies for another delightful twist.
- Nutty Crunch: Add 1/2 to 1 cup of chopped pecans, walnuts, or even macadamia nuts for extra texture and flavor.
- Flavor Boosters: A tiny splash of almond extract (1/4 teaspoon) can add a lovely, subtle complexity. Or, for a truly minty holiday cookie, add 1/2 teaspoon of peppermint extract with the vanilla.
- Spice It Up: A pinch of cinnamon or nutmeg can bring a warm, cozy feel.
- Gluten-Free: You can often swap out the all-purpose flour for a 1:1 gluten-free baking flour blend if you need to accommodate dietary restrictions.
- Sprinkle Magic: Right after scooping the dough, sprinkle some extra holiday sprinkles on top for an even more festive look!
Tips for Success
Want to ensure your cookies are absolutely perfect every time? Keep these friendly tips in mind:
- Softened Butter is Key: I can’t stress this enough! If your butter is too cold, it won’t cream properly with the sugars, leading to dense cookies. If it’s melted, your cookies will spread too much. Take it out of the fridge an hour or two before you start.
- Don’t Overmix: Once you add the flour, mix just until no dry streaks remain. Overmixing develops the gluten in the flour, which can lead to tough cookies.
- Measure Flour Correctly: For best results, use the “spoon and level” method. Spoon the flour into your measuring cup and then level it off with a straight edge, rather than scooping directly from the bag. This prevents compacting the flour and adding too much.
- Cool Baking Sheets: If you’re baking multiple batches, make sure your baking sheets have cooled down between batches. Placing dough on a hot sheet will cause the cookies to spread too quickly.
- Prep Ahead: You can make the cookie dough a day or two in advance and store it covered in the refrigerator. Just let it sit at room temperature for 15-20 minutes before scooping and baking.
- Gift-Giving Secret: To keep gift cookies extra fresh, place a slice of bread in the airtight container with them. The bread will dry out, and the cookies will stay soft!
How to Store Winter Wonderland Chocolate Chip Christmas Cookies
Once your beautiful cookies have cooled (if they last that long!), here’s how to keep them fresh:
- At Room Temperature: Store your cookies in an airtight container at room temperature for up to 5-7 days. I like to place a piece of parchment paper between layers if stacking them.
- In the Fridge: If you really want to extend their life, you can store them in an airtight container in the refrigerator for up to 10 days, but they might become a bit firmer.
- Freezing Baked Cookies: These cookies freeze wonderfully! Once completely cool, place them in a single layer on a baking sheet and freeze until solid. Then, transfer them to a freezer-safe bag or container for up to 3 months. Thaw at room temperature or warm them gently in the microwave for a fresh-baked feel.
- Freezing Dough: You can also freeze the unbaked cookie dough! Form into balls, freeze them on a baking sheet, then transfer to a freezer-safe bag. When you’re ready to bake, just pop them on a parchment-lined sheet and add an extra minute or two to the baking time.
FAQs
Q: Can I use all white chocolate chips instead of a mix?
A: Absolutely! Feel free to use all white chocolate chips, or any combination of your favorite chocolates, to suit your taste. The key is to keep the total amount of mix-ins similar.
Q: My cookies spread too much. What did I do wrong?
A: There are a few culprits! Your butter might have been too warm (melted, not just softened), your oven temperature might be off, or you might have used too little flour (or measured incorrectly). Make sure your butter is just softened, use a good oven thermometer, and spoon and level your flour.
Q: How can I make these cookies extra chewy?
A: The combination of brown sugar and granulated sugar in this recipe already helps with chewiness! To maximize it, avoid overbaking. Pull them from the oven when the edges are set and lightly golden, but the centers still look soft and slightly undone. They’ll continue to set as they cool.
Q: Can I use different holiday candies?
A: Yes, absolutely! Feel free to swap out the red & green candy-coated chocolates for other holiday-themed candies, like crushed candy canes (add after baking if you want them to stay crisp!), chopped toffee bits, or even small gumdrops. Get creative!
For even more baking inspiration and a treasure trove of dessert ideas, don’t forget to browse through all the amazing Crispy Kitchens recipes. Happy baking, my friend!
Don’t miss out on more delicious recipes and kitchen inspiration! Follow us on Pinterest for daily updates.

Winter Wonderland Chocolate Chip Christmas Cookies
Ingredients
Equipment
Method
- Step 1: Get Ready: Preheat your oven to a cozy 350°F (175°C). While it's warming up, line a baking sheet (or two, if you have them!) with parchment paper.
- Step 2: Cream It Up: In a large bowl, grab your softened butter, granulated sugar, and light brown sugar. Beat them together with an electric mixer until they're beautifully light and fluffy. This can take about 2-3 minutes.
- Step 3: Egg-cellent Addition: Beat in your eggs one at a time, ensuring each is fully incorporated. Once all eggs are mixed in, stir in the vanilla extract.
- Step 4: Dry Mix Magic: In a separate, medium-sized bowl, whisk together the flour, baking soda, baking powder, and salt until evenly distributed.
- Step 5: Combine & Conquer: Gradually add the dry flour mixture to the wet butter mixture. Mix on low speed, or by hand, until everything is just combined. Do not overmix.
- Step 6: Fold in the Festive Fun: Gently fold in the semi-sweet chocolate chips, white chocolate chips, and the red & green candy-coated chocolates until distributed throughout the dough.
- Step 7: Scoop & Bake: Using a cookie scoop (or about 2 tablespoons per cookie), drop mounds of dough onto your prepared baking sheet. Leave space between each cookie for them to spread.
- Step 8: Golden Perfection: Pop your cookies into the preheated oven and bake for 10–12 minutes. You're looking for edges that are lightly golden, but the centers should still look wonderfully soft and slightly underbaked.
- Step 9: Cool Down: Once they're out of the oven, let the cookies cool on the baking sheet for about 5 minutes. Then, carefully transfer them to a wire rack to cool completely.