Oh, friend, do you ever get that craving? That undeniable, urgent need for something sweet, something comforting, but you just don’t have the time or energy for a big baking project? I know exactly what you mean! It takes me right back to my grandma’s kitchen, where she always had a little something special tucked away for a quick treat. And often, those treats were the simplest, made with love and just a handful of ingredients.
Well, get ready, because today I’m sharing a recipe that’s going to become your new secret weapon for instant gratification: these incredible 3-Ingredient Peanut Butter Balls! Seriously, three ingredients. That’s it! They come together in a flash, require absolutely no baking, and taste like pure, creamy, peanut butter heaven with a delightful little crunch. They’re so easy, they almost feel like cheating – but trust me, your taste buds won’t be complaining!
Why You’ll Love 3-Ingredient Peanut Butter Balls
- Fast: From pantry to plate in under 15 minutes of active prep time!
- Easy: No baking, no complicated steps, just mix, roll, and chill. Perfect for even the newest kitchen adventurers.
- Giftable: They look adorable and taste amazing, making them perfect for holiday trays, potlucks, or a thoughtful homemade gift.
- Crowd-pleasing: Who doesn’t love peanut butter? These are a guaranteed hit with kids and adults alike.
Ingredients
You truly only need these three pantry staples, and I bet you already have them on hand!
- 1 cup Peanut Butter: Your favorite creamy peanut butter is the star here. I usually go for a classic, smooth variety. If you prefer natural, just make sure to stir it really well to incorporate any oil before measuring!
- 1 cup Powdered Sugar: This gives our balls that melt-in-your-mouth sweetness and helps bind everything together beautifully.
- 1 cup Rice Cereal: The magic ingredient for that satisfying, subtle crunch. I love how it makes them feel a little lighter than a fudge, but still wonderfully substantial.
How to Make 3-Ingredient Peanut Butter Balls
Get ready for the easiest “recipe” you’ve ever followed! You’ll be amazed at how quickly these come together.
- Combine Peanut Butter and Powdered Sugar: In a large mixing bowl, scoop in your peanut butter and then add the powdered sugar right on top. Now, grab a sturdy spoon or a rubber spatula and mix, mix, mix! You want to get it really well-combined and smooth. It might look a little crumbly at first, but keep at it, and it will come together into a nice, pliable dough. This is the base for so many wonderful no-bake treats, much like when I’m whipping up my super simple Easy No-Bake Caramel Pretzel Bars.
- Fold in the Rice Cereal: Once your peanut butter and sugar mixture is smooth, it’s time for the crunch! Gently add the rice cereal to the bowl. Use your spoon or spatula to carefully fold it in. The key here is “gently” – you want to distribute the cereal without crushing it too much. We’re aiming for little pockets of crunch, not powdered rice!
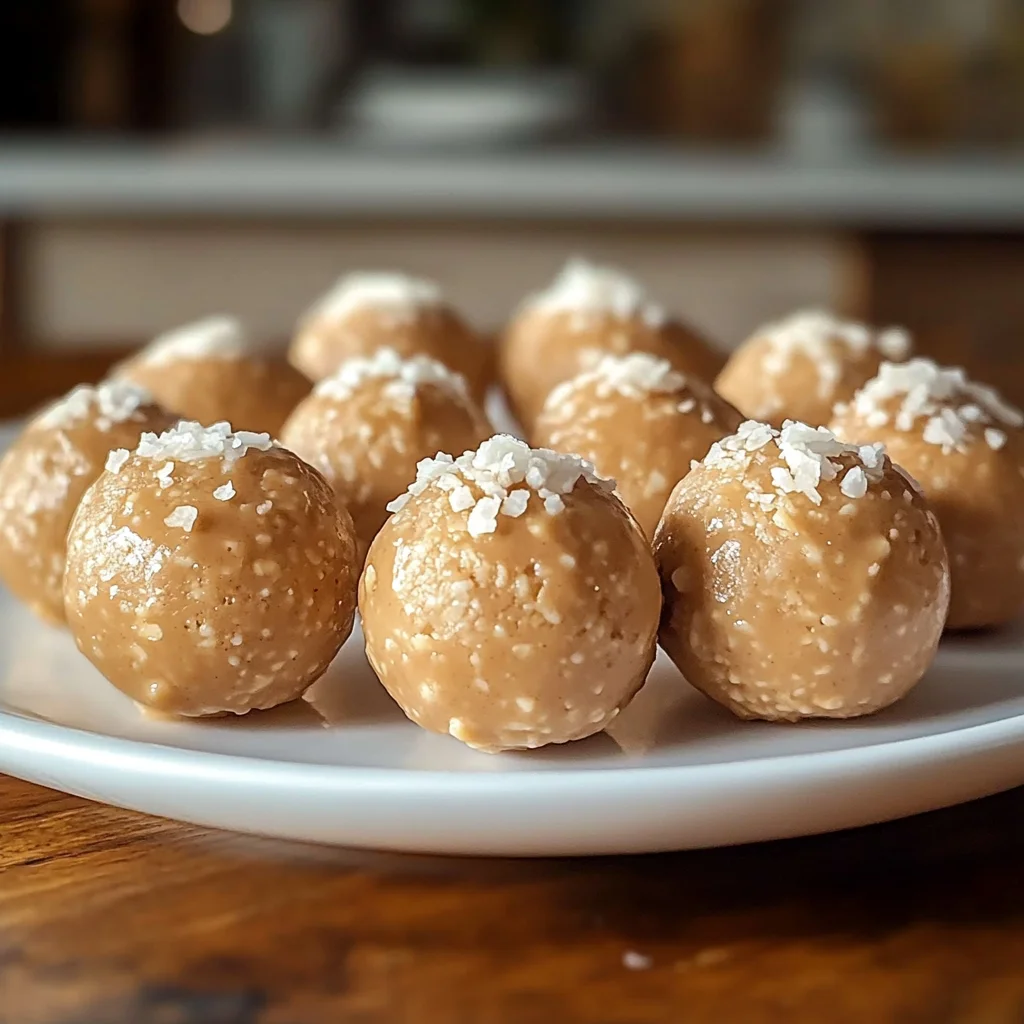
- Roll into Balls: Now for the fun part! Grab small portions of the mixture – about 1 inch in diameter, or roughly the size of a gumball. Use your hands to roll them into neat little spheres. This mixture is super forgiving, so don’t worry about perfection. If your hands start to get a little sticky, a quick rinse or wiping them with a damp cloth helps.
- Place on a Lined Baking Sheet: As you roll each delightful ball, place it onto a baking sheet that you’ve lined with parchment paper. The parchment paper isn’t strictly necessary for non-stick, but it makes cleanup a breeze and keeps your balls from sticking if they get too warm.
- Refrigerate to Set: This step is crucial for the perfect texture! Pop your baking sheet of peanut butter balls into the refrigerator for at least 30 minutes. This chilling time allows them to firm up nicely, making them less sticky and giving them that wonderful solid bite. Patience is a virtue, my friends, but it’s worth it!
- Serve Chilled: Once they’re firm, they’re ready to enjoy! Serve them straight from the fridge. They’re deliciously cool and perfectly firm.
Substitutions & Additions
This recipe is a fantastic blank canvas for your creativity! While I adore the classic, here are a few ideas to shake things up:
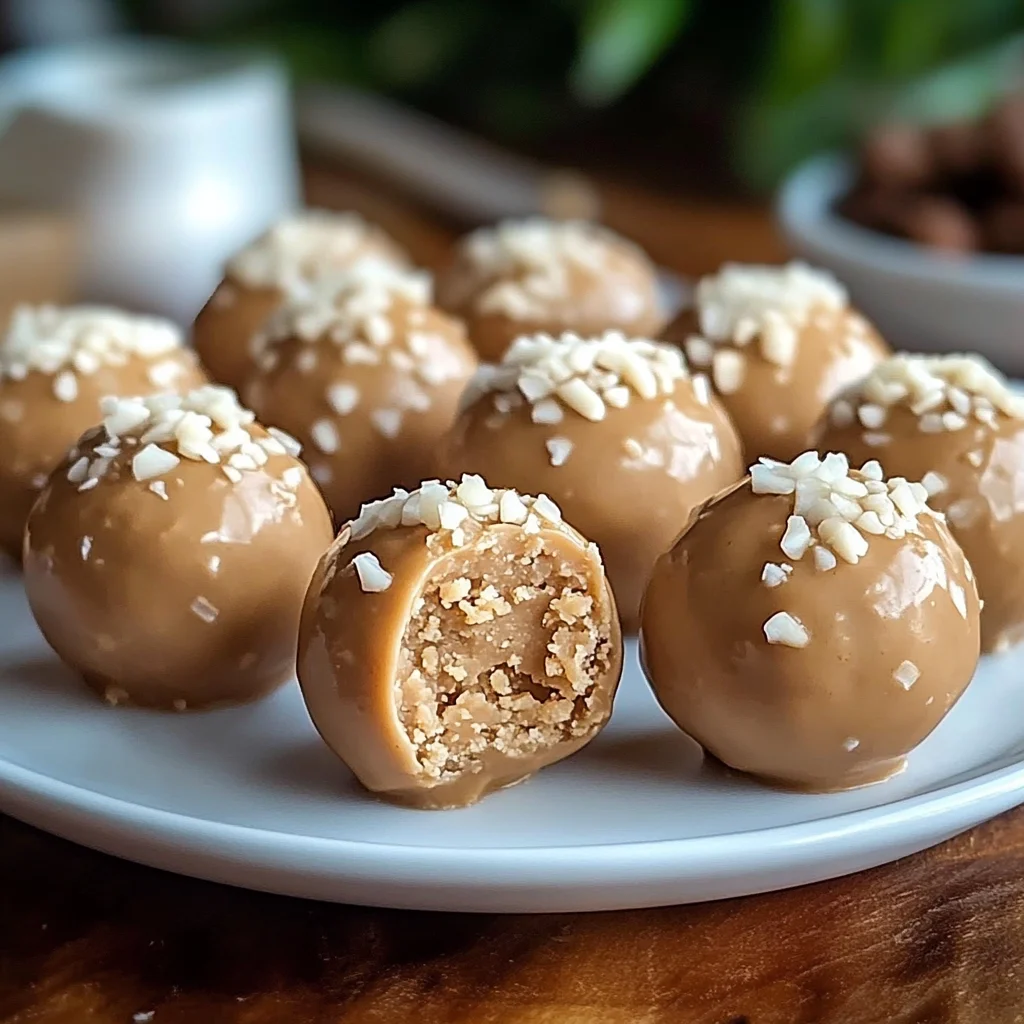
- Chocolate Coating: For the ultimate treat, melt some chocolate chips (milk, dark, or white!) with a tiny bit of coconut oil or shortening until smooth. Dip your chilled peanut butter balls into the chocolate, let any excess drip off, and return them to the parchment-lined sheet to set in the fridge. Oh my goodness! This is a classic for a reason. If you’re a true peanut butter fanatic like I am, you might also love exploring other no-bake delights such as our No-Bake Reese’s Peanut Butter Bars, which take this chocolate-peanut butter combo to the next level.
- Sprinkles: Before the chocolate sets (if you’re dipping them), or right after rolling (if you’re not), roll them in festive sprinkles! Great for holidays or just for fun.
- Other Cereal: Experiment with other crisp cereals like corn flakes or even crushed pretzels for a salty-sweet twist. Just make sure they’re finely crushed so they mix in well.
- Add-ins: Fold in a tablespoon of mini chocolate chips, a sprinkle of flaky sea salt, or a teaspoon of vanilla extract with the peanut butter and sugar for extra flavor.
- Different Nut Butters: While “peanut” butter balls, you can certainly try almond butter or cashew butter. Just be aware that the texture might vary slightly, and you might need to adjust the amount of powdered sugar to get the right consistency. It’s all about playing in the kitchen!
- Coconut: If you love coconut, try rolling the finished balls in shredded coconut flakes for an extra layer of flavor and texture. This would also be delicious in a decadent Easy Peanut Butter Cup Dump Cake!
Tips for Success
- Creamy Peanut Butter is Key: While natural peanut butter can work, ensure it’s well-stirred to avoid a dry or overly oily mixture. For consistent results, I recommend creamy, processed peanut butter (like Jif or Skippy) for this recipe.
- Don’t Overmix the Cereal: Once the cereal is added, mix just enough to distribute it evenly. Too much mixing can crush the cereal, taking away that delightful crunch.
- Chill Time is Essential: Do not skip the refrigeration step! It allows the balls to firm up and prevents them from being too sticky or crumbly when you handle them.
- Scale Up or Down: This recipe is easily scalable. Want more? Double or triple the ingredients. Just need a few? Halve them! The 1:1:1 ratio is your friend.
- Hands-On Rolling: Your hands are the best tool for rolling these! The warmth from your hands helps slightly soften the mixture just enough to make it pliable for shaping.
How to Store 3-Ingredient Peanut Butter Balls
These little gems store beautifully, making them perfect for prepping ahead!
- Refrigerator: Store them in an airtight container in the refrigerator for up to 1-2 weeks. They hold their shape and flavor perfectly when chilled.
- Freezer: For longer storage, you can absolutely freeze them! Place the chilled balls in a single layer on a parchment-lined baking sheet and freeze until solid. Once frozen, transfer them to a freezer-safe bag or airtight container. They’ll keep well for up to 2-3 months. Just pull them out a few minutes before you want to enjoy one, or eat them straight from the freezer for a super-chilled treat!
FAQs
Got questions? I’ve got answers, friend!
Q: Can I use crunchy peanut butter?
A: You can, but it will add a lot more texture from the peanut pieces on top of the rice cereal. If you love extra crunch, go for it! I prefer creamy for a smoother base.
Q: My mixture is too sticky/crumbly. What went wrong?
A: If it’s too sticky, you might need a tiny bit more powdered sugar. If it’s too crumbly, your peanut butter might be too dry (especially if using natural). Try adding a half-teaspoon of milk or melted coconut oil to help it come together. A good mix with your hands often solves stickiness too, as the warmth helps.
Q: Do I need to bake them at all?
A: Nope, not at all! These are a true no-bake delight. The refrigeration step is all you need to set them.
Q: Are these gluten-free?
A: Yes, as long as your peanut butter and rice cereal are certified gluten-free, these peanut butter balls are a wonderful gluten-free treat!
For more easy and delicious recipes, be sure to follow us on Pinterest!
3-Ingredient Peanut Butter Balls That Melt in Your Mouth!
Ingredients
Equipment
Method
- Step 1: In a large mixing bowl, combine peanut butter and powdered sugar. Mix thoroughly with a sturdy spoon or rubber spatula until well-combined and smooth. It might appear crumbly at first but will come together into a pliable dough.
- Step 2: Gently fold the rice cereal into the peanut butter-sugar mixture using your spoon or spatula. Ensure it's distributed evenly without crushing the cereal too much.
- Step 3: Take small portions (about 1 inch in diameter) of the mixture and roll them into neat spheres using your hands.
- Step 4: Place each rolled ball onto a baking sheet lined with parchment paper.
- Step 5: Refrigerate the peanut butter balls for at least 30 minutes to allow them to firm up nicely.
- Step 6: Serve chilled directly from the refrigerator.