There’s something truly magical about the flavors of a classic Boston Cream Pie—the creamy vanilla custard, the soft cake layers, and the rich chocolate glaze all coming together to create a timeless dessert. But what if you could capture that iconic taste in a rich, velvety fudge that melts in your mouth? That’s exactly what this Boston Cream Pie Fudge recipe does. It’s like a nostalgic trip back to grandma’s kitchen, but with a fun, modern twist that’s quick and easy enough to whip up anytime you’re craving something sweet and special.
I remember my first bite of Boston Cream Pie Fudge—it was like the perfect marriage between a candy shop treat and a classic bakery dessert. And the best part? It’s surprisingly simple to make, with just a few ingredients you probably already have on hand. Whether you’re making this fudge for a holiday gift, a party treat, or just a cozy night in, it’s sure to bring smiles all around.
Why You’ll Love Boston Cream Pie Fudge
- Fast: From start to finish, this fudge comes together in just a couple of hours, including cooling time.
- Easy: No complicated baking techniques here—just a little stovetop stirring and some swirling magic.
- Giftable: Wrapped up in pretty boxes or tins, this fudge makes a thoughtful homemade gift perfect for any occasion.
- Crowd-pleasing: The creamy vanilla base with chocolate swirls appeals to all ages and is sure to be a party favorite.
Ingredients
Let’s take a peek at what you’ll need to bring this Boston Cream Pie Fudge to life. The ingredients split nicely into two parts: the vanilla fudge base and the chocolate swirl and glaze. Here’s a quick rundown:
- Granulated sugar: The sweet backbone of the fudge, creating that classic candy texture.
- Heavy cream: This adds richness and a creamy mouthfeel that’s essential for fudge.
- Unsalted butter: Just half a stick melts into the mix, giving it a silky finish without overpowering the sweetness.
- White chocolate chips: These melt smoothly into the base, contributing to the fudge’s luscious vanilla flavor.
- Marshmallow creme: Adds a light, fluffy texture that helps the fudge set perfectly.
- Instant vanilla pudding mix (dry): This dry mix boosts the vanilla custard flavor and thickens the fudge.
- Vanilla extract: A splash of this classic flavoring deepens the overall taste.
- Unsweetened cocoa powder: For the chocolate swirl that creates the marbled effect.
- Semisweet chocolate chips: These make the shiny, rich chocolate glaze on top.
- Vegetable oil: Mixed into the glaze to give it that perfect pourable consistency.
All these simple ingredients come together to create a fudge that tastes like a slice of Boston Cream Pie in every bite. If you love classic desserts with a homemade touch, this recipe fits right in with other favorites on Crispy Kitchens’ recipe collection.
How to Make Boston Cream Pie Fudge
Now, let’s roll up our sleeves and get started. I’ll guide you through each step to ensure your fudge turns out perfectly smooth, silky, and beautifully swirled.
- Prepare your pan: Line an 8×8-inch baking pan with parchment paper, leaving a 2-inch overhang on two opposite sides. This little trick helps you lift the fudge out easily once it’s set—trust me, it makes cutting so much neater.
- Cook the fudge base: In a large heavy-bottomed saucepan, combine the granulated sugar, heavy cream, and unsalted butter. Cook over medium heat, stirring constantly until the butter melts and the mixture comes to a full boil.
- Boil and test: Reduce the heat to medium-low and keep stirring for 7 minutes. You’ll want to test the doneness by dropping a small spoonful into a cup of ice water. If it forms a soft ball that you can easily pick up with your fingers, you’re ready. Or, if you have a candy thermometer, aim for 237-239°F for that perfect fudge consistency.
- Add white chocolate: Remove the pan from heat. Immediately stir in the white chocolate chips vigorously until the mixture is smooth and the chips have fully melted.
- Mix in marshmallow and pudding: Stir in the marshmallow creme until fully incorporated. Then add the dry instant vanilla pudding mix and vanilla extract, mixing until the fudge thickens and becomes smooth.
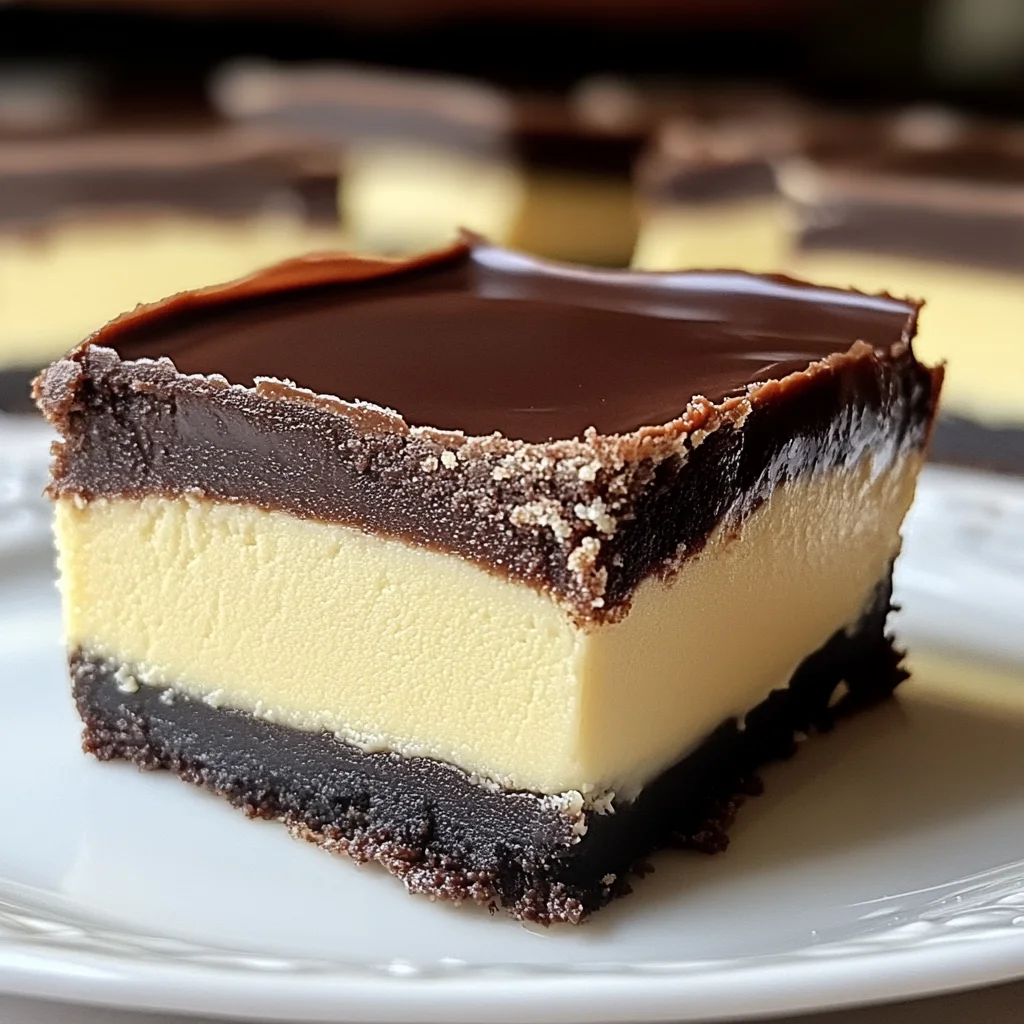
- Create the layers: Pour about two-thirds of the vanilla fudge into your prepared pan, spreading it evenly with a spatula.
- Make the chocolate swirl: Whisk the unsweetened cocoa powder into the remaining fudge in the saucepan until fully combined and smooth.
- Swirl it up: Drop spoonfuls of the chocolate fudge over the vanilla layer in the pan. Use a knife or skewer to gently swirl the chocolate into the vanilla fudge, creating that gorgeous marble effect we all love.
- Cool and set: Let the fudge cool at room temperature until firm, about 2 hours. If you’re in a hurry, you can pop it in the fridge, but I like the texture best when it sets slowly.
- Cut into squares: Use the parchment paper overhang to lift the fudge out of the pan. Then cut it into 16 equal squares (4×4) for perfect bite-sized treats.
- Make the chocolate glaze: In a microwave-safe bowl, combine the semisweet chocolate chips and vegetable oil. Microwave in 30-second intervals, stirring after each, until the mixture is melted and smooth.
- Glaze the fudge: Let the chocolate glaze cool for 15 minutes until it thickens but remains pourable. Dip the top of each fudge square into the glaze, letting excess drip off. Place the squares chocolate-side up on parchment paper or a wire rack.
- Set the glaze: Allow the glaze to set at room temperature until firm, about 1 hour. Now your Boston Cream Pie Fudge is ready to enjoy!
This recipe is a wonderful blend of old-fashioned candy-making with the nostalgic flavors of a beloved dessert. If you enjoy recipes that combine classic tastes with easy, no-fuss methods, you might also want to try the No-Bake Peanut Butter Brownie Cookies—another simple treat that’s perfect for when you want to impress without spending hours in the kitchen.
Substitutions & Additions
Feel free to get creative with this fudge! Here are some ideas if you want to tweak the recipe or add your personal flair:
- Swap the pudding flavor: Try chocolate or butterscotch instant pudding mix for a fun twist on the classic vanilla.
- Use different chocolate chips: Dark chocolate chips instead of semisweet for a richer glaze, or white chocolate for a double vanilla effect.
- Add a splash of liqueur: Vanilla or coffee liqueur stirred into the fudge base can add a grown-up depth of flavor.
- Mix in nuts: Chopped pecans or walnuts folded into the vanilla fudge add a delightful crunch.
- Top with sprinkles or crushed cookies: Before the glaze sets, sprinkle crushed graham crackers or your favorite festive sprinkles for extra texture and color.
Remember, fudge is quite forgiving, so you can experiment with flavors and textures to match your taste or occasion. If you love the idea of swirled chocolate desserts, you might also enjoy the rich, creamy layers in the Grandma’s Easy Blackberry White Chocolate Cheesecake—a luscious dessert that’s just as crowd-pleasing.
Tips for Success
Making fudge might seem intimidating at first, but with a few simple tips, you’ll be a pro in no time.
- Use a heavy-bottomed pan: This helps the sugar mixture heat evenly and prevents it from burning.
- Stir constantly: Don’t walk away! Stirring keeps the mixture smooth and prevents scorching.
- Test doneness carefully: The soft ball stage is key—too early and your fudge will be too soft, too late and it’ll be grainy.
- Be patient with cooling: Letting the fudge set at room temperature gives the best texture. If you refrigerate it too quickly, the texture can become too hard or brittle.
- Use parchment paper: It’s a game changer for easy removal and neat cutting.
- Prepare your glaze while fudge cools: This saves time and ensures your glaze is ready to dip when the fudge is cut.
Also, if you want to prep ahead, you can make the fudge base and swirl it the day before, then glaze just before serving. Just keep the fudge covered tightly in the fridge overnight. I love having this sweet treat ready for unexpected guests or a movie night.
How to Store Boston Cream Pie Fudge
Storing fudge properly is important to keep it fresh and delicious. Here’s how I recommend handling your Boston Cream Pie Fudge:
- Room temperature: Store fudge in an airtight container at room temperature for up to 1 week. Keep it away from direct sunlight or heat sources to avoid melting.
- Refrigerator: If your kitchen is warm, refrigerate the fudge for up to 2 weeks. Bring it to room temperature before serving for the best texture.
- Freezing: You can freeze fudge for up to 3 months. Wrap each piece individually in wax paper or plastic wrap, then place in a freezer-safe container. Thaw in the fridge overnight before enjoying.
When you’re ready to serve, I suggest letting refrigerated or frozen fudge sit out for about 15-20 minutes so it softens slightly—it really brings out that creamy, melt-in-your-mouth texture.
FAQs
Can I use regular chocolate pudding mix instead of instant?
For this recipe, instant pudding mix is best because it dissolves quickly and helps the fudge set properly. Regular pudding mix might not blend in as smoothly or firm up the fudge the same way.
What if I don’t have marshmallow creme?
You can substitute with an equal amount of mini marshmallows melted gently into the fudge, though the texture might be slightly less smooth. Marshmallow creme is ideal for that soft, creamy consistency.
Is it necessary to use a candy thermometer?
It’s very helpful but not absolutely necessary. The cold water test for the soft ball stage is an old-fashioned and reliable method that works well if you don’t have a thermometer.
Can I make this fudge vegan or dairy-free?
This recipe relies on dairy ingredients like butter, heavy cream, and white chocolate chips, so it would require significant substitutions. Vegan marshmallow creme and dairy-free chocolate chips exist, but texture and flavor might vary. I’d recommend sticking to the classic version for best results or exploring other vegan fudge recipes.
If you’re in the mood for other no-bake treats that are just as simple and satisfying, check out these No-Bake Peanut Butter Brownie Cookies—perfect for quick dessert fixes.
Thanks for stopping by to make this delightful Boston Cream Pie Fudge with me! I hope it fills your kitchen with sweet memories and your heart with joy.
Don’t forget to follow us on Pinterest for more inspired recipes and kitchen fun!

Boston Cream Pie Fudge
Ingredients
Equipment
Method
- Step 1: Line an 8x8-inch baking pan with parchment paper, leaving a 2-inch overhang on two opposite sides for easy lifting.
- Step 2: In a large heavy-bottomed saucepan, combine granulated sugar, heavy cream, and unsalted butter. Cook over medium heat, stirring constantly until butter melts and mixture reaches a full boil.
- Step 3: Reduce heat to medium-low and stir for 7 minutes. Test doneness by dropping a spoonful into ice water; it should form a soft ball. Alternatively, use a candy thermometer aiming for 237-239°F.
- Step 4: Remove pan from heat and immediately stir in white chocolate chips until smooth and melted.
- Step 5: Stir in marshmallow creme until fully incorporated. Then add instant vanilla pudding mix and vanilla extract, mixing until fudge thickens and smooths out.
- Step 6: Pour about two-thirds of the vanilla fudge into the prepared pan and spread evenly with a spatula.
- Step 7: Whisk unsweetened cocoa powder into the remaining fudge in the saucepan until smooth and fully combined.
- Step 8: Drop spoonfuls of the chocolate fudge over the vanilla layer in the pan and swirl gently with a knife or skewer to create a marbled effect.
- Step 9: Let fudge cool at room temperature until firm, about 2 hours. Refrigeration is optional but may change texture.
- Step 10: Use parchment overhang to lift fudge from pan and cut into 16 equal squares (4x4) for bite-sized pieces.
- Step 11: In a microwave-safe bowl, combine semisweet chocolate chips and vegetable oil. Microwave in 30-second intervals, stirring until melted and smooth.
- Step 12: Let glaze cool for 15 minutes until thick but pourable. Dip top of each fudge square into glaze, allowing excess to drip off. Place squares chocolate-side up on parchment or wire rack.
- Step 13: Allow glaze to set at room temperature until firm, about 1 hour. Your Boston Cream Pie Fudge is ready to enjoy!