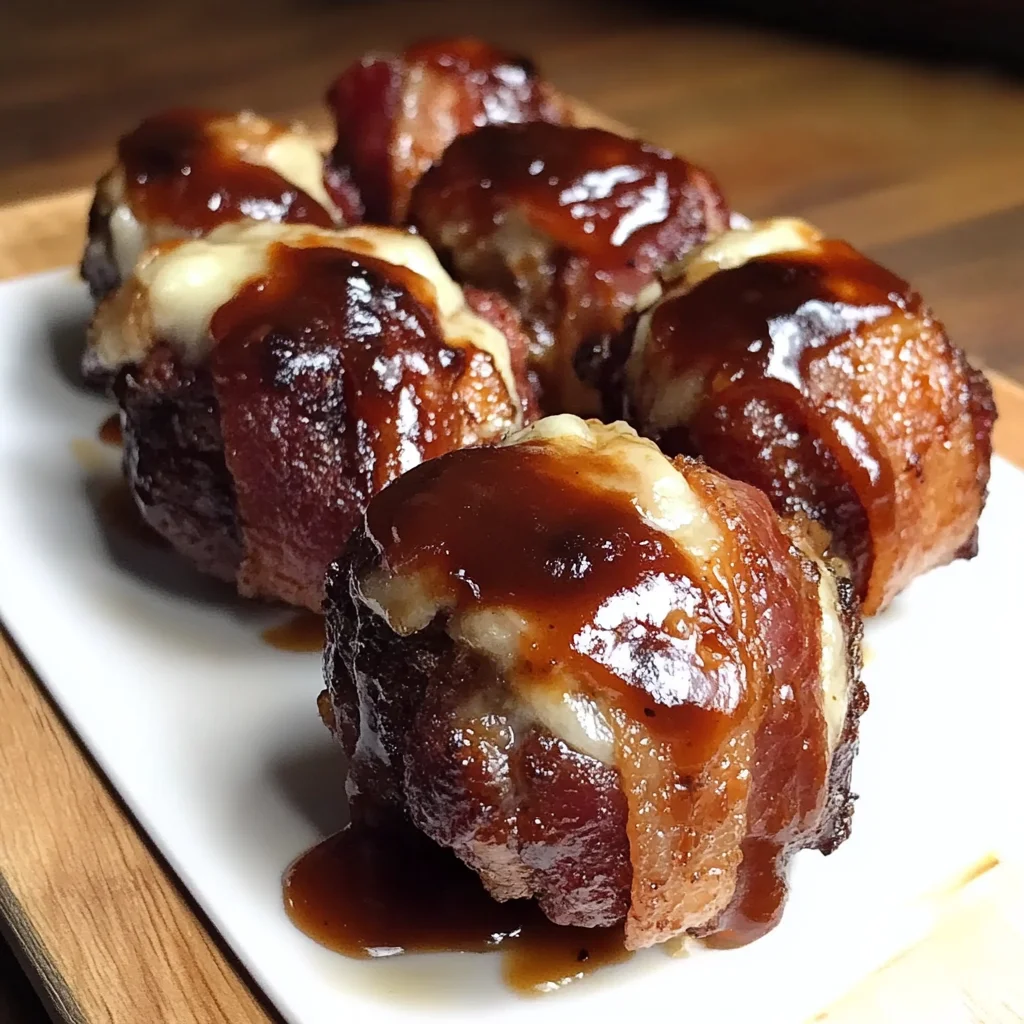
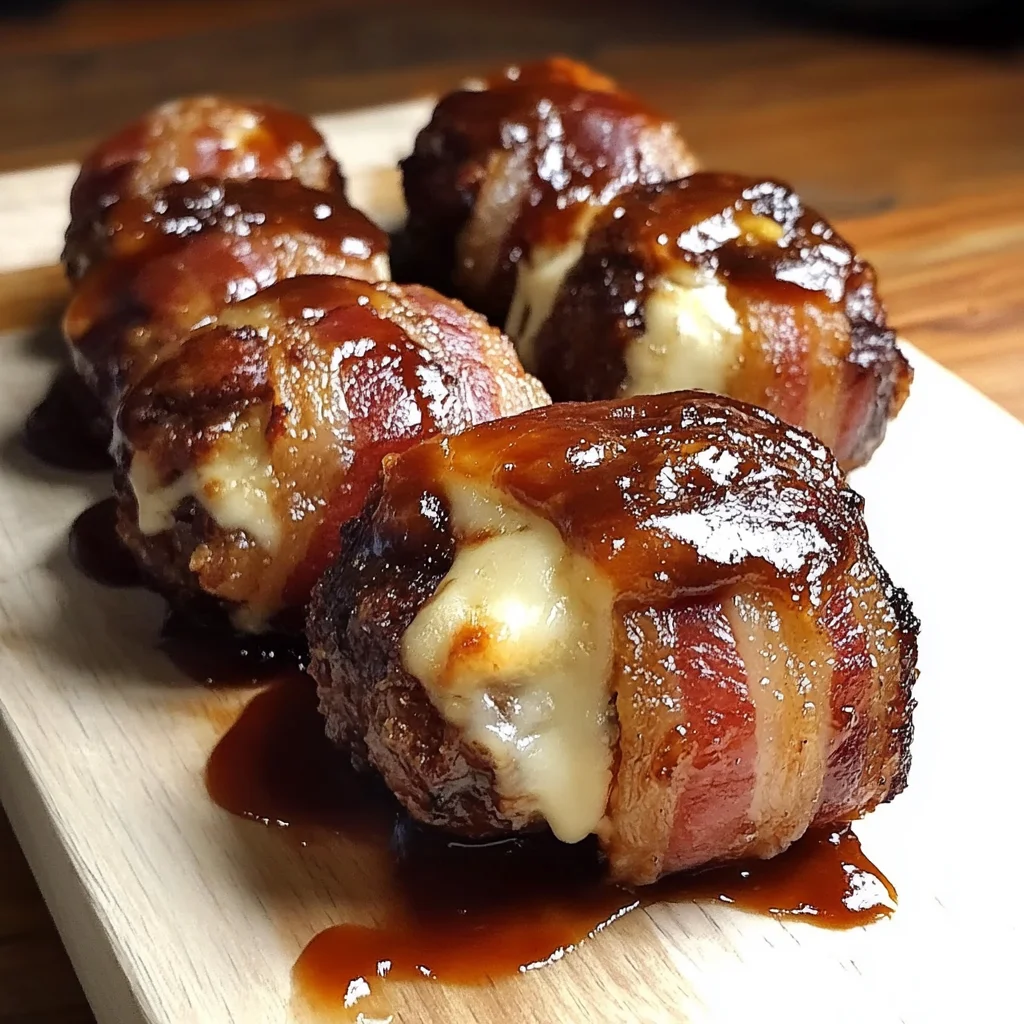
Oh, friend, do you ever get that craving for something truly comforting, something that just screams “good times” and brings a smile to everyone’s face? I know I do! There’s just something magical about gathering with loved ones, the air filled with laughter and the irresistible aroma of something truly special cooking. Well, let me tell you, these Cheddar-Stuffed BBQ Bacon Bombs are about to become your new favorite way to create those unforgettable moments. They’re ridiculously easy, surprisingly quick, and packed with so much flavor, you’ll wonder where they’ve been all your life. Picture this: juicy seasoned beef, gooey melted cheddar, crispy smoky bacon, and a sweet-and-tangy BBQ glaze, all in one perfect bite. Trust me, these aren’t just a meal; they’re an experience!
Why You’ll Love Cheddar-Stuffed BBQ Bacon Bombs
If you’re anything like me, you’re always on the hunt for those go-to recipes that bring a smile to everyone’s face without making you break a sweat. These BBQ Bacon Bombs are exactly that kind of recipe. They’re savory, they’re cheesy, and they’re oh-so-satisfying. Here’s why they’ll become your new favorite:
- Fast: From mixing bowl to oven, these come together in a flash, making them perfect for those busy weeknights when you need dinner on the table without a fuss.
- Easy: No complicated techniques here! Just simple steps that anyone can follow, whether you’re a seasoned chef or just starting your cooking journey.
- Giftable: While you might not want to give these away (they’re that good!), they make a fantastic edible gift for a new parent, a friend recovering from an illness, or even as a thoughtful gesture for a neighbor. Just bake and deliver!
- Crowd-pleasing: Seriously, who can resist bacon, cheese, and BBQ? These bombs are always the first to disappear at parties, game days, or family dinners. When I need a comforting and simple weeknight meal that practically cooks itself, I often turn to dishes like my Easy Slow Cooker Taco Chicken Rice, which, like these bombs, delivers big flavor with minimal fuss.
Ingredients
Getting started with these amazing bombs is super simple, and you likely have most of these ingredients chilling in your pantry or fridge already! We’re talking about basic, wholesome ingredients that come together to create pure magic.
- 1 pound ground beef: I always go for 80/20 for the best flavor and juiciness, but leaner ground beef works wonderfully too if you prefer!
- 1/2 cup breadcrumbs: These are our secret to keeping things moist and helping everything hold its shape. Any plain breadcrumbs will do the trick!
- 1 large egg: Our trusty binding agent, locking in all that goodness and ensuring our bombs stay perfectly formed.
- 1 teaspoon salt: Essential for bringing out all the delicious savory flavors of the beef.
- 1/2 teaspoon black pepper: A classic seasoning that adds a little warmth and depth.
- 1/2 teaspoon garlic powder: Because everything is better with a hint of garlic, right?
- 1/2 teaspoon onion powder: This adds a lovely savory layer that complements the beef beautifully.
- 1/2 cup shredded cheddar cheese: Oh, that gooey, cheesy center! Feel free to grab your favorite cheddar here – mild, sharp, or even a mix!
- 8 slices beef bacon: The glorious star of the show! It gets wonderfully crispy and adds that unbeatable smoky, salty flavor that just takes these bombs over the top.
- 1/4 cup barbecue sauce: Your favorite bottle will do just fine here. Whether you prefer sweet, smoky, tangy, or a little spicy, use what you love!
How to Make Cheddar-Stuffed BBQ Bacon Bombs
Alright, let’s get cooking! This is the fun part, and I promise, it’s a breeze. Just follow along, and you’ll have these delicious bombs ready in no time!
- First things first, let’s get that oven ready. Go ahead and preheat your oven to 375°F (190°C). While it’s heating up, grab a baking sheet and line it with parchment paper for easy cleanup. Trust me, you’ll thank yourself later!
- Now, in a large mixing bowl, it’s time to bring our meat mixture to life. Add your ground beef, breadcrumbs, egg, salt, black pepper, garlic powder, and onion powder. Dive in with your hands (it’s the best way!) and mix everything until it’s just fully integrated. A little tip from my kitchen: try not to overmix, as that can make the meat tough. We want these bombs to be wonderfully tender!
- Time for the cheesy surprise! Gently divide your meat mixture into eight equal portions. Take each portion and flatten it into a small patty – kind of like a mini burger. Now, place a generous pinch of that delicious shredded cheddar cheese right in the center. Carefully shape the meat around the cheese, rolling it into a neat ball and making sure the cheese is completely sealed inside. This is crucial to prevent any gooey leaks during baking!
- Next up, the bacon! Take one slice of beef bacon and wrap it snugly around each stuffed meatball. Make sure to secure the ends underneath the ball so it stays perfectly wrapped as it bakes. This creates that irresistible crispy exterior.
- Arrange your bacon-wrapped bombs onto your prepared parchment-lined baking sheet, leaving a little space between each one so they can crisp up nicely.
- Now for that classic BBQ flavor! Grab your favorite barbecue sauce and brush each bomb evenly. Don’t be shy here; a good coating will give them a fantastic glaze and a tangy kick.
- Pop that baking sheet into your preheated oven. Bake for about 25–30 minutes, or until the bacon is gloriously crisp and browned, and the internal temperature of the beef reaches a safe 160°F (71°C). Every oven is a little different, so keep an eye on them!
- Once they’re out of the oven, let them cool for just a minute or two before serving. They’ll be piping hot and absolutely delicious! Enjoy these hot and watch them disappear!
Substitutions & Additions
One of my favorite things about cooking is how flexible recipes can be! These Cheddar-Stuffed BBQ Bacon Bombs are no exception. Feel free to get creative and make them your own!
- Ground Meat Swap: Not a beef fan? No problem! You can easily use ground turkey, ground pork, or even a combination of meats. Just ensure it reaches the correct internal temperature for safe eating.
- Cheese Varieties: While cheddar is classic, imagine a spicy kick with Pepper Jack, a melty pull with mozzarella, or the creamy goodness of Colby Jack! You could even try a smoky Gouda.
- Bacon Alternatives: If you prefer, regular pork bacon works beautifully too – just adjust your cooking time slightly as it might render fat differently. For a lighter option, you could even try thinly sliced prosciutto for a gourmet touch.
- Sauce It Up: Don’t limit yourself to just BBQ! Try a sweet and savory teriyaki glaze, a spicy hot honey sauce, or even just a simple dry rub for a different flavor profile.
- Spice Them Up: For a bit of heat, finely chop a jalapeño or two (remove seeds for less heat) and mix it into the ground beef. A dash of smoked paprika or a pinch of cayenne pepper in the meat mixture can also add a lovely depth of flavor.
- Veggie Boost: Finely diced onion or bell pepper mixed into the meat can add extra flavor and a touch of vegetable goodness. Just make sure they’re diced very small so they cook through.
And if you’re a fan of these savory little ‘bombs,’ you definitely have to try my Garlic Parmesan Cheeseburger Bombs next for a whole new flavor adventure!
Tips for Success
To ensure your Cheddar-Stuffed BBQ Bacon Bombs turn out perfectly every single time, here are a few of my go-to tips:
- Don’t Overmix the Meat: This is a golden rule for meatballs and meatloaf! Overmixing can make your beef tough and dense. Mix just until the ingredients are combined.
- Seal That Cheese Tightly: Take a moment to really pinch and seal the edges of the meat around the cheddar. This prevents the cheese from melting out and creating a mess on your baking sheet. We want that gooey goodness inside the bomb!
- Don’t Crowd the Pan: Give each bomb its space on the baking sheet. If they’re too close together, they’ll steam instead of crisp up, and we want that bacon to be perfectly crunchy!
- Pat the Bacon Dry: If your bacon is a little wet, gently pat it with a paper towel before wrapping. This helps it crisp up better in the oven.
- Even Slices of Bacon: Try to choose bacon slices that are roughly the same thickness for even cooking and crispness.
- Prep Ahead for Ease: You can assemble these bombs completely, up to the point of brushing with BBQ sauce, and store them covered in the fridge for up to 24 hours. Just add the sauce and bake when you’re ready!
How to Store Cheddar-Stuffed BBQ Bacon Bombs
If (and that’s a big if!) you happen to have any leftovers, these BBQ Bacon Bombs store beautifully, making them great for meal prep or a quick snack later.
- In the Fridge: Place any cooled leftovers in an airtight container and store them in the refrigerator for up to 3-4 days.
- In the Freezer (Cooked): If you want to save them longer, once fully cooled, place the cooked bombs in a single layer on a baking sheet and freeze until solid. Then, transfer them to a freezer-safe bag or container. They’ll keep well for up to 1 month. Thaw overnight in the fridge before reheating.
- In the Freezer (Uncooked): You can also freeze them uncooked! Follow all the assembly steps, but don’t brush with BBQ sauce. Flash freeze on a baking sheet, then transfer to a freezer-safe bag. Thaw in the fridge, then add sauce and bake as directed.
- Reheating: For best results, reheat in an oven or air fryer at 350°F (175°C) until warmed through and the bacon is crispy again, about 10-15 minutes. This will help maintain that delicious texture. Microwaving is an option, but the bacon won’t be as crisp.
FAQs
Here are answers to some common questions you might have about making these delightful Cheddar-Stuffed BBQ Bacon Bombs:
Q: Can I use ground turkey instead of ground beef?
A: Yes, absolutely! Ground turkey or even ground chicken would work beautifully for this recipe. Just be sure to cook them until they reach an internal temperature of 165°F (74°C) to ensure they are fully cooked through.
Q: What’s the best way to get the bacon extra crispy?
A: To achieve super crispy bacon, make sure your bombs aren’t crowded on the baking sheet, allowing air to circulate. You can also pat the bacon dry before wrapping. If your bacon isn’t quite as crisp as you’d like at the end of baking, you can pop them under the broiler for a minute or two (watching them very carefully!) until they reach your desired crispness.
Q: Can I make these ahead of time?
A: Yes, you certainly can! You can assemble the bombs (stuffing the cheese, wrapping the bacon) and store them in an airtight container in the refrigerator for up to 24 hours before baking. When you’re ready to cook, brush with BBQ sauce and bake as directed.
Q: What kind of barbecue sauce should I use?
A: The beauty of this recipe is that you can use your absolute favorite barbecue sauce! Whether you prefer a sweet, smoky, tangy, or spicy variety, it will all taste fantastic. Don’t be afraid to experiment with different brands and flavors.
For more delicious and easy recipes, be sure to follow us on Pinterest!
Easy Cheddar-Stuffed BBQ Bacon Bombs
Ingredients
Equipment
Method
- Step 1: Preheat your oven to 375°F (190°C). Line a baking sheet with parchment paper for easy cleanup.
- Step 2: In a large mixing bowl, combine ground beef, breadcrumbs, egg, salt, black pepper, garlic powder, and onion powder. Mix until just integrated, being careful not to overmix.
- Step 3: Divide the meat mixture into eight equal portions. Flatten each portion into a small patty, place a generous pinch of shredded cheddar cheese in the center, and carefully shape the meat around the cheese, rolling it into a neat ball and sealing completely.
- Step 4: Wrap one slice of beef bacon snugly around each stuffed meatball, securing the ends underneath. Arrange the bacon-wrapped bombs on the prepared baking sheet, leaving space between each.
- Step 5: Brush each bomb evenly with your favorite barbecue sauce.
- Step 6: Bake for 25–30 minutes, or until the bacon is crispy and browned, and the internal temperature of the beef reaches 160°F (71°C).
- Step 7: Let cool for a minute or two before serving. Enjoy hot!