There’s something truly nostalgic about the crunch of a perfectly fried chicken breast paired with a burst of unexpected flavor. If you grew up loving the tangy zip of dill pickles and the rich, savory goodness of Parmesan cheese, then this Crispy Dill Pickle Parmesan Chicken recipe is about to become your new favorite comfort food. It’s one of those dishes that brings back memories of family dinners, yet feels exciting and fresh enough to impress anyone at your next get-together.
What I absolutely adore about this recipe is how effortlessly it transforms simple chicken breasts into a crispy, golden masterpiece infused with the bright, zesty notes of dill pickle juice. The Parmesan adds a nutty, cheesy layer that perfectly complements the tang, while the seasoned breadcrumb coating gives you that crave-worthy crunch we all love. Plus, it’s quick and easy to make—ready in under an hour—making it ideal for busy weeknights or casual weekend dinners. Trust me, once you try this, it’ll become a staple in your kitchen rotation!
Why You’ll Love Crispy Dill Pickle Parmesan Chicken
- Fast – Marinate, coat, and fry in less than an hour!
- Easy – Simple ingredients and straightforward steps make it foolproof.
- Giftable – Make a batch for friends or family and watch everyone swoon.
- Crowd-pleasing – Perfect for game days, potlucks, or family dinners.
Ingredients
Let’s talk ingredients for a moment because every single one plays a starring role here:
- 4 boneless, skinless chicken breasts – The perfect blank canvas for all those bold flavors.
- 1 cup dill pickle juice – This is the secret weapon! It tenderizes the chicken and infuses it with that unmistakable tang.
- 1 cup seasoned breadcrumbs – Adds crunch and seasoning for a flavorful crust.
- 1/2 cup grated Parmesan cheese – Brings a savory, nutty punch that pairs beautifully with dill.
- 1/2 cup all-purpose flour – Helps the coating stick and creates a nice base layer.
- 2 large eggs, whisked – Acts as the “glue” binding the flour and breadcrumb layers.
- 1 tsp garlic powder – Adds a subtle depth of flavor.
- 1 tsp onion powder – Enhances the savory profile.
- 1/2 tsp paprika – Gives a touch of warmth and color.
- Salt and pepper – To taste, to bring everything together.
- Cooking oil – For frying, choose a neutral oil like vegetable or canola for the best crisp.
Each ingredient is easy to find, and you probably already have most of them in your pantry. If you’re as much of a fan of tangy chicken as I am, this recipe will quickly become a go-to. And if you love putting a twist on classic dishes, you might also enjoy my Creamy Lemon Chicken for another zesty chicken favorite.
How to Make Crispy Dill Pickle Parmesan Chicken
Now, let’s get cooking! I’ll walk you through each step so you feel confident and ready to create this crispy delight.
- Marinate the Chicken: Start by placing your chicken breasts in a shallow dish or a zip-top bag. Pour the dill pickle juice over the chicken, making sure each piece is well coated. This marinade is key—not only does it tenderize the meat, but it also infuses that unmistakable dill pickle tang. Refrigerate the chicken for anywhere from 30 minutes up to 2 hours. I usually aim for about an hour; it’s the sweet spot for flavor without turning the chicken too soft.
- Prepare Your Dredging Stations: While the chicken marinates, set up three shallow dishes to streamline your breading process. In the first dish, mix the flour with garlic powder, onion powder, paprika, salt, and pepper. This seasoned flour will be the first layer of coating.
- In the second dish, whisk your eggs until smooth. This will help the breadcrumb mixture stick perfectly.
- In the third dish, combine the Parmesan cheese with the seasoned breadcrumbs. This combo is what creates that irresistible golden crust that’s cheesy, crunchy, and packed with flavor.
- Coat the Chicken: When your chicken is marinated, remove it from the fridge and pat it dry with paper towels. This step is important to ensure the coating sticks well and fries up crispy instead of soggy.
- Now, take each chicken breast and dredge it first in the seasoned flour, shaking off any excess. Next, dip it into the whisked eggs, making sure it’s fully coated. Finally, press it into the Parmesan-breadcrumb mixture, coating it evenly and generously. Don’t be shy here—this crust is what makes each bite so delightful.
- Fry to Perfection: Heat about 1/2 inch of cooking oil in a large skillet over medium-high heat. When the oil is hot (you can test it by dropping a pinch of the breadcrumb mixture in—it should sizzle immediately), carefully add the chicken breasts. Fry for about 5 to 7 minutes on each side, depending on thickness, until the chicken is golden brown and cooked through. The internal temperature should reach 165°F for safe eating.
- Drain and Rest: Transfer the cooked chicken to a wire rack set over a baking sheet to drain any excess oil. Let the chicken rest for a few minutes before serving. This resting time helps keep the juices locked in and the crust wonderfully crisp.
This method ensures a juicy, flavorful chicken with a crust that crunches satisfyingly with every bite. Pair it with your favorite sides or a simple salad, and you’ve got a meal that feels like a warm hug on a plate. For a fresh side, I often reach for an easy cucumber salad, which balances the richness perfectly.
Substitutions & Additions
One of the best things about this recipe is how adaptable it is. Don’t have seasoned breadcrumbs on hand? No problem! You can easily substitute with plain breadcrumbs and add extra garlic powder and dried herbs to the mix.
If you want to make this a bit lighter, consider baking the chicken instead of frying. Simply place the coated chicken breasts on a greased baking sheet and bake at 400°F for 20-25 minutes, flipping halfway through. They won’t have quite the same deep-fried crunch, but the flavor will still shine through beautifully.
For extra flavor, try adding some crushed red pepper flakes to the breadcrumb mixture if you like a little heat. Or sprinkle some fresh chopped dill on top just before serving to enhance that pickle vibe.
If you’re feeling adventurous, you might enjoy stuffing the chicken breasts with a slice of sharp cheddar or cream cheese before breading. This adds a gooey surprise inside that will wow your guests. Just be sure to secure the chicken with toothpicks and adjust cooking time as needed.
And if you’re a fan of Parmesan chicken, you might appreciate my Easy Cheesy Baked Chicken Tacos that put a fun spin on Parmesan-coated chicken in a handheld form.
Tips for Success
- Don’t skip the marinade: The dill pickle juice is what makes this chicken stand out. Marinate for at least 30 minutes, but no more than 2 hours to keep the chicken from getting too soft.
- Pat chicken dry: Dry chicken holds the coating better and fries up crispier.
- Use a wire rack to drain: This prevents sogginess by letting excess oil drip away instead of pooling around the chicken.
- Maintain oil temperature: Keep the oil hot enough to sizzle but not so hot that the coating burns before the chicken cooks through. Medium-high heat is usually just right.
- Prep ahead: You can marinate the chicken the night before and keep it covered in the fridge. When ready to cook, just set up your dredging stations and fry fresh.
- Double coating option: For an even thicker crust, repeat the egg and breadcrumb step once more before frying.
How to Store Crispy Dill Pickle Parmesan Chicken
If you have leftovers (and believe me, that’s a good problem to have), you can store them in an airtight container in the refrigerator for up to 3 days. To reheat and keep that crispy texture, I recommend warming the chicken in a 375°F oven on a wire rack for about 10 minutes. This helps refresh the crust without making it soggy like a microwave might.
For longer storage, you can freeze cooked chicken breasts wrapped tightly in plastic wrap and placed in a freezer bag for up to 2 months. Thaw overnight in the fridge and crisp up in the oven before serving.
This recipe is perfect for meal prep too! Marinate and coat the chicken, then freeze uncooked on a baking sheet. Once frozen, transfer to a freezer bag and bake or fry directly from frozen when you’re ready. It’s a smart way to have a flavorful dinner ready in no time.
FAQs
Can I use dill pickle juice from homemade pickles?
Absolutely! Homemade pickle juice works wonderfully and often has a fresher, more vibrant flavor than store-bought varieties. Just be mindful of salt levels and adjust seasoning accordingly.
Is it possible to bake instead of fry the chicken?
Yes! Baking at 400°F for 20-25 minutes, flipping halfway, will give you a less oily but still deliciously crispy chicken. Using a wire rack on the baking sheet helps keep the crust crisp.
Can I use chicken thighs instead of breasts?
Definitely. Boneless, skinless thighs are juicier and can add extra flavor. Adjust cooking time accordingly; thighs may need a few more minutes to cook through.
What sides go well with Crispy Dill Pickle Parmesan Chicken?
This chicken pairs beautifully with fresh salads, roasted vegetables, or even a creamy pasta. If you love easy side dishes, I highly recommend trying my Easy Zesty Italian Tuna Pasta Salad for a light and tangy complement.
I hope you enjoy making and eating this Crispy Dill Pickle Parmesan Chicken as much as I do. It’s the kind of recipe that brings that perfect balance of comfort, crunch, and tangy excitement to your table. Whether you’re cooking for family, friends, or just treating yourself, this dish is sure to please.
For more delicious and comforting recipes, be sure to explore the full collection at Crispy Kitchens’ recipe archive. And if you love discovering new twists on classic chicken dishes, don’t miss my Easy Crispy Hot Honey Chicken Bowls—they’re another fantastic way to enjoy crispy chicken with bold flavors!
Happy cooking, and don’t forget to share your crispy creations!
Follow me on Pinterest for more mouthwatering recipes and kitchen inspiration.
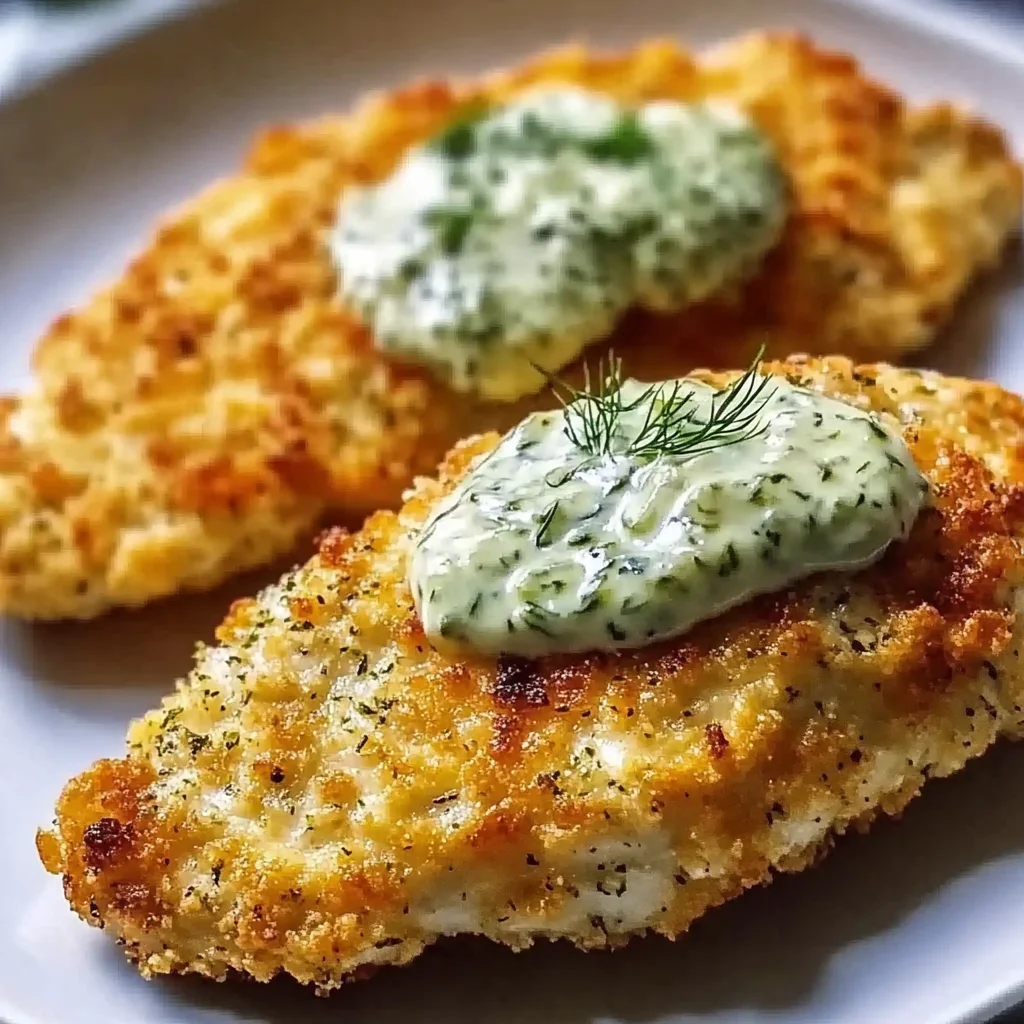
Crispy Dill Pickle Parmesan Chicken
Ingredients
Equipment
Method
- Step 1: Place chicken breasts in a shallow dish or zip-top bag and pour dill pickle juice over them. Refrigerate and marinate for 30 minutes to 2 hours, ideally about 1 hour.
- Step 2: Set up three shallow dishes: one with flour mixed with garlic powder, onion powder, paprika, salt, and pepper; one with whisked eggs; and one with Parmesan cheese combined with seasoned breadcrumbs.
- Step 3: Remove chicken from marinade and pat dry with paper towels to ensure coating sticks well.
- Step 4: Dredge each chicken breast first in the seasoned flour, then dip in the eggs, and finally coat evenly with the Parmesan-breadcrumb mixture.
- Step 5: Heat about 1/2 inch of cooking oil in a large skillet over medium-high heat. When hot, carefully add chicken breasts and fry for 5 to 7 minutes per side until golden brown and cooked through (internal temperature 165°F).
- Step 6: Transfer cooked chicken to a wire rack over a baking sheet to drain excess oil. Let rest for a few minutes before serving.