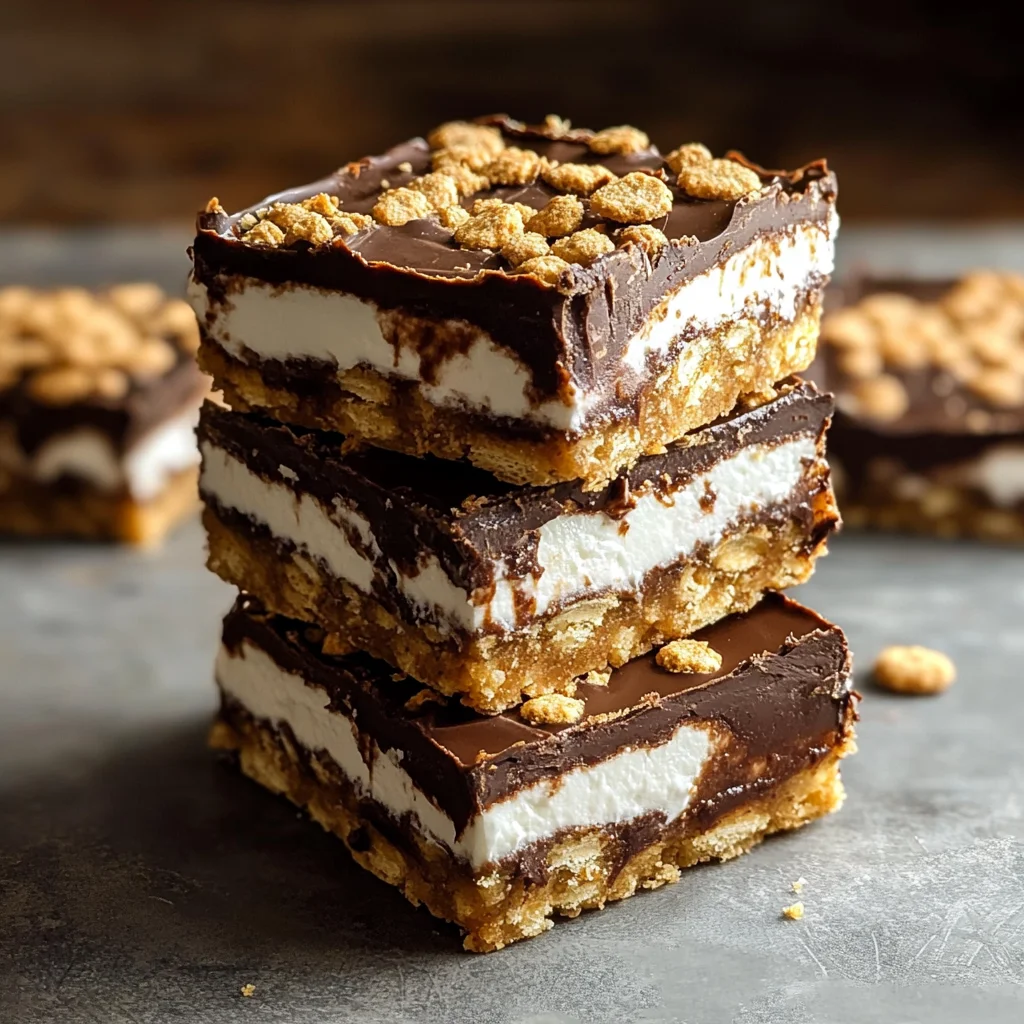
There’s something so magical about a s’more that instantly transports you back to those warm summer nights, gathered around a campfire with friends and family. The crackling fire, the sweet smell of toasted marshmallows, and that gooey, melty chocolate sandwiched between crunchy graham crackers—it’s pure nostalgia wrapped in a delicious bite. But let’s be honest, not everyone has a campfire handy year-round, and sometimes you just want those classic flavors without the hassle. That’s where these Easy S’more Bars come in. They capture all that gooey, chocolatey goodness in a simple, no-fuss baking pan treat that you can whip up anytime you want.
I love how quick and easy this recipe is, perfect for an impromptu dessert, a potluck contribution, or even a thoughtful homemade gift. Plus, there’s something so satisfying about cutting into these bars and seeing those layers of crisp graham cracker crust, melted chocolate, and toasted marshmallow bubbles. If you’re a fan of classic campfire treats but want a fuss-free way to enjoy them, these bars will become your go-to dessert in no time.
Why You’ll Love Easy S’more Bars – Decadent Chocolate Graham Treat
- Fast: Ready in under 30 minutes, these bars come together in a flash.
- Easy: Just a handful of simple ingredients and straightforward steps.
- Giftable: Wrapped up nicely, they make a sweet homemade gift for friends and neighbors.
- Crowd-pleasing: A guaranteed hit at parties, bake sales, or family gatherings.
Ingredients
One of the best parts about this recipe is how pantry-friendly it is. You probably already have most of these ingredients on hand, which makes it even easier to satisfy that s’mores craving any time.
- 2 cups graham cracker crumbs: The crunchy, slightly sweet base that gives s’mores their signature flavor. You can crush whole graham crackers yourself or buy pre-crumbled.
- 1/2 cup melted butter: This binds the crumbs into a firm, buttery crust. Using real butter adds richness and flavor.
- 4 cups chocolate chips: I recommend semi-sweet or milk chocolate chips for that perfect melty texture and sweet balance. Feel free to mix in some dark chocolate for a richer bite.
- 1 package mini marshmallows: These little clouds toast beautifully in the oven, creating that iconic gooey, golden top layer.
- 1/4 teaspoon salt (optional): Just a pinch to enhance all the sweetness and balance the flavors.
How to Make Easy S’more Bars – Decadent Chocolate Graham Treat
Let’s dive into the step-by-step process. Don’t worry, it’s straightforward, and I’m here to guide you through each part so your bars turn out perfect and irresistible.
- Preheat your oven to 350°F (175°C). This ensures your bars bake evenly from the start.
- Combine graham cracker crumbs and melted butter in a mixing bowl. Stir until every crumb is coated and the mixture feels like damp sand. This step is key to forming a solid crust. If you like a slight salty contrast, add the 1/4 teaspoon of salt here.
- Press the crumb mixture firmly into the bottom of a 9×13-inch baking pan. Use the bottom of a measuring cup or your hands to pack it down evenly. A compact crust means your bars won’t crumble when you cut them.
- Evenly pour the chocolate chips over the graham cracker crust. Spread them out a bit if needed to cover the whole surface.
- Bake the pan for 5-7 minutes. Keep a close eye on the chocolate chips—they should soften and just start to melt, but not fully liquefy.
- Remove the pan from the oven and use a spatula to spread the softened chocolate chips into a smooth, even layer. This makes sure every bite has that luscious chocolate.
- Sprinkle mini marshmallows evenly over the chocolate layer. I like to cover the entire surface so each bar has a perfect marshmallow topping.
- Return the pan to the oven and bake for 8-12 minutes. Watch closely—once the marshmallows puff up and turn golden brown, they’re ready. This toasted marshmallow layer is what makes these bars so crave-worthy.
- Let the bars cool completely on a wire rack at room temperature for 1-2 hours. This is important so the layers set and you get neat, clean slices.
- Slice into desired portions. For the cleanest cuts, dip a sharp knife in hot water and wipe it dry between slices. This little trick keeps the knife from dragging gooey marshmallows and chocolate.
And there you have it—perfectly decadent s’more bars that bring the campfire magic indoors!
Substitutions & Additions
One of the joys of this recipe is how flexible it is. Feel free to get creative or adjust based on what you have on hand!
- Chocolate type: Swap the classic chocolate chips for white chocolate, peanut butter chips, or even butterscotch chips for a different twist.
- Crust alternatives: Use crushed chocolate graham crackers for an extra chocolatey base, or try crushed digestive biscuits if you can’t find graham crackers.
- Marshmallow variations: If mini marshmallows aren’t available, regular marshmallows cut into smaller pieces work well too.
- Add nuts: Sprinkle chopped toasted pecans or walnuts over the chocolate layer before adding marshmallows for some crunch and flavor contrast.
- Mix-ins: Fold in a handful of toffee bits or mini peanut butter cups with the chocolate chips for an indulgent upgrade.
- Salted caramel drizzle: Once cooled, drizzle some salted caramel sauce over the bars for a gourmet touch.
If you love the idea of combining chocolate and graham flavors in easy desserts, you might also enjoy my Banana S’mores Muffins, which add a fruity twist to the classic combo.
Tips for Success
Because I want your s’more bars to turn out as delicious as possible, here are some of my top tips and tricks:
- Don’t skip pressing the crust firmly: This step ensures a sturdy base that holds together well when sliced.
- Watch the marshmallows closely: They can go from perfectly toasted to burnt pretty fast, so keep an eye on them during that last bake.
- Cool completely before cutting: This helps the chocolate and marshmallow layers set up nicely, making slicing much easier and cleaner.
- Use the hot water knife trick: Dipping your knife in hot water and drying it between cuts prevents sticky messes and helps you get neat bars.
- Make ahead: These bars can be made a day in advance and stored at room temperature or refrigerated. Just bring them to room temp before serving for the best texture.
- Line your pan: For super easy removal, try lining your baking pan with parchment paper leaving overhang on the sides. This way, you can lift the whole slab out to slice.
For more simple yet crowd-pleasing dessert ideas, check out my recipe collection—you’ll find plenty of inspiration for your next baking adventure.
How to Store Easy S’more Bars – Decadent Chocolate Graham Treat
Storing these bars correctly will keep them fresh and gooey for days, so you can enjoy them a little at a time (if they last that long!).
- Room temperature: Store bars in an airtight container at room temperature for up to 3 days. They stay soft and marshmallows remain tender.
- Refrigeration: You can refrigerate them for up to a week, especially if your kitchen is warm. Just note that the texture will firm up a bit, so bring them back to room temp or warm slightly before serving.
- Freezing: Wrap individual bars tightly in plastic wrap and place in a freezer-safe container or bag. Freeze for up to 2 months. Thaw at room temperature before eating. They may lose some marshmallow fluffiness but still taste amazing.
If you want an easy, make-ahead dessert that’s a guaranteed crowd-pleaser at your next gathering, these s’more bars check all the boxes.
FAQs
Can I use regular marshmallows instead of mini marshmallows?
Absolutely! Just chop regular marshmallows into smaller pieces so they melt and toast more evenly across the bars.
Do I have to use graham cracker crumbs, or can I use whole crackers?
You can crush whole graham crackers yourself in a zip-top bag with a rolling pin if you don’t have pre-crumbled ones. Just make sure the crumbs are fine enough to create a firm crust.
Can I make these bars gluten-free?
Yes! Substitute regular graham crackers with gluten-free graham cracker crumbs or any gluten-free cookie crumbs you like. The rest of the ingredients are naturally gluten-free.
What’s the best way to cut these bars without making a mess?
Use a sharp knife dipped in hot water and dry it between cuts. This prevents the marshmallow and chocolate from sticking to the blade and gives you clean slices.
And if you’re in the mood for another no-bake chocolate treat, you might want to try this easy No-Bake Peanut Butter Brownie Cookies recipe—it’s just as indulgent and fuss-free!
Thanks for stopping by the kitchen today! I hope these Easy S’more Bars bring a little sweet warmth to your day, whether you’re baking for yourself, your family, or friends. Don’t forget to check out more cozy recipes and kitchen inspiration anytime.
For even more delicious ideas and baking inspiration, be sure to follow me on Pinterest—I’m always sharing new recipes, tips, and mouthwatering photos you won’t want to miss!
Easy S’more Bars – Your New Favorite Decadent Chocolate Graham Treat
Ingredients
Equipment
Method
- Step 1: Preheat your oven to 350°F (175°C).
- Step 2: Combine graham cracker crumbs and melted butter in a mixing bowl. Stir until mixture feels like damp sand. Add salt if using.
- Step 3: Press the crumb mixture firmly into the bottom of a 9×13-inch baking pan to form a solid crust.
- Step 4: Evenly pour chocolate chips over the crust. Spread out if needed.
- Step 5: Bake for 5-7 minutes until chocolate chips soften but do not fully melt.
- Step 6: Remove pan and spread the softened chocolate chips into a smooth, even layer with a spatula.
- Step 7: Sprinkle mini marshmallows evenly over the chocolate layer.
- Step 8: Return pan to oven and bake for 8-12 minutes until marshmallows puff up and turn golden brown.
- Step 9: Let bars cool completely on a wire rack at room temperature for 1-2 hours so layers set.
- Step 10: Slice into bars using a sharp knife dipped in hot water and dried between cuts for clean slices.