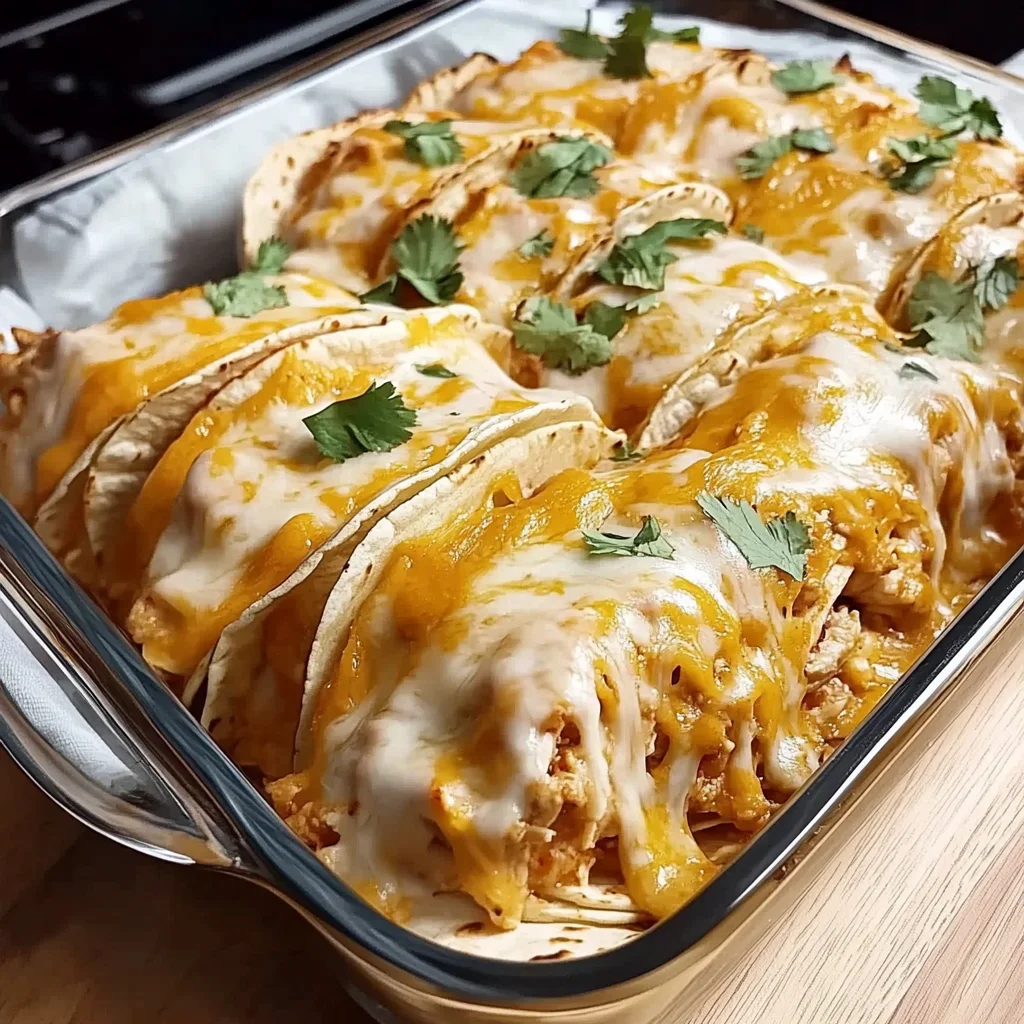
Oh, friend, do you ever have those evenings where you just want something utterly delicious, deeply satisfying, but also super easy? The kind of meal that takes you back to cozy family dinners, but without all the fuss? Well, get ready, because I’m about to introduce you to your new go-to, stress-free, flavor-packed meal: Cheesy Baked Chicken Tacos!
This recipe is more than just a meal; it’s a solution. It’s for those busy weeknights when you’re craving Mexican-inspired comfort food but don’t want a mountain of dishes. It’s quick enough for after-school activities, simple enough for beginners, and so incredibly cheesy and flavorful that everyone at the table will be asking for seconds. Trust me, once you try these, you’ll wonder how you ever lived without them!
Why You’ll Love Cheesy Baked Chicken Tacos
- Fast
- Easy
- Giftable
- Crowd-pleasing
Ingredients
Gathering your ingredients for these baked chicken tacos is a breeze! Here’s what you’ll need:
- 2 cups cooked shredded chicken: This is where the “fast” comes in! A store-bought rotisserie chicken is your best friend here, or use any leftover cooked chicken you have on hand.
- 1 tbsp olive oil: Just a little to get our aromatics going.
- 1 small onion, diced: Adds a lovely savory base to our chicken filling.
- 2 cloves garlic, minced: Because everything is better with garlic, right?
- 1 (10 oz) can diced tomatoes with green chilies, drained: This is a secret weapon for flavor, adding a touch of tomatoey goodness and a mild kick without extra effort.
- 1 packet taco seasoning (or homemade blend): Your favorite brand works perfectly. If you’re feeling fancy, whip up your own blend of chili powder, cumin, paprika, and oregano!
- ½ cup chicken broth: To keep our chicken filling juicy and help the flavors meld together.
- 8–10 flour or corn tortillas: I love the softness of flour tortillas for these, but corn works wonderfully too, especially if you warm them slightly first.
- 2 cups shredded Mexican blend cheese (or cheddar + mozzarella mix): The star of the show! This is what makes them so deliciously cheesy and bubbly.
- ½ cup red onion, diced (optional): For a little fresh crunch and zing right on top.
- ½ cup fresh cilantro, chopped: Brightens everything up and adds that classic taco aroma.
- Sour cream, salsa, or guacamole (for serving): The perfect cool and creamy accompaniments for dipping!
How to Make Cheesy Baked Chicken Tacos
Let’s get cooking! You won’t believe how simple these steps are to create such a comforting and delicious meal.
- First things first, grab your favorite large skillet and heat that tablespoon of olive oil over medium heat. Once it’s shimmering, toss in your diced onion and minced garlic. Sauté them gently for about 3-5 minutes, until they’re softened and smell absolutely amazing.
- Now for the magic! Stir in your cooked shredded chicken, the drained diced tomatoes with green chilies, that trusty packet of taco seasoning, and the chicken broth. Give it a good stir to combine everything beautifully. Let it all simmer for about 5-6 minutes, or until the sauce has thickened up nicely and all those flavors have had a chance to become best friends. If you’re starting with raw chicken and need to cook it first, you could even prep some flavorful shredded chicken using a recipe like our Easy Baked Ranch Chicken beforehand to make this step even smoother!
- While your chicken mixture is simmering, go ahead and preheat your oven to a cozy 375°F (190°C).
- Lightly grease a 9×13-inch baking dish. A little cooking spray or a pat of butter will do the trick to prevent sticking.
- Time to assemble! Lay out your tortillas. Spoon a generous amount of the warm chicken mixture into the center of each tortilla, then sprinkle a little bit of your shredded cheese on top of the filling. Don’t overdo it with the filling, or they’ll be hard to roll! Roll up each tortilla snugly and place it seam-side down in your prepared baking dish. For more taco night inspiration, especially if you’re a seafood lover, don’t miss our Quick & Easy Grilled Fish Tacos!
- Once all your tacos are nestled in the dish, generously sprinkle the remaining shredded cheese evenly over the tops. This is where we get that glorious golden, bubbly crust!
- If you’re feeling it (and I highly recommend it!), scatter the diced red onion and chopped fresh cilantro over the top of the cheese. It adds a pop of color and freshness that is just chef’s kiss.
- Pop your baking dish into the preheated oven and bake uncovered for 15-20 minutes. You’re looking for that cheese to be perfectly melted, bubbly, and slightly golden brown around the edges. Oh, the anticipation!
- Carefully remove from the oven (it’ll be hot!) and let it rest for a minute. Garnish with a little more fresh cilantro if you like, and serve immediately with big dollops of sour cream, spoonfuls of salsa, or a scoop of creamy guacamole. Enjoy every single bite!
Substitutions & Additions
One of the best things about tacos? They’re incredibly versatile! Feel free to play around with these ideas:
- Spice it Up: If you love a little extra heat, add a pinch of cayenne pepper to your chicken mixture, or a few dashes of your favorite hot sauce. Sliced jalapeños on top before baking would also be fantastic!
- Different Meats: Not a chicken fan, or just want to switch things up? You can absolutely use cooked ground beef, ground turkey, or even shredded pork in place of the chicken. And if you’re looking for another super simple, cheesy, ground-meat dish that’s just as satisfying, you might love our Easy Cheesy Ground Beef Quesadillas.
- Vegetarian Option: For a meatless meal, swap the chicken for black beans or pinto beans, maybe some sautéed bell peppers and corn.
- Cheese, Please: While Mexican blend is perfect, feel free to use Monterey Jack, Colby Jack, or even a sharp cheddar if that’s what your heart desires.
- Extra Veggies: Sauté some diced bell peppers or corn along with your onion and garlic for extra flavor and nutrition in the filling.
- Crispy Shells: If you prefer a crispier taco, you can slightly bake your tortillas before filling them, or even use hard taco shells and simply fill them, top with cheese, and bake.
Tips for Success
Making these baked chicken tacos is pretty straightforward, but a few little tricks can make them absolutely perfect!
- Don’t Overfill: It’s tempting to load them up, but a moderate amount of filling ensures they roll up easily and stay intact while baking. About 1/4 to 1/3 cup of filling per tortilla is usually just right.
- Warm Your Tortillas: If your tortillas are feeling a bit stiff and prone to cracking, warm them slightly before filling. You can do this in a microwave (10-15 seconds per stack) or quickly in a dry skillet. This makes them pliable and much easier to roll.
- Use Cooked Chicken: This recipe truly shines with pre-cooked shredded chicken. It’s the ultimate shortcut! If you don’t have leftover chicken, a rotisserie chicken is your best friend.
- Flavorful Seasoning: Don’t skimp on the taco seasoning! It’s key to that delicious, authentic taste. Taste your chicken mixture before filling and adjust seasoning if needed.
- Prep Ahead: The chicken filling can be made a day or two in advance and stored in the fridge. This makes assembly even quicker on a busy night.
How to Store Cheesy Baked Chicken Tacos
Got leftovers? Lucky you! Here’s how to keep those delicious baked chicken tacos fresh:
- In the Fridge: Let any leftover tacos cool completely, then store them in an airtight container in the refrigerator for up to 2-3 days.
- Reheating: For best results, reheat in a preheated oven at 350°F (175°C) for about 10-15 minutes, or until warmed through and the cheese is bubbly again. You can also microwave them, but the tortillas might be softer.
- Freezing (Unbaked): You can assemble the tacos (without the final topping of cilantro/red onion) and freeze them uncooked. Wrap them tightly in plastic wrap and then foil, or place them in a freezer-safe bag. They’ll keep for up to 1-2 months. When ready to bake, thaw them in the fridge overnight and bake as directed, or bake from frozen (this will increase the baking time).
- Freezing (Baked): Baked tacos can also be frozen! Once cooled, wrap individually and freeze. Reheat in the oven from frozen until warmed through and crispy.
FAQs
Q: Can I use ground beef instead of chicken?
A: Absolutely! Cook and season ground beef (or turkey) as you would for traditional tacos, then use it in place of the shredded chicken. It’s just as delicious!
Q: Can I make these ahead of time?
A: Yes! You can prepare the chicken filling up to 2-3 days in advance and store it in an airtight container in the fridge. Then, simply assemble and bake when you’re ready for dinner.
Q: What kind of tortillas work best?
A: Both flour and corn tortillas work great. I personally love flour for their soft, pliable texture, but corn tortillas offer a more traditional flavor and can be fantastic when warmed slightly before rolling to prevent cracking.
Q: What other toppings can I serve with these?
A: The possibilities are endless! Think diced avocado, a squeeze of fresh lime juice, pico de gallo, a sprinkle of cotija cheese, or even a drizzle of your favorite hot sauce or a creamy cilantro-lime dressing.
For more delicious and easy recipes, make sure to follow us on Pinterest!

Cheesy Baked Chicken Tacos
Ingredients
Equipment
Method
- Step 1: Grab your favorite large skillet and heat 1 tablespoon of olive oil over medium heat. Add the diced onion and minced garlic. Sauté gently for about 3-5 minutes, until softened and fragrant.
- Step 2: Stir in the cooked shredded chicken, the drained diced tomatoes with green chilies, the packet of taco seasoning, and the chicken broth. Stir well to combine. Let it simmer for about 5-6 minutes, or until the sauce has thickened and flavors have melded.
- Step 3: While the chicken mixture is simmering, preheat your oven to 375°F (190°C).
- Step 4: Lightly grease a 9x13-inch baking dish to prevent sticking.
- Step 5: Lay out your tortillas. Spoon a generous amount of the warm chicken mixture into the center of each tortilla, then sprinkle a little shredded cheese on top of the filling. Roll up each tortilla snugly and place it seam-side down in your prepared baking dish.
- Step 6: Once all tacos are nestled in the dish, generously sprinkle the remaining shredded cheese evenly over the tops.
- Step 7: Optionally, scatter the diced red onion and chopped fresh cilantro over the top of the cheese for a pop of color and freshness.
- Step 8: Pop your baking dish into the preheated oven and bake uncovered for 15-20 minutes, or until the cheese is perfectly melted, bubbly, and slightly golden brown around the edges.
- Step 9: Carefully remove from the oven and let rest for a minute. Garnish with more fresh cilantro if desired, and serve immediately with sour cream, salsa, or guacamole. Enjoy!