Hey there, friend! Do you ever get that craving for something that’s a little sweet, a little spicy, and perfectly comforting? You know, the kind of meal that feels like a weekend treat but is totally doable any night of the week? Well, get ready, because these Hot Honey Chicken Bowls are about to become your new favorite go-to. Forget takeout – we’re making crispy, sticky, flavorful chicken right here in our own kitchens, and piling it high with all the good stuff in a bowl. It’s incredibly easy, surprisingly quick, and honestly, just plain fun to eat!
Why You’ll Love This Recipe
Seriously, what’s not to love? These bowls hit all the right notes:
- Fast: Get dinner on the table in under an hour!
- Easy: Simple steps, big flavor payoff.
- Giftable: (Okay, maybe not the whole bowl, but the Hot Honey Chicken itself is a fantastic potluck addition!)
- Crowd-pleasing: Everyone gets to build their own perfect bowl!
Ingredients
Here’s what you’ll need to gather for this flavor explosion. Nothing fancy, just good stuff!
- For the chicken:
- 1 lb boneless, skinless chicken breasts or thighs: Cut into bite-sized pieces. Thighs tend to stay a little more moist, but breasts work great too!
- 1/2 cup buttermilk: This is our little secret weapon for tender, juicy chicken. No buttermilk? No problem! Just mix 1/2 cup milk with 1 tsp lemon juice or white vinegar and let it sit for 5 minutes.
- 1 cup all-purpose flour: The base for our crispy coating.
- 1 teaspoon paprika: Adds color and a touch of smoky sweetness.
- 1/2 teaspoon garlic powder: Because garlic makes everything better, right?
- Salt and pepper, to taste: The essentials!
- Oil for frying: Use something with a high smoke point like vegetable, canola, or peanut oil.
- For the hot honey glaze:
- 1/4 cup honey: The sweet side of our sweet and spicy duo.
- 1–2 teaspoons hot sauce: Pick your favorite! Sriracha, Frank’s RedHot, or a local craft sauce work perfectly. Start with less if you’re sensitive to heat and add more if you’re feeling brave!
- 1/2 teaspoon red pepper flakes (optional): For an extra kick and pretty speckles!
- 1/2 tablespoon butter: Just a tiny bit for richness and shine.
- For the bowls:
- 2 cups cooked rice or quinoa: Your base! Whatever you prefer or have on hand.
- 1 cup shredded lettuce or cabbage: Adds a lovely crunch and freshness.
- 1/2 cup cherry tomatoes, halved: Little bursts of sweetness.
- 1/2 avocado, sliced: Creamy, cool goodness.
- 1/4 cup shredded cheese (cheddar or Monterey Jack): Because cheese belongs everywhere, especially in bowls!
- Ranch or creamy dressing (optional): Adds another layer of creamy comfort.
- Fresh parsley or green onions for garnish: A pop of color and fresh flavor.
How to Make It
Okay, let’s get cooking! This comes together quicker than you think.
- First things first, get your chicken ready. You’ll want to cut your chicken into roughly equal bite-sized pieces so they cook evenly. Pop them into a bowl and pour that buttermilk over them. Let them soak for at least 15-30 minutes. This is key for tender chicken!
- While the chicken is soaking, set up your dredging station. Grab a shallow bowl (a pie plate works great here!) and whisk together the flour, paprika, garlic powder, salt, and pepper.
- Now, drain the excess buttermilk from your chicken pieces. Take each piece and dredge it in the flour mixture, pressing gently to make sure it’s nicely coated. You want a good layer of that seasoned flour for maximum crispiness! Set the coated pieces aside.
- Heat your oil in a deep skillet or pot. You need enough oil to come up the sides of the chicken pieces when you fry them. Get that oil hot – ideally around 350°F (175°C). If you don’t have a thermometer, you can test it by dropping a tiny pinch of flour in; it should sizzle immediately.
- Carefully add your coated chicken pieces to the hot oil, but don’t overcrowd the pan! Fry in batches. Let them cook for about 5-6 minutes, flipping halfway through, until they’re beautifully golden brown and crispy all over. Use a slotted spoon or spider to transfer the fried chicken to a plate lined with paper towels to drain off any excess oil.
- While your chicken is draining (or even while the last batch is frying), let’s make that glorious hot honey glaze! In a small saucepan, melt the butter over low heat. Stir in the honey, hot sauce, and red pepper flakes (if using). Let it simmer gently for just 1-2 minutes – just enough to bring it together and warm it through. Don’t let it boil rapidly.
- Put the fried chicken pieces into a clean bowl and pour the hot honey glaze over them. Gently toss everything together until all those crispy chicken bites are beautifully coated in that sticky, sweet, spicy sauce.
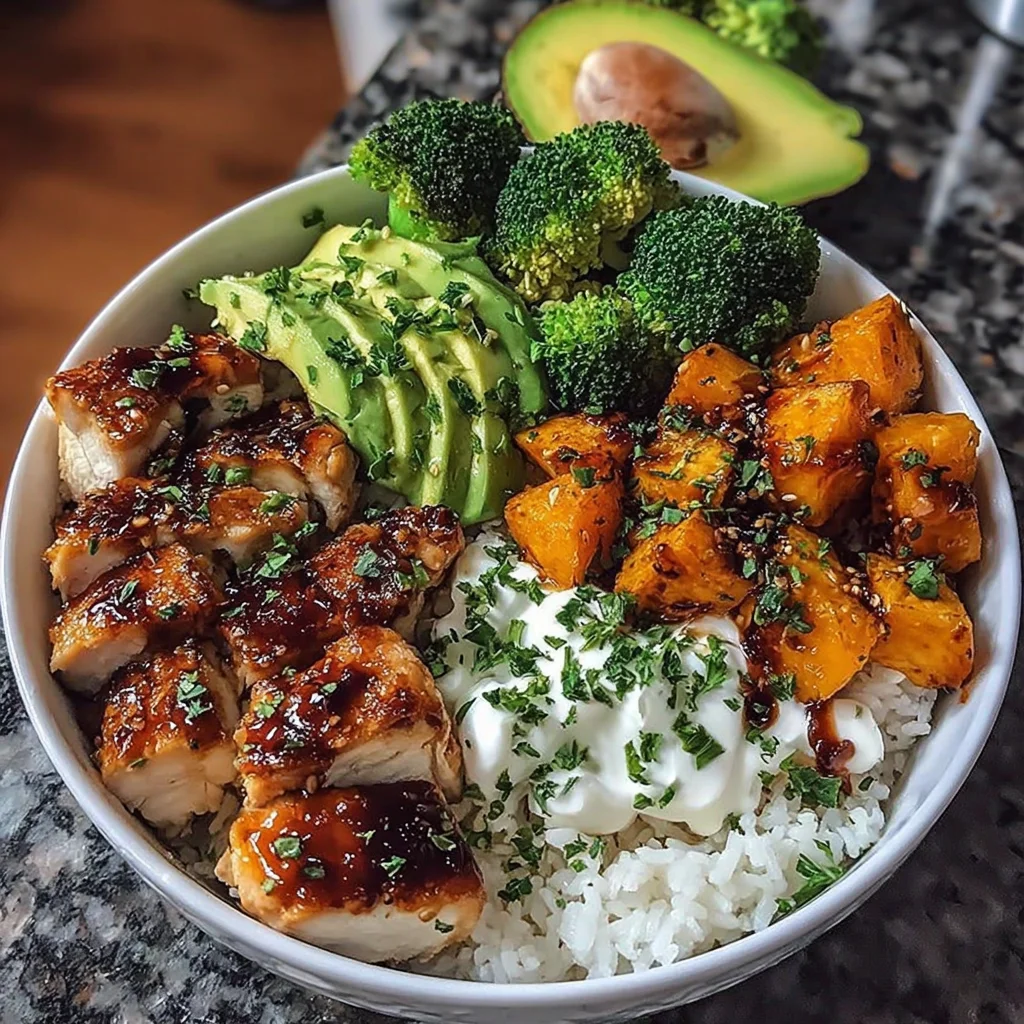
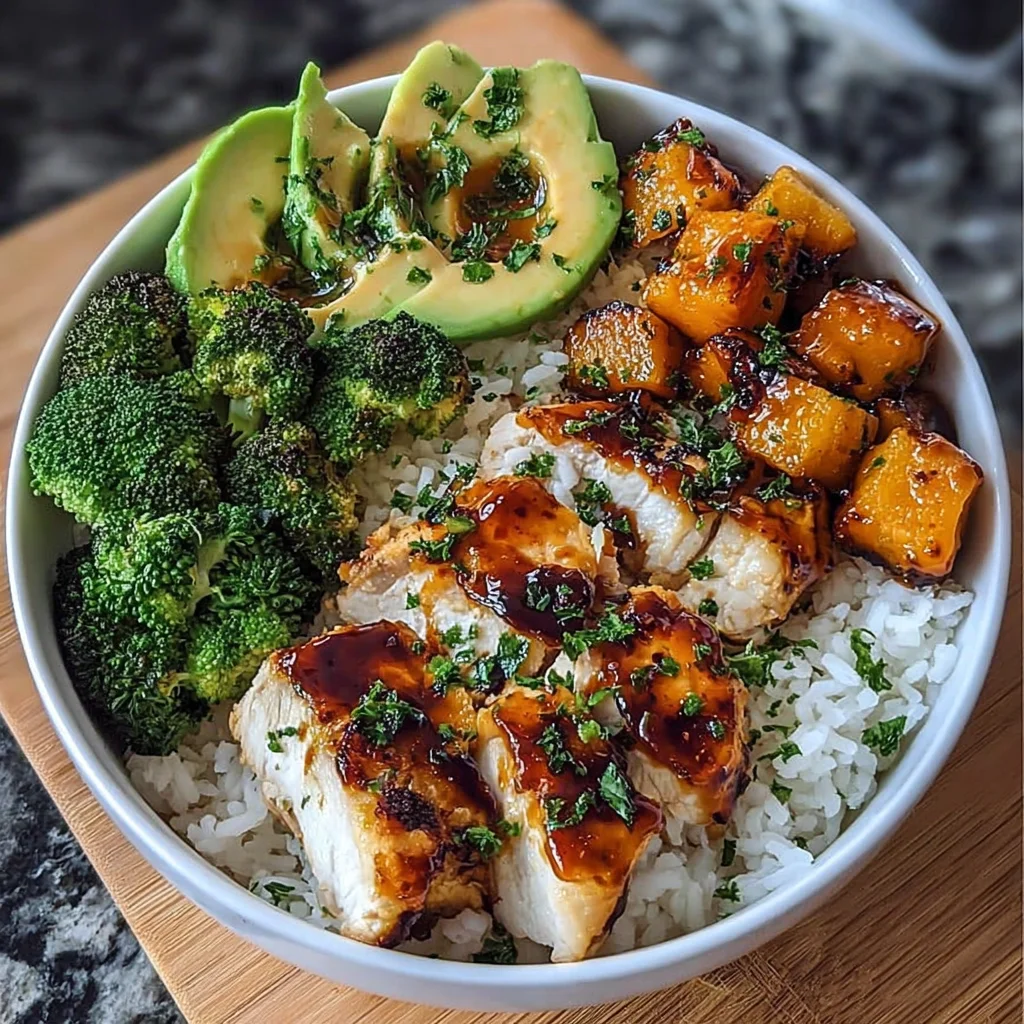
- Now for the fun part – building your bowl! In each serving bowl, pile in your cooked rice or quinoa, add a generous handful of shredded lettuce or cabbage, scatter the halved cherry tomatoes and sliced avocado. Tuck in your hot honey chicken pieces, sprinkle with shredded cheese.
- If you’re using it, drizzle some ranch or creamy dressing over the top. Finish with a sprinkle of fresh chopped parsley or green onions for a little extra color and freshness.
- Serve immediately and enjoy every single bite!
Substitutions & Additions
This recipe is super flexible! Feel free to mix and match based on what you have or what you love:
- Make it meatless: Swap the chicken for firm or extra-firm tofu, pressed and cut into cubes. You can dredge and fry it the same way! Shrimp would also be delicious and quick to fry.
- Swap the base: Not feeling rice or quinoa? Use cauliflower rice for a low-carb option, or even some simple noodles.
- Veggie power: Add other veggies like thinly sliced cucumber, bell peppers, corn, shredded carrots, or pickled red onions for extra crunch and flavor.
- Cheese please: Crumbled feta or cotija cheese would be fantastic swaps for the cheddar/Monterey Jack.
- Sauce it up: Experiment with different hot sauces in the glaze. You could also swirl in a little garlic powder or a pinch of ginger for extra flavor.
- Different dressing: A cooling blue cheese dressing, a simple crema, or even just a squeeze of lime would be great here.
- Garnish galore: Toasted sesame seeds add a nice texture and look.
Tips for Success
A few little pointers to make sure your Hot Honey Chicken Bowls turn out perfectly every time:
- Don’t skip the soak: The buttermilk really does make a difference in tenderness! Even 15 minutes helps.
- Coat it well: Make sure you really press that flour mixture onto the chicken pieces for a good crispy crust.
- Oil temperature is key: If the oil isn’t hot enough, the chicken will be greasy. If it’s too hot, the outside will burn before the inside cooks. Aim for that 350°F (175°C) sweet spot.
- Don’t overcrowd: Frying in batches is important! Too many pieces at once will lower the oil temperature and result in soggy chicken. Give them space!
- Toss just before serving: Coating the chicken in the hot honey right before adding it to the bowls keeps the glaze from making the chicken soggy if it sits too long.
- Prep ahead: You can definitely chop all your bowl ingredients (veggies, avocado, cheese) ahead of time and store them separately in the fridge. You can also mix the flour dredge. Cook your rice or quinoa in advance too!
How to Store It
These bowls are best enjoyed fresh, but you can definitely save leftovers!
I recommend storing the hot honey chicken separately from the bowl components (rice, veggies, etc.). This helps keep the chicken from getting too soggy and keeps the cold ingredients fresh.
- Store the hot honey chicken in an airtight container in the fridge for 3-4 days.
- Store the cooked rice/quinoa, chopped veggies, and cheese in separate containers.
- To reheat the chicken, the best way to regain some crispiness is in a toaster oven or air fryer until heated through. You can also gently warm it in a skillet. The microwave works too, but the texture won’t be as crisp.
- Reassemble your bowl with warmed chicken and fresh or stored cold ingredients.
FAQs
Got questions? I’ve got answers!
Q: Can I bake or air fry the chicken instead of frying?
A: Yes, you can! For baking, toss the coated chicken with a little oil and bake at 400°F (200°C) for 20-25 minutes, flipping halfway. For air frying, air fry at 400°F (200°C) for 10-15 minutes, flipping halfway. It won’t be quite as crispy as pan-frying, but it’s a healthier option that still tastes great coated in the hot honey!
Q: How spicy is the hot honey glaze?
A: That’s totally up to you! Start with 1 teaspoon of hot sauce for a mild kick and work your way up to 2 or even more if you love the heat. The honey balances it out nicely.
Q: Can I make the hot honey sauce ahead of time?
A: Absolutely! You can make the glaze and store it in a jar at room temperature. Gently warm it up on the stovetop or in the microwave for a few seconds before tossing it with the hot chicken.
Q: What kind of hot sauce should I use?
A: Any vinegar-based hot sauce you love will work! Classic options like Frank’s RedHot or Texas Pete are popular for hot honey, but feel free to experiment with your favorites.
Easy Crispy Hot Honey Chicken Bowls
Ingredients
Equipment
Method
- Step 1: Cut chicken into bite-sized pieces. Place chicken in a bowl and pour buttermilk over them. Let soak for at least 15-30 minutes.
- Step 2: While chicken is soaking, set up your dredging station. In a shallow bowl, whisk together the flour, paprika, garlic powder, salt, and pepper.
- Step 3: Drain excess buttermilk from chicken. Dredge each piece in the flour mixture, pressing gently to coat well. Set coated pieces aside.
- Step 4: Heat oil in a deep skillet or pot to about 350°F (175°C). Add coated chicken pieces carefully, frying in batches without overcrowding the pan. Cook for about 5-6 minutes per batch, flipping halfway through, until golden brown and crispy. Transfer fried chicken to a plate lined with paper towels.
- Step 5: While chicken is draining (or while last batch fries), make the hot honey glaze. In a small saucepan, melt butter over low heat. Stir in honey, hot sauce, and red pepper flakes (if using). Simmer gently for 1-2 minutes.
- Step 6: Put the fried chicken pieces into a clean bowl and pour the hot honey glaze over them. Toss gently until coated.
- Step 7: Build bowls: In each serving bowl, add cooked rice or quinoa, shredded lettuce or cabbage, cherry tomatoes, and sliced avocado. Top with hot honey chicken pieces and shredded cheese.
- Step 8: Drizzle with ranch or creamy dressing (if using). Garnish with fresh chopped parsley or green onions. Serve immediately.
Notes
- Make it meatless: Swap chicken for firm tofu or shrimp.
- Swap the base: Use cauliflower rice for low-carb or simple noodles.
- Veggie power: Add cucumber, bell peppers, corn, shredded carrots, or pickled red onions.
- Cheese please: Use crumbled feta or cotija cheese.
- Sauce it up: Experiment with different hot sauces; add garlic powder or ginger to the glaze.
- Different dressing: Try blue cheese dressing, crema, or lime juice.
- Garnish galore: Add toasted sesame seeds.
- Don't skip the soak: Buttermilk improves tenderness (15 minutes minimum helps).
- Coat it well: Press flour mixture onto chicken for crispiness.
- Oil temperature is key: Aim for 350°F (175°C) to avoid greasiness or burning.
- Don't overcrowd: Fry in batches for crispy results.
- Toss just before serving: Coats the chicken without making it soggy quickly.
- Prep ahead: Chop bowl ingredients, mix flour dredge, or cook rice/quinoa in advance.