Hey there, friend! Do you ever get that craving for something warm, soft, and utterly comforting? Something that smells like pure happiness baking in your oven? For me, that’s always homemade cheesy garlic breadsticks. Forget the dry, sad ones from the store! Making them yourself is not only incredibly satisfying, but it’s also way easier than you might think. Picture this: movie night, pizza night, soup night, or just a Tuesday night that needs a little extra joy – these breadsticks are the perfect, warm, cheesy sidekick you need. This recipe is so simple, you’ll wonder why you didn’t make them sooner. Trust me, once you make these, they’ll be your go-to!
Why You’ll Love This Recipe
- Fast: For a yeast dough, the rise time is totally manageable, making these surprisingly quick!
- Easy: No complicated techniques here! Just simple mixing, a little kneading, and shaping.
- Giftable: Okay, maybe you won’t actually give these away, but they’re perfect for bringing to a potluck or party!
- Crowd-pleasing: Seriously, who doesn’t love warm bread, garlic, and cheese? They disappear in minutes!
Ingredients
Gathering your ingredients is the first cozy step. Here’s what you’ll need to make this magic happen:
- All-purpose flour (2 cups): The building block of our delicious dough! Simple all-purpose works perfectly.
- Active dry yeast (1 packet, 2 1/4 teaspoons): This is what gives our breadsticks that wonderful fluffy rise. Make sure it’s active!
- Warm water (3/4 cup): Not hot, not cold – just nice and warm, like a cozy bath. This wakes up the yeast. Aim for around 105-115°F (40-46°C).
- Sugar (1 tablespoon): Just a tiny bit to help feed the yeast and give the dough a little sweetness.
- Salt (1 teaspoon): Essential for flavor! Don’t skip it.
- Olive oil (2 tablespoons): Adds richness and helps keep the dough soft and pliable.
- Garlic powder (1 teaspoon): Our key flavor component for that classic garlic bread taste.
- Shredded mozzarella cheese (1 cup): Melts beautifully and creates those irresistible cheese pulls. Pre-shredded is fine, but shredding your own often melts a little better!
- Parmesan cheese (1/4 cup): Adds a salty, nutty depth of flavor.
- Fresh parsley (optional, for garnish): A little sprinkle of green adds freshness and makes them look extra pretty!
How to Make It
Alright, let’s get baking! Follow these simple steps, and you’ll have warm, cheesy goodness in no time.
First things first, grab a large mixing bowl. Pour in your warm water. You want it warm enough to activate the yeast, but not so hot that it kills it. Think comfortably warm to the touch. Stir in the sugar and then sprinkle the active dry yeast over the top. Give it a gentle swirl and then just let it sit for about 5 minutes. You’ll know it’s working when it starts to get foamy and bubbly. That’s the yeast coming to life!
Once your yeast is nice and frothy, add the flour, olive oil, and salt to the bowl. Now, mix everything together. You can use a wooden spoon, a spatula, or even your hands (my favorite way!). Just keep mixing until everything comes together and forms a shaggy, sticky dough.
Time to get your hands a little dusty! Flour a clean surface (your counter works great) and turn the dough out onto it. Now, start kneading. Push the dough away from you with the heels of your hands, fold it back over, and repeat. Do this for about 5-7 minutes. You’ll feel the dough transform from sticky and rough to smooth and elastic. It should spring back slowly when you gently poke it.
Grab a clean bowl and lightly grease it with a little olive oil or cooking spray. Pop your beautifully kneaded dough into the bowl, turning it to coat all sides with the oil. Cover the bowl with a clean kitchen towel. Find a warm spot in your kitchen – maybe near a sunny window or in a slightly warm (but turned off!) oven. Let the dough rise here for about 1 hour, or until it has roughly doubled in size. This is where the magic happens!
While your dough is having its beauty rest, preheat your oven to 425°F (220°C). And get your baking sheet ready – you can grease it or line it with parchment paper (I love parchment for easy cleanup!).
Okay, hour’s up! Your dough should be big and puffy. Gently punch it down to release the air – it’s strangely satisfying! Transfer the dough back to your lightly floured surface. Now, roll it out into a rectangle shape, aiming for about 1/2 inch thick. Don’t worry about perfect edges, it’s homemade!
Using a knife or a pizza cutter, slice the dough into strips. The size is totally up to you – thin and crispy or thicker and chewy! Carefully transfer these strips to your prepared baking sheet, leaving a little space between them.
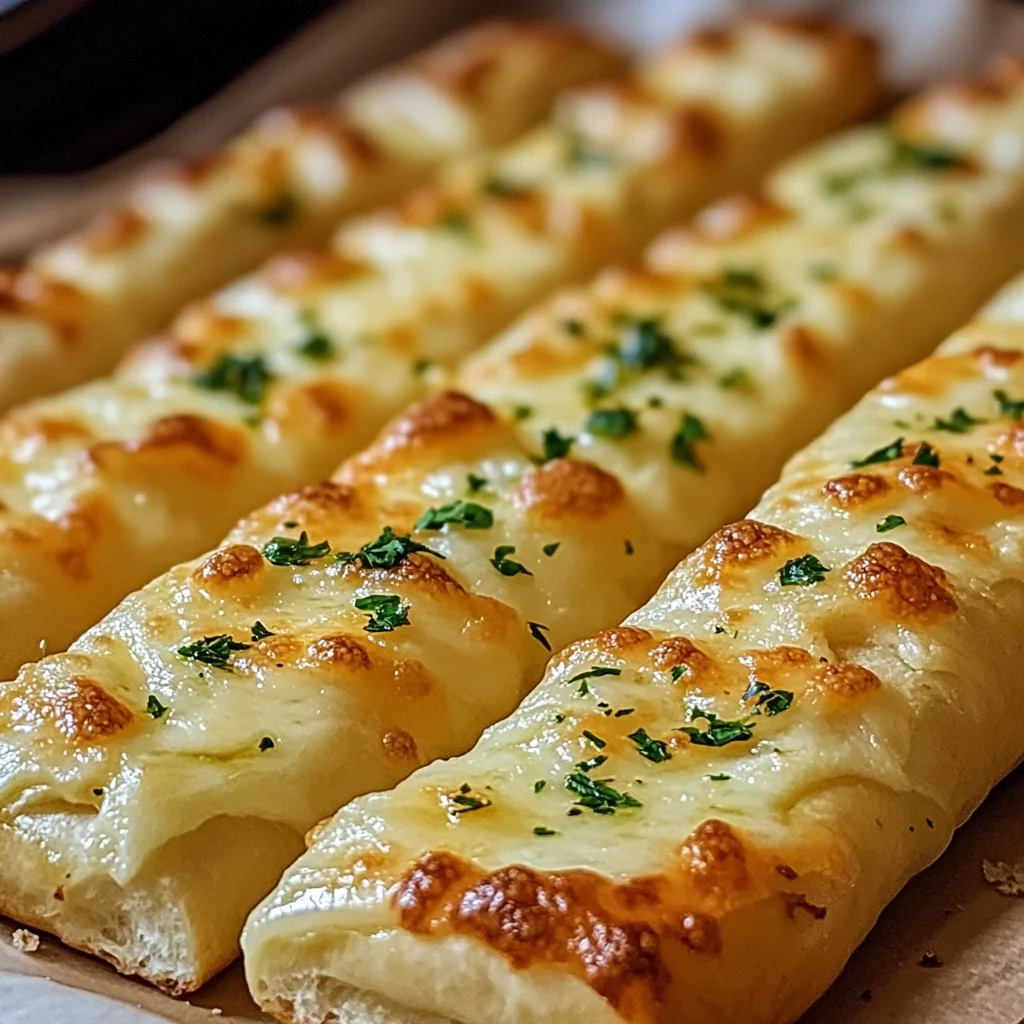
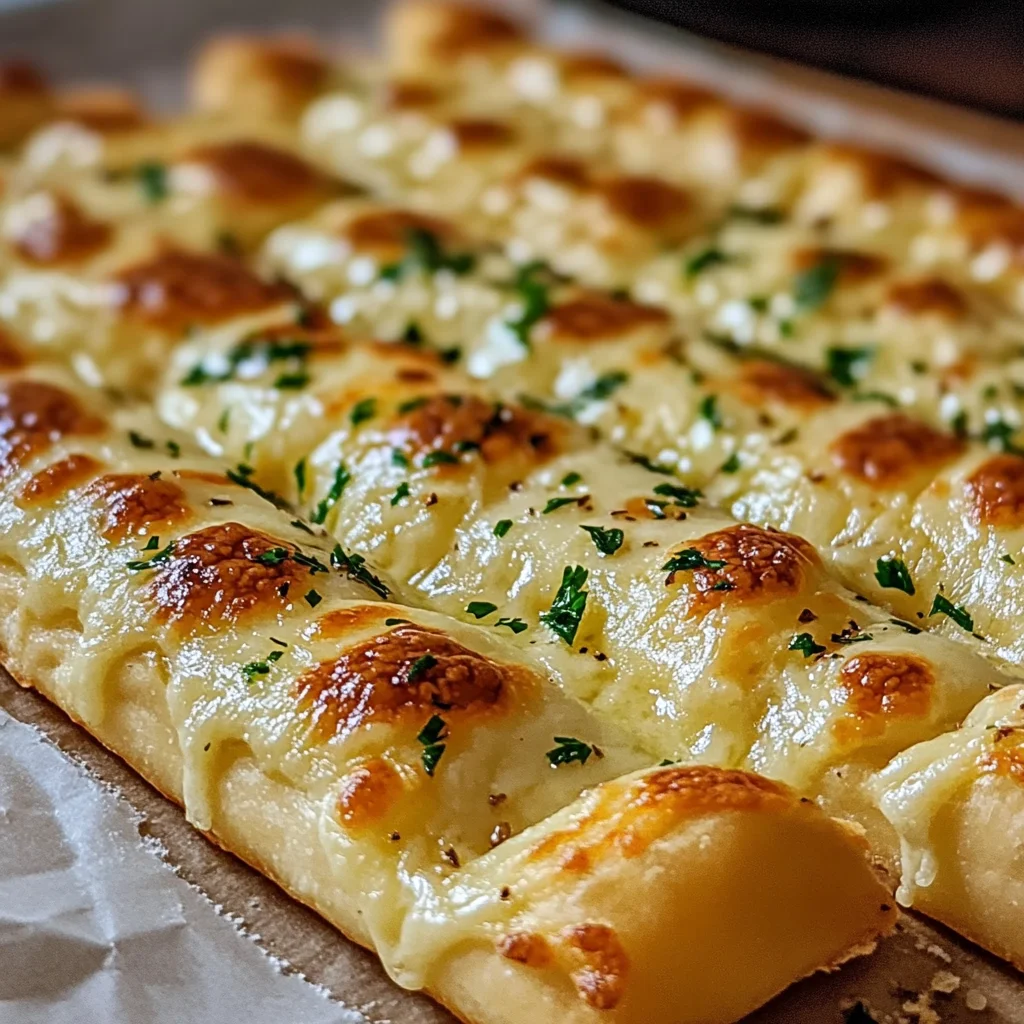
Now for the best part! Melt some butter and brush it generously over the top of each breadstick. Sprinkle them evenly with the garlic powder, then pile on that delicious shredded mozzarella and Parmesan cheese. Don’t be shy with the cheese!
Cover the breadsticks loosely with that clean kitchen towel again and let them rest for another 20 minutes. This quick second rise gives them a little extra puffiness before baking.
Pop the baking sheet into your preheated oven. Bake for 12-15 minutes. Keep an eye on them! You’re looking for them to be golden brown around the edges and for that cheese to be bubbly and melted and maybe even a little browned in spots – pure perfection.
Carefully take the hot breadsticks out of the oven. They’re going to smell amazing! Let them cool on the baking sheet for just a couple of minutes – resist the urge to grab them immediately, the cheese is lava! Serve them warm, perhaps with a sprinkle of fresh parsley if you’re feeling fancy.
Substitutions & Additions
- Cheeses: Swap mozzarella for provolone, cheddar, or a blend! You could also add a sprinkle of red pepper flakes with the cheese for a little kick.
- Herbs: Mix dried Italian seasoning or dried oregano into the garlic powder topping. Or, mix fresh chopped rosemary or chives into the dough itself!
- Garlic Infusion: For even more garlic flavor, melt butter with minced fresh garlic and brush that on before sprinkling the cheese.
- Vegan: Use plant-based butter, olive oil, and vegan mozzarella/Parmesan. The rest of the ingredients are naturally vegan.
- Everything Bagel: Sprinkle with everything bagel seasoning instead of garlic powder and cheese after the butter wash!
Tips for Success
- Warm Water is Key: If your water is too hot, it will kill the yeast. If it’s too cold, the yeast won’t activate. Use a thermometer if you’re unsure, or just test it on your wrist – it should feel comfortably warm, like baby bathwater.
- Don’t Skip the Kneading: Kneading develops the gluten, which gives your breadsticks structure and that lovely chewy texture.
- Find a Warm Spot to Rise: Yeast loves warmth! If your kitchen is chilly, you can heat your oven for a minute or two, turn it off, and let the dough rise in there.
- Don’t Overbake: Keep an eye on them towards the end of the baking time. They should be golden, not dark brown.
- Parchment Paper: Using parchment paper makes cleanup a breeze and prevents sticking. Highly recommend!
- Prep Ahead: You can make the dough, let it do its first rise, punch it down, and then store it in a greased, airtight container in the refrigerator for up to 24 hours. Let it sit at room temperature for about 30 minutes before rolling and shaping.
How to Store It
- Room Temperature: If you somehow have leftovers (unlikely!), you can store them in an airtight container or a zip-top bag at room temperature for 1-2 days. They are definitely best fresh, though!
- Refrigerator: For slightly longer storage, keep them in an airtight container in the fridge for up to 4-5 days.
- Freezer: Once completely cooled, you can freeze them in a single layer on a baking sheet until solid, then transfer them to a freezer-safe bag or container for up to 2-3 months.
- Reheating: The best way to reheat is in a preheated oven or toaster oven at around 350°F (175°C) for 5-10 minutes, until warm and slightly crispy again. Microwaving works in a pinch but can make them a bit chewy.
FAQs
Got questions? I’ve got answers!
Q: Can I use instant yeast instead of active dry?
A: Yes! You can typically substitute instant yeast directly for active dry yeast. You don’t need to proof it in the warm water first, you can just add it directly to the dry ingredients with the water and oil, but proofing it doesn’t hurt and ensures it’s active.
Q: My dough isn’t rising. What happened?
A: The most common culprit is your yeast wasn’t active (either old or killed by too-hot water) or your rising spot wasn’t warm enough. Make sure your yeast is fresh and your water temperature is correct! Yeast doughs also need time and patience.
Q: Can I make the dough in a stand mixer?
A: Absolutely! Use the dough hook attachment. Mix the wet ingredients and yeast, then add the dry. Mix on low speed until a dough forms, then increase the speed to medium-low and knead for about 5-7 minutes, until the dough is smooth and pulls away from the sides of the bowl.
Q: Can I add fresh minced garlic instead of garlic powder?
A: You can! I recommend mixing it with melted butter and brushing it on before the cheese, rather than sprinkling raw minced garlic directly on the dough. Just be aware that fresh garlic can brown quickly in the oven.
There you have it! Your guide to making the most delicious, easy homemade cheesy garlic breadsticks you’ve ever tasted. Whip up a batch soon – your taste buds will thank you!

Homemade Cheesy Garlic Breadsticks
Ingredients
Equipment
Method
- Step 1: Activate Yeast: In a large mixing bowl, pour warm water. Stir in sugar, then sprinkle active dry yeast over the top. Let it sit for about 5 minutes until foamy and bubbly.
- Step 2: Mix Dough: Add flour, olive oil, and salt to the bowl with the yeast mixture. Mix together with a spoon, spatula, or hands until a shaggy, sticky dough forms.
- Step 3: Knead Dough: Flour a clean surface and turn the dough out onto it. Knead for about 5-7 minutes, pushing the dough away with the heels of your hands, folding it back, and repeating, until the dough is smooth and elastic.
- Step 4: First Rise: Lightly grease a clean bowl with olive oil or cooking spray. Place the dough in the bowl, turning to coat. Cover with a clean kitchen towel and let rise in a warm spot for about 1 hour, or until doubled in size.
- Step 5: Prepare & Shape: While dough rises, preheat oven to 425°F (220°C). Grease a baking sheet or line with parchment paper. Gently punch down the risen dough. Transfer to a lightly floured surface and roll into a rectangle about 1/2 inch thick. Slice into strips using a knife or pizza cutter and transfer to the prepared baking sheet, spacing slightly apart.
- Step 6: Add Toppings & Second Rise: Brush melted butter generously over the top of each breadstick. Sprinkle evenly with garlic powder, then top with shredded mozzarella and Parmesan cheese. Cover loosely with the kitchen towel and let rest for another 20 minutes for a quick second rise.
- Step 7: Bake: Bake in the preheated oven for 12-15 minutes, or until golden brown around the edges and the cheese is bubbly and melted.
- Step 8: Cool & Serve: Carefully remove from the oven and let cool on the baking sheet for a couple of minutes. Serve warm, optionally garnished with fresh parsley.