Do you ever get that craving for a homemade dessert, but the thought of turning on the oven, baking, cooling, and all that fuss just makes you want to reach for a store-bought treat? Oh, believe me, I’ve been there! But what if I told you there’s a dessert that tastes like pure decadence, comes together in minutes, and requires absolutely no baking? Say hello to your new best friend: this incredible No-Bake Chocolate Cherry Cream Pie!
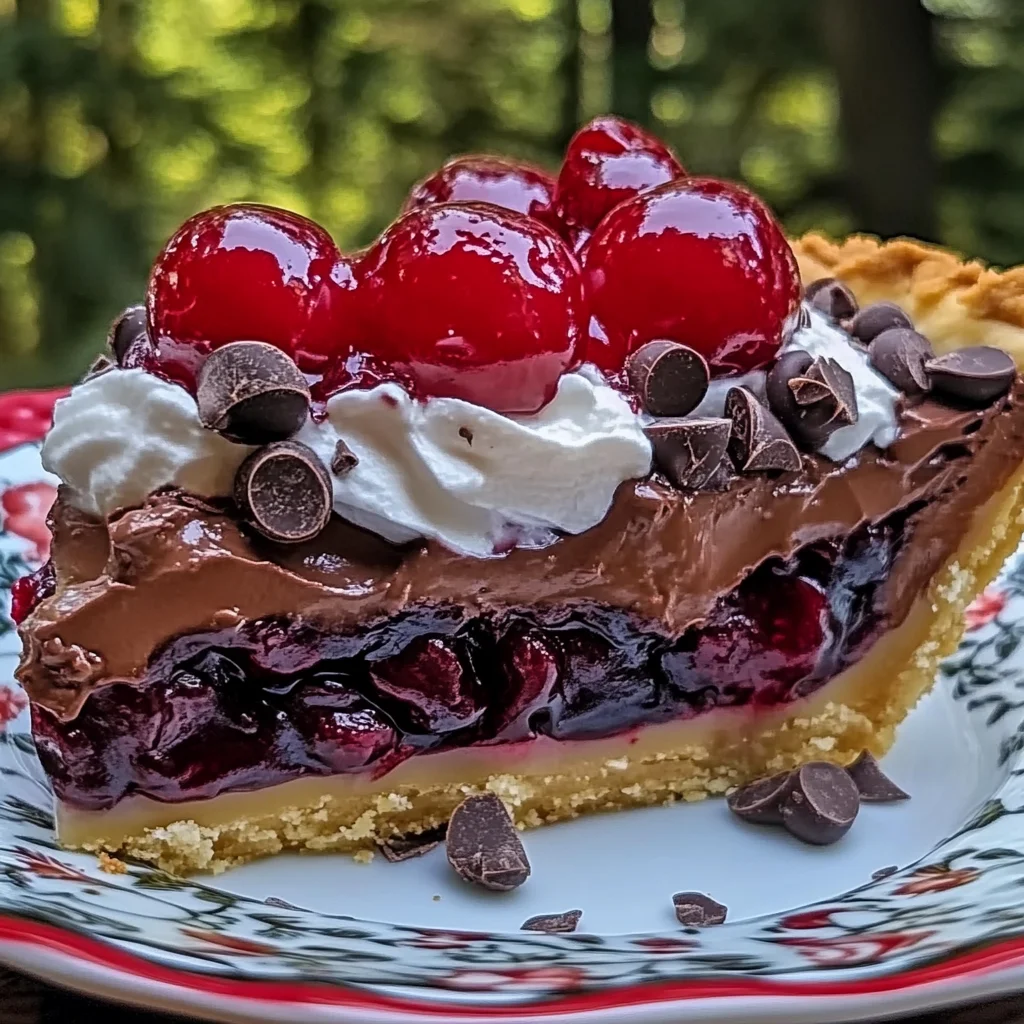
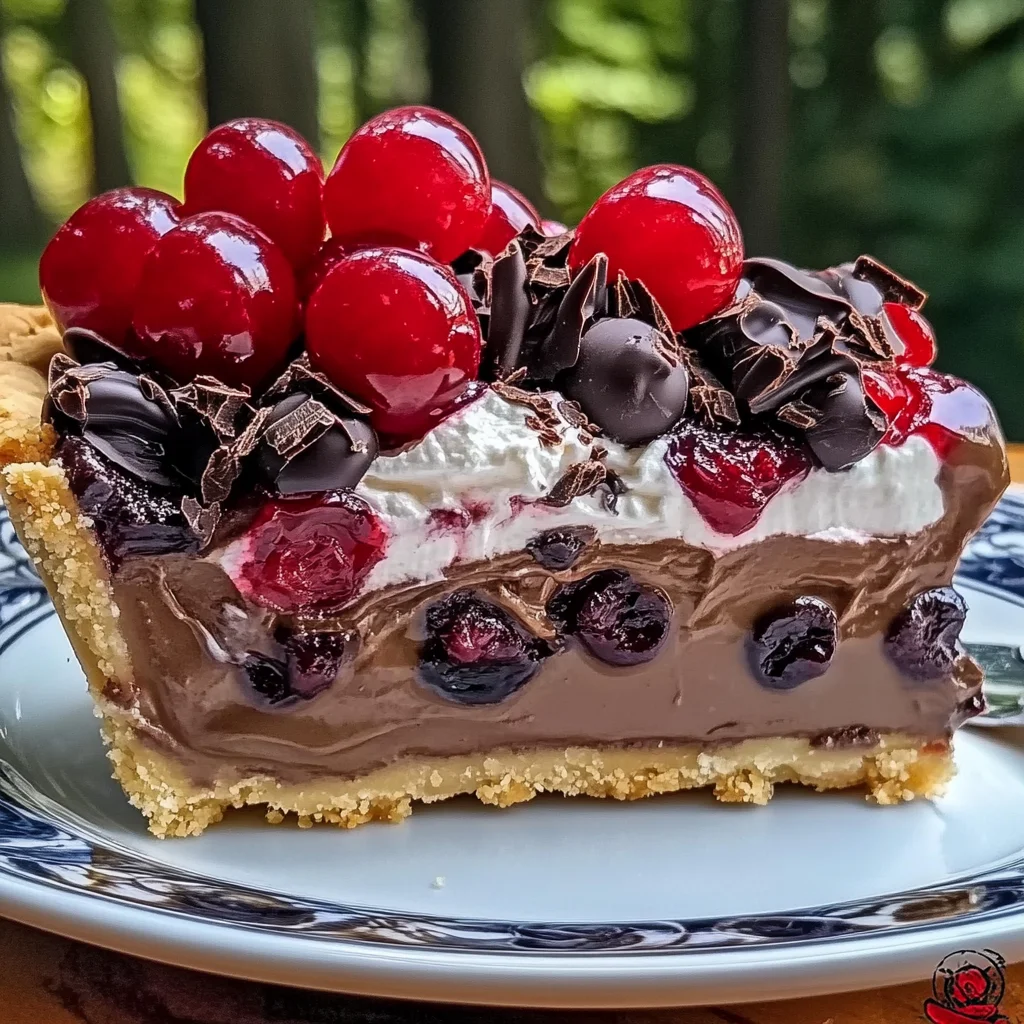
This pie isn’t just easy; it’s practically magic. With layers of rich chocolate, luscious cherry, and cloud-like whipped cream all nestled in a crispy crust, it’s a showstopper that will have everyone asking for the recipe. It’s the kind of pie that brings back memories of simpler times, sunny afternoons, and family gatherings, all without breaking a sweat in the kitchen. Plus, if you’re a fan of super speedy treats, you’ll know this pie fits right in with other fuss-free favorites, like our amazing Easy No-Bake Caramel Pretzel Bars. Trust me, it’s so quick and simple, you’ll wonder why you haven’t been making it forever. It’s truly a memorable treat!
Why You’ll Love Chocolate Cherry Cream Pie
- Fast: From start to delicious finish in under 15 minutes of active prep time!
- Easy: No baking, no complicated steps, just simple layering.
- Giftable: Perfect for potlucks, parties, or as a thoughtful homemade gift.
- Crowd-pleasing: A classic flavor combination that everyone adores.
Ingredients
- 1 pre-baked 9-inch pie crust: You can use a graham cracker crust, shortbread crust, or even a traditional pastry crust – whatever you love most! Just make sure it’s fully cooled.
- 1 can (21 oz) cherry pie filling (or homemade): The star of the show! Feel free to use your favorite brand, or whip up your own homemade cherry filling if you’re feeling ambitious.
- 1 box (3.9 oz) chocolate pudding mix (instant): Make sure it’s instant pudding for that quick set! Semi-sweet or dark chocolate pudding works wonderfully.
- 2 cups cold milk: Essential for getting that perfect pudding consistency. I always use 2% or whole milk for the creamiest results.
- 1 ½ cups whipped cream (homemade or store-bought): The fluffy crown of our pie! A tub of frozen whipped topping, thawed, works perfectly, or you can whip up some fresh cream for an extra special touch.
- ½ cup chocolate chips (semi-sweet or dark): For that lovely chocolatey sprinkle on top. Mini chocolate chips are great too!
- Fresh cherries, for garnish (optional): Adds a beautiful pop of color and freshness, especially if you’re serving it for a special occasion.
How to Make Chocolate Cherry Cream Pie
Get ready for the easiest pie-making experience of your life! Just follow these simple steps:
- Prep Your Crust: First things first, make sure your 9-inch pie crust is already pre-baked and completely cooled. A warm crust will melt your beautiful layers, and we don’t want that!
- Layer the Cherries: Open up that can of cherry pie filling and spread it out evenly over the bottom of your cooled pie crust. Make sure to get it into all the nooks and crannies.
- Whip Up the Pudding: In a medium bowl, combine your chocolate pudding mix with the cold milk. Whisk it vigorously for about 2 minutes, or until the mixture starts to thicken. Don’t worry if it’s not super thick right away; it will continue to set as it chills. Once it’s slightly thickened, gently spread this chocolatey goodness over the cherry layer.
- Add the Creamy Topping: Now for the dreamy top layer! Gently spread your whipped cream over the chocolate pudding layer, creating a smooth and even topping. I like to use an offset spatula for this to get it perfectly flat, but a regular spoon or spatula works just fine too.
- Garnish and Glam Up: Sprinkle those chocolate chips generously over the whipped cream. If you have fresh cherries on hand, arrange a few artfully on top for a truly stunning presentation.
- Chill Out: This is arguably the hardest part – the waiting! Pop your pie into the refrigerator for at least 2 hours. This chilling time is crucial to allow all those delicious layers to set up nicely, ensuring clean slices.
- Slice and Serve: Once completely chilled and set, grab a sharp knife, slice into generous portions, and serve this delightful pie. Enjoy every chocolatey, cherry-filled bite!
Substitutions & Additions
This pie is already amazing, but there’s always room to play around! Here are some ideas to make it your own:
- Crust Variations: Instead of a traditional crust, try an Oreo cookie crust for even more chocolatey goodness, or a shortbread crust for a buttery twist.
- Fruit Fun: Not a cherry fan? No problem! Swap out the cherry pie filling for blueberry, strawberry, or even apple. Peach pie filling would be delicious too!
- Pudding Perfection: Experiment with different instant pudding flavors! Vanilla, cheesecake, or even white chocolate pudding would be fantastic alternatives.
- Extra Chocolate Punch: If you’re a true chocoholic, consider adding a drizzle of chocolate syrup over the whipped cream, or mix in some mini chocolate chips directly into the pudding layer. For an even more intense chocolate experience, you might want to try our Decadent Triple Chocolate Cheesecake next time!
- Creamy Upgrades: A dollop of cream cheese mixed into your whipped cream (or making a cream cheese frosting) would add a lovely tangy richness.
- Nutty Nibblers: A sprinkle of chopped toasted pecans or walnuts on top would add a wonderful crunch.
- Spice it Up: A pinch of cinnamon in the cherry layer can really elevate the flavor.
Tips for Success
- Cold Milk is Key: When making the pudding, always use really cold milk. This helps the pudding set faster and more consistently.
- Whisk Vigorously: Don’t be shy when whisking the pudding! A good, strong whisk for the full 2 minutes helps prevent lumps and ensures a smooth consistency.
- Chill, Chill, Chill: I can’t stress this enough – proper chilling time is crucial for this no-bake pie. Rushing it will result in a messy, unset pie. If you’re really short on time, you can pop it in the freezer for about 30-45 minutes to speed up the setting process, then transfer it to the fridge.
- Cover Loosely: Once garnished, loosely cover the pie with plastic wrap. You don’t want the plastic touching the whipped cream directly, or it might stick.
- Make Ahead: This pie is fantastic for making a day ahead. In fact, I think the flavors meld even better after a full night in the fridge!
How to Store Chocolate Cherry Cream Pie
Keeping your delicious pie fresh is easy! Store any leftovers tightly covered with plastic wrap in the refrigerator. It will stay fresh and delicious for 3-4 days. I wouldn’t recommend freezing this pie, as the whipped cream and pudding layers can become watery or change texture when thawed. Best enjoyed fresh and chilled!
FAQs
Q: Can I use homemade cherry pie filling?
A: Absolutely! Homemade cherry pie filling will make this pie even more special. Just make sure it’s completely cooled before spreading it into the crust.
Q: Can I use a different type of crust?
A: Yes! A graham cracker crust or an Oreo cookie crust would be fantastic alternatives and would still keep it a no-bake dessert. Just make sure it’s a 9-inch crust.
Q: My pudding isn’t setting, what happened?
A: The most common reason is not using cold enough milk or not whisking long enough. Make sure your milk is really cold and you whisk vigorously for the full 2 minutes. Sometimes, if it’s very humid, it can take a bit longer to set, so patience and extra chilling time can help.
Q: Can I make this a sugar-free dessert?
A: You can certainly try! Look for sugar-free instant chocolate pudding mix, sugar-free cherry pie filling, and sugar-free whipped topping. The taste will be slightly different, but it’s a great option for those managing sugar intake.
If you loved making this easy pie, make sure to follow us on Pinterest for more delicious and simple recipes!

Easy No-Bake Chocolate Cherry Cream Pie
Ingredients
Equipment
Method
- Step 1: Prep Your Crust: Make sure your 9-inch pie crust is already pre-baked and completely cooled. A warm crust will melt your beautiful layers.
- Step 2: Layer the Cherries: Open the can of cherry pie filling and spread it out evenly over the bottom of your cooled pie crust, ensuring it gets into all the nooks and crannies.
- Step 3: Whip Up the Pudding: In a medium bowl, combine the chocolate pudding mix with the cold milk. Whisk vigorously for about 2 minutes, or until the mixture starts to thicken. Gently spread this chocolatey goodness over the cherry layer.
- Step 4: Add the Creamy Topping: Gently spread your whipped cream over the chocolate pudding layer, creating a smooth and even topping. An offset spatula works well for this.
- Step 5: Garnish and Glam Up: Sprinkle the chocolate chips generously over the whipped cream. If you have fresh cherries on hand, arrange a few artfully on top for a stunning presentation.
- Step 6: Chill Out: Pop your pie into the refrigerator for at least 2 hours. This chilling time is crucial to allow all those delicious layers to set up nicely, ensuring clean slices. For a quicker set, you can freeze for 30-45 minutes before transferring to the fridge.
- Step 7: Slice and Serve: Once completely chilled and set, grab a sharp knife, slice into generous portions, and serve this delightful pie. Enjoy every chocolatey, cherry-filled bite!