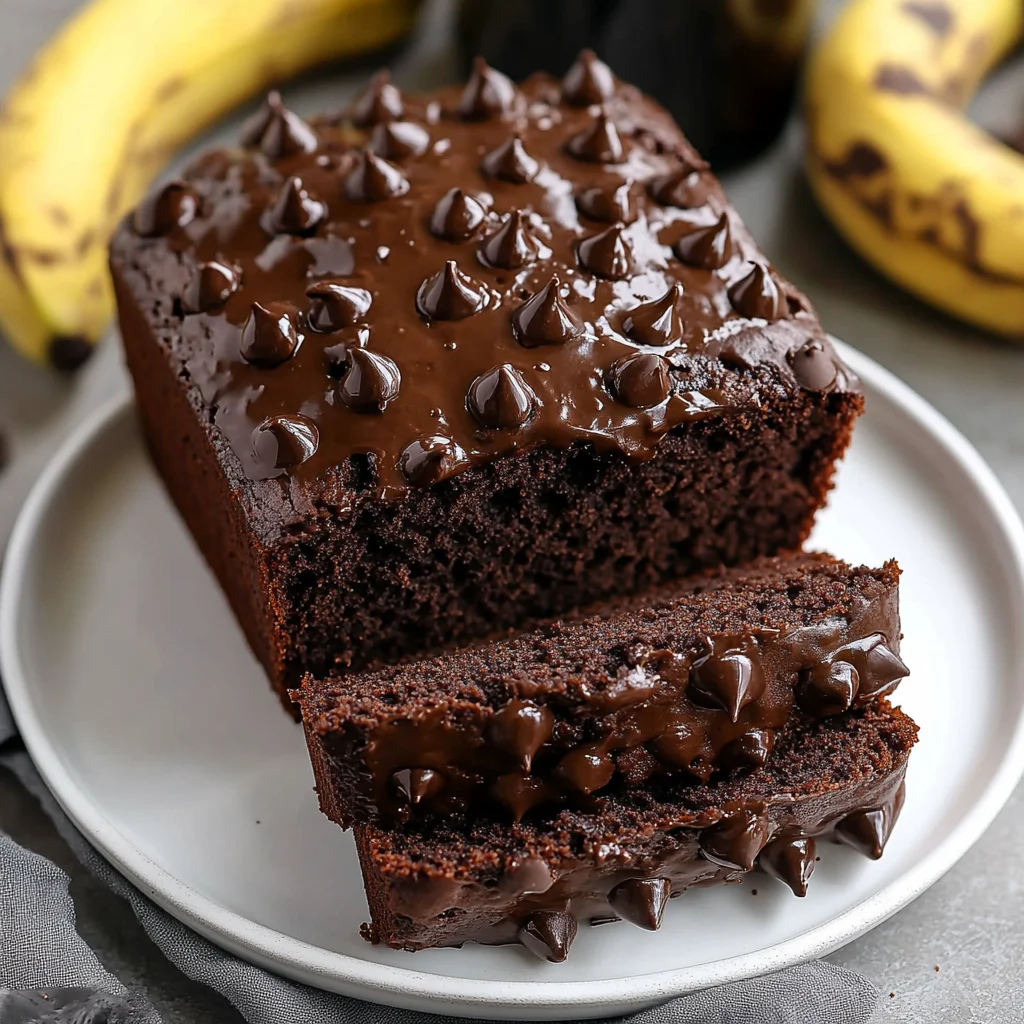
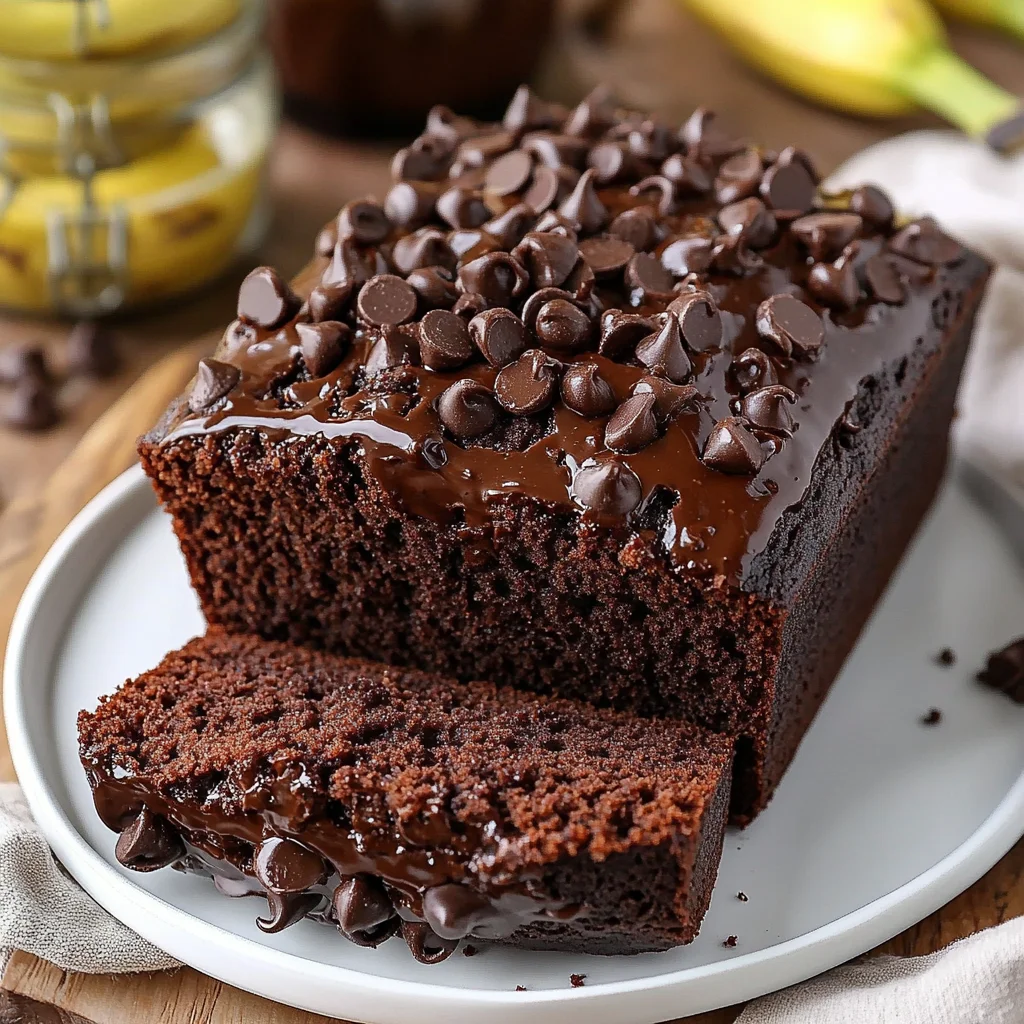
Oh, my sweet friends, there are just some smells that instantly transport you back to grandma’s kitchen, or a lazy Sunday morning, or even a simple moment of pure comfort. For me, that magical aroma is often the rich, sweet scent of banana bread baking in the oven. It’s like a warm hug for your soul, isn’t it?
But what if I told you that you could whip up that same nostalgic goodness, with all the chocolatey joy, but in a way that’s actually good for you? And what if I also told you it’s so easy, you’ll wonder why you ever bought a mix? Get ready, because this Healthy Chocolate Banana Bread recipe is about to become your new kitchen obsession. It’s quick to put together, bakes into a beautifully moist loaf, and tastes absolutely divine. Prepare to be delighted!
Why You’ll Love Healthy Chocolate Banana Bread
- Fast
- Easy
- Giftable
- Crowd-pleasing
Ingredients
You know how much I love keeping things simple and wholesome in the kitchen. This recipe uses ingredients you probably already have, or can easily find at your local store. Here’s what you’ll need to create this chocolatey masterpiece:
- 3 medium ripe bananas (about 12 oz/360 g): The riper, the better! We’re talking brown spots galore – that’s where all the natural sweetness and banana flavor live.
- 2 large eggs: These act as our binder, helping everything come together beautifully for that perfect banana bread texture.
- ¼ cup (60 g) nut butter (almond, peanut, cashew, or sunflower seed butter): Choose your favorite! This adds a wonderful richness, healthy fats, and helps keep our bread wonderfully moist. I often use almond butter, but peanut butter gives it a lovely, classic twist.
- ⅓ cup (70 g) granular sweetener (monk fruit or brown sugar): You get to decide here! Monk fruit keeps it low-sugar, while brown sugar adds a deep, molasses-y warmth that’s just divine.
- 1 tsp vanilla extract: A classic for a reason, vanilla brings out all the other flavors. Don’t skip it!
- ⅙ tsp sea salt: Just a pinch to balance the sweetness and really make those chocolate flavors pop.
- 1 ½ cup (150 g) oat flour (or preferred gluten-free flour blend): I love using oat flour for its wholesome, subtle nutty flavor and fantastic texture. If you don’t have oat flour, you can easily make your own by blending rolled oats in a food processor until fine!
- ½ cup (50 g) cocoa powder: The star of the show for our chocolate goodness! Make sure it’s unsweetened cocoa powder.
- 2 tsp baking powder: Our leavening agent, ensuring our bread rises beautifully and is light and airy.
- ¼ cup (40 g) chocolate chips: Because what’s chocolate banana bread without those delightful pockets of melted chocolate? Dark chocolate chips are my personal favorite for this healthy version.
- High Protein Option: If you’re looking for an extra boost, you can swap out ½ cup (50 g) of the oat flour for ½ cup (50 g) of your favorite protein powder. Just note that different protein powders absorb liquid differently, so you might need to adjust slightly.
How to Make Healthy Chocolate Banana Bread
Let’s get our hands (just a little bit!) dirty and whip up this magic. It’s truly as easy as 1-2-3!
1. Preheat Oven & Prepare Pan: First things first, go ahead and preheat your oven to a cozy 350°F (180°C). While it’s warming up, grab a 20 cm (about 7.9 inches) loaf pan. You can either line it with parchment paper, leaving a little overhang on the sides for easy lifting later (which I highly recommend for no-fuss removal!), or just grease it really well with a little oil. Trust me, that parchment paper trick is a game-changer!
2. Combine Wet Ingredients: In a large mixing bowl, grab your three beautifully ripe bananas. Mash them up with a fork until they are completely smooth. No big lumps here, friends! Once they’re mashed, stir in your chosen nut butter and the eggs until everything is wonderfully combined with the mashed banana. Give it a good whisk!
3. Add Sweetener & Flavoring: Now for the good stuff! Add your granular sweetener of choice, the vanilla extract, and that tiny pinch of sea salt to the banana mixture. Give this wet mixture a good stir with a whisk or fork for about two minutes. You want to make sure all those lovely ingredients are thoroughly combined and happy together.
4. Combine Dry Ingredients: In a separate bowl, it’s time to bring our dry stars together. Whisk together the oat flour (or your preferred gluten-free flour blend), the cocoa powder, and the baking powder. If you’re going for the high protein option, this is where you’d add your protein powder in with the flour. Whisk well to make sure there are no clumps of cocoa or baking powder.
5. Mix Wet and Dry & Add Chocolate Chips: Now for the moment of truth! Pour your dry ingredient mixture into the wet mixture. Give it a good stir until everything is just combined. The key here is to be gentle – don’t overmix! Overmixing can lead to a tougher loaf. Once it’s just mixed, gently fold through those lovely chocolate chips. I always hold a few back to sprinkle on top!
6. Bake: Pour your beautiful batter into your prepared loaf pan. If you saved a few chocolate chips, now’s the time to sprinkle them generously on top for that irresistible bakery look. Pop it into your hot oven for 30 to 40 minutes. You’ll know it’s ready when a toothpick inserted into the very center of your chocolate banana bread comes out clean. Every oven is a little different, so keep an eye on it!
7. Cool: Ah, the hardest part: waiting! Once it’s done, remove the loaf pan from the oven and let your banana bread cool in the pan for about 15 minutes. This helps it set up nicely. Then, carefully lift it out of the pan using that parchment paper overhang (see, I told you it was handy!) and let it cool completely on a wire rack before slicing and serving. I know, I know, it smells incredible, but a little patience makes for the best slices!
Substitutions & Additions
One of my favorite things about baking is experimenting and making recipes truly yours. Here are some fun ways to play with this Healthy Chocolate Banana Bread:
- Flour Power: While oat flour is fantastic, you could also try a 1:1 gluten-free flour blend, whole wheat pastry flour, or even all-purpose flour if gluten isn’t a concern. Just be aware that textures might vary slightly.
- Sweetener Swaps: Instead of granular sweetener, you could use maple syrup or honey (use ⅓ cup, but reduce your liquid ingredients by about 1-2 tablespoons as these are liquid sweeteners).
- Nut Butter Adventures: Feel free to experiment with different nut butters! Cashew butter makes it extra creamy, and sunflower seed butter is a great nut-free option.
- Extra Goodies: Feeling adventurous? Stir in a handful of chopped walnuts or pecans for crunch, shredded coconut, or even a dash of cinnamon or nutmeg for a warming spice blend.
- Protein Power-Up: If you’re adding protein powder, try different flavors! A vanilla or chocolate protein powder can really enhance the overall taste.
Tips for Success
Baking is a science and an art, but mostly, it’s about having fun! Here are a few little pointers to make sure your chocolate banana bread turns out perfectly every time:
- Don’t Overmix: This is probably the golden rule of quick breads! Once you add the dry ingredients to the wet, mix just until combined. A few small streaks of flour are totally fine. Overmixing develops the gluten too much, which can lead to a tougher, chewier loaf.
- Ripe Bananas are Key: Seriously, the browner, the better! Overripe bananas are sweeter and have a more intense banana flavor, which is exactly what we want here. If your bananas aren’t quite ripe enough, you can speed up the process by baking them on a baking sheet at 300°F (150°C) for 15-20 minutes until their peels turn black.
- Cool Completely: I know it’s hard to resist, but letting the bread cool completely before slicing allows it to firm up and prevents it from crumbling. Plus, the flavors develop even more as it cools.
- Check for Doneness: Use that toothpick! If it comes out clean, your bread is ready. If it has wet batter on it, give it a few more minutes.
- Parchment Paper is Your Friend: It makes removing the loaf from the pan so incredibly easy and mess-free. If you don’t have it, make sure your pan is very well greased!
How to Store Healthy Chocolate Banana Bread
If you miraculously have any leftover (which, let’s be real, is a rare occurrence!), here’s how to keep it fresh and delicious:
At room temperature: Store your chocolate banana bread in an airtight container at room temperature for 2-3 days. This keeps it lovely and moist.
In the refrigerator: For a longer shelf life, you can store it in an airtight container in the refrigerator for up to 5-7 days. It might get a little denser when cold, but a quick zap in the microwave can warm it right up!
Freezing: Banana bread freezes beautifully! Once completely cooled, slice the loaf and wrap individual slices tightly in plastic wrap, then place them in a freezer-safe bag or container. It will keep in the freezer for up to 3 months. When you’re ready for a treat, just thaw a slice at room temperature or warm it gently in the microwave or toaster oven.
FAQs
Q: Can I use regular all-purpose flour instead of oat flour?
A: Yes, you absolutely can! The texture might be slightly different, but it will still be delicious. Use the same measurement of 1 ½ cups.
Q: My bananas aren’t ripe enough! What do I do?
A: No problem! You can ripen them quickly by baking them on a baking sheet at 300°F (150°C) for 15-20 minutes, or until the skins turn completely black. Let them cool before mashing.
Q: Can I make muffins instead of a loaf?
A: Definitely! This batter works great for muffins. Simply divide the batter into a greased or lined muffin tin and bake for about 18-25 minutes, or until a toothpick comes out clean. You’ll get about 12 muffins.
Q: Is this banana bread really healthy?
A: Yes! By using wholesome ingredients like ripe bananas for natural sweetness, oat flour for fiber, and nut butter for healthy fats, this recipe is a much healthier alternative to traditional banana bread recipes often loaded with refined sugars and flours. Plus, it’s packed with flavor!
For more cozy recipes and kitchen inspiration, be sure to follow us on Pinterest!

Healthy Chocolate Banana Bread
Ingredients
Equipment
Method
- Step 1: Preheat Oven & Prepare Pan: First things first, go ahead and preheat your oven to a cozy 350°F (180°C). While it's warming up, grab a 20 cm (about 7.9 inches) loaf pan. You can either line it with parchment paper, leaving a little overhang on the sides for easy lifting later (which I highly recommend for no-fuss removal!), or just grease it really well with a little oil. Trust me, that parchment paper trick is a game-changer!
- Step 2: Combine Wet Ingredients: In a large mixing bowl, grab your three beautifully ripe bananas. Mash them up with a fork until they are completely smooth. No big lumps here, friends! Once they’re mashed, stir in your chosen nut butter and the eggs until everything is wonderfully combined with the mashed banana. Give it a good whisk!
- Step 3: Add Sweetener & Flavoring: Now for the good stuff! Add your granular sweetener of choice, the vanilla extract, and that tiny pinch of sea salt to the banana mixture. Give this wet mixture a good stir with a whisk or fork for about two minutes. You want to make sure all those lovely ingredients are thoroughly combined and happy together.
- Step 4: Combine Dry Ingredients: In a separate bowl, it’s time to bring our dry stars together. Whisk together the oat flour (or your preferred gluten-free flour blend), the cocoa powder, and the baking powder. If you're going for the high protein option, this is where you'd add your protein powder in with the flour. Whisk well to make sure there are no clumps of cocoa or baking powder.
- Step 5: Mix Wet and Dry & Add Chocolate Chips: Now for the moment of truth! Pour your dry ingredient mixture into the wet mixture. Give it a good stir until everything is just combined. The key here is to be gentle – don't overmix! Overmixing can lead to a tougher loaf. Once it's just mixed, gently fold through those lovely chocolate chips. I always hold a few back to sprinkle on top!
- Step 6: Bake: Pour your beautiful batter into your prepared loaf pan. If you saved a few chocolate chips, now’s the time to sprinkle them generously on top for that irresistible bakery look. Pop it into your hot oven for 30 to 40 minutes. You’ll know it’s ready when a toothpick inserted into the very center of your chocolate banana bread comes out clean. Every oven is a little different, so keep an eye on it!
- Step 7: Cool: Ah, the hardest part: waiting! Once it's done, remove the loaf pan from the oven and let your banana bread cool in the pan for about 15 minutes. This helps it set up nicely. Then, carefully lift it out of the pan using that parchment paper overhang (see, I told you it was handy!) and let it cool completely on a wire rack before slicing and serving. I know, I know, it smells incredible, but a little patience makes for the best slices!