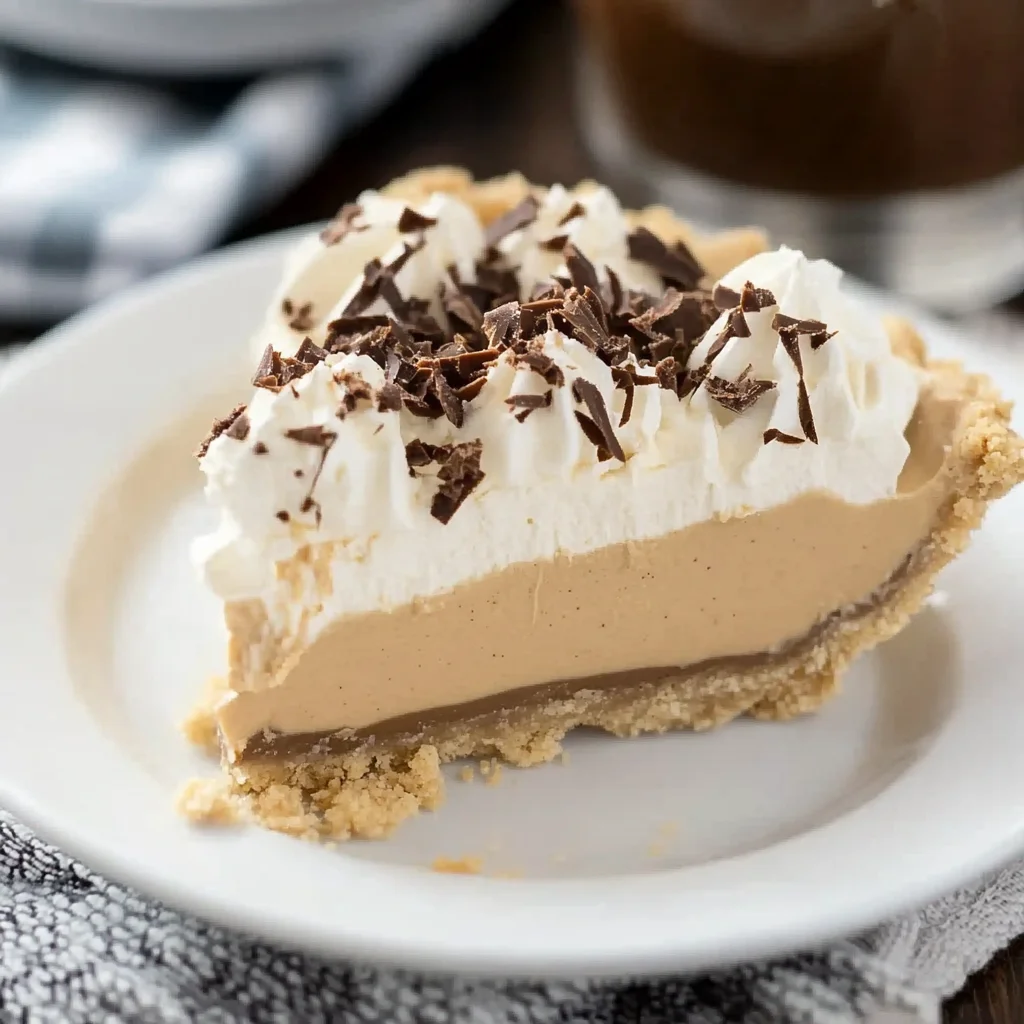
There’s something truly magical about a dessert that takes you right back to cozy family gatherings and carefree childhood afternoons. If you’re anything like me, peanut butter has always held a special place in your heart—and on your spoon! This No Bake Peanut Butter Pie is exactly that kind of dessert. It’s creamy, rich, and simply melts in your mouth, but best of all? It’s incredibly easy to make. No oven required, no complicated steps—just pure, peanut buttery goodness that you’ll want to share with everyone you know.
I remember the first time I tried a peanut butter pie like this at a friend’s house. It was one of those moments when you realize simple ingredients can come together to create something unforgettable. Whether you’re making it for a last-minute party, a family dinner, or a sweet surprise for yourself, this pie will quickly become a staple in your recipe box. It’s quick, fuss-free, and absolutely crowd-pleasing. Let me walk you through why this pie is a must-try, how to make it perfectly every time, and some fun twists you might want to try.
Why You’ll Love No Bake Peanut Butter Pie
- Fast: Ready in a flash without heating up your kitchen.
- Easy: Just a handful of ingredients and simple steps.
- Giftable: Makes a thoughtful, homemade treat for friends and family.
- Crowd-pleasing: Peanut butter lovers and dessert fans alike will be asking for seconds.
This pie is one of those recipes you can whip up on a whim. It’s perfect for busy weeknights or for impressing guests without breaking a sweat. Plus, it’s a wonderful alternative to baked pies when you want something cool, creamy, and refreshing. If you’re a fan of other no-bake delights, you might also enjoy the No Bake Peanut Butter Brownie Cookies—another fantastic peanut butter treat that’s just as simple and satisfying!
Ingredients
Before you get started, let’s talk about the ingredients that make this pie so special and easy to come by:
- Chocolate graham cracker crust: This adds a lovely chocolatey crunch that pairs perfectly with peanut butter. You can buy a pre-made crust or make your own if you’re feeling adventurous.
- Cream cheese (8 ounces, room temperature): Cream cheese lends that smooth, tangy richness that balances the sweetness and peanut butter flavor beautifully.
- Sugar (½ cup): Just enough to sweeten the filling without overpowering the peanut butter.
- Creamy peanut butter (1 cup): The star of the show! Use your favorite brand—natural or classic creamy peanut butter works great.
- Vanilla extract (1 teaspoon): A small addition that brightens and deepens the flavor.
- Frozen whipped topping (8 ounces, thawed): This keeps the pie light and fluffy, and since it’s frozen, it’s easy to keep on hand for desserts like this.
- Whipped cream (optional): For topping if you want to add an extra touch of decadence.
These ingredients come together to make a filling that’s creamy, luscious, and perfectly balanced. If you’ve ever made a no-bake cheesecake or a peanut butter mousse, you’ll find this recipe just as delightful and straightforward. And if you’d like to explore more no-bake recipes, the 3-Ingredient No Bake Cool Whip Candy is another quick and fun project to try.
How to Make No Bake Peanut Butter Pie
Now, let’s get into the kitchen and make this pie happen. I’ll walk you through each step to ensure your pie turns out just right.
- Start by beating the cream cheese and sugar in a mixing bowl until smooth and creamy. This is the base of your filling, and it’s important to get out any lumps so your pie is silky smooth.
- Add the peanut butter and vanilla extract to the cream cheese mixture. Continue beating until everything is fully combined. This step is where the rich peanut butter flavor really shines, so take your time to mix well.
- Gently fold in the thawed whipped topping. This keeps the filling light and airy. Use a spatula and fold carefully so you don’t deflate the whipped topping.
- Spread the filling evenly into the chocolate graham cracker crust. You want a nice, even layer so each bite has that perfect balance of crust and filling.
- Refrigerate for at least 4 hours. This is the magic time when the pie sets up into a sliceable, creamy dream. I like to refrigerate mine overnight because it makes serving a breeze the next day.
- Serve topped with whipped cream if desired. The whipped cream adds a fresh, fluffy finish that guests love.
And that’s it! It’s simple, satisfying, and you’ll love how your kitchen smells like peanut butter heaven. If you want to impress guests even more, try serving this pie alongside a fresh fruit salad or even a scoop of vanilla ice cream for an extra indulgent experience.
Substitutions & Additions
One of the best things about this pie is how adaptable it is. If you want to switch things up or cater to different tastes, here are some ideas you might enjoy:
- Crust swaps: Try an Oreo crust for a chocolate overload or a classic graham cracker crust if you prefer less chocolate. You can also use a homemade crust made from crushed pretzels for a salty-sweet twist.
- Peanut butter alternatives: If you’re not a peanut butter fan, almond butter or sunflower seed butter can be great substitutes. Just make sure they’re creamy and not too thick.
- Sweetener swaps: Instead of sugar, try honey or maple syrup for a different kind of sweetness and a bit of extra depth.
- Adding crunch: Mix in chopped peanuts or chocolate chips into the filling for some texture. You could also sprinkle chopped Reese’s or candy pieces on top for extra fun.
- Flavor boosts: A pinch of cinnamon or a touch of espresso powder can enhance the peanut butter flavor in unexpected ways.
- Make it chocolate peanut butter: Fold in some melted chocolate or cocoa powder to the filling for a chocolate peanut butter combo that’s hard to beat. For a wonderful chocolate-peanut butter dessert inspiration, check out the Easy Chocolate Covered Strawberry Pie.
Don’t be afraid to get creative here! I love experimenting, and sometimes the best desserts come from a happy accident. This pie is a great base to personalize and make your own.
Tips for Success
To make sure your No Bake Peanut Butter Pie turns out perfectly every time, here are some tips I’ve picked up along the way:
- Room temperature cream cheese: This is key for a smooth filling. If it’s too cold, you’ll get lumps and it won’t mix well with the peanut butter.
- Don’t overbeat the whipped topping: When folding in, be gentle. Overmixing can deflate it and make the pie denser than you want.
- Let it chill long enough: The pie needs at least 4 hours in the fridge to set properly. If you’re short on time, try freezing it for 2 hours, but don’t skip chilling altogether.
- Use a springform pan if possible: It makes serving the pie much easier and keeps the crust intact.
- Prep ahead: This pie is fantastic made the day before. I often prepare it the night before a party or dinner, so I’m not rushed last minute.
- Serving tip: Use a warm knife to slice—run it under hot water and dry before cutting clean slices without sticking.
With these small tweaks, you’ll be able to serve a picture-perfect pie every time. And if you love no-bake desserts, you might want to explore some other easy crowd-pleasers on Crispy Kitchens’ recipe collection for inspiration.
How to Store No Bake Peanut Butter Pie
Storing this pie properly is just as important as making it, especially if you want to enjoy leftovers or prepare it ahead of time for a gathering.
- Refrigerator: Store the pie covered tightly with plastic wrap or in an airtight container. It will keep fresh for up to 4 days. The crust stays crisp, and the filling maintains its creamy texture.
- Freezer: You can freeze the pie for up to 1 month. Wrap it well with plastic wrap and then foil to prevent freezer burn. Thaw overnight in the fridge before serving.
- Serving after storage: Give the pie a gentle stir or re-spread the top if needed after thawing to keep it looking fresh and inviting.
If you’re planning to make this pie for a party, it’s a great idea to prepare it a day or two in advance so the flavors meld beautifully and you can focus on other dishes—like maybe something savory and comforting, such as the Creamy Lemon Chicken I recently shared.
FAQs
Can I use crunchy peanut butter instead of creamy?
Absolutely! Crunchy peanut butter adds a nice texture, but keep in mind it might make the filling slightly less smooth. It’s a great way to add a bit of crunch without extra toppings.
Is there a gluten-free option for the crust?
Yes! Look for gluten-free chocolate graham cracker crusts at the store, or make your own using gluten-free cookies or crackers crushed with melted butter. This pie is very adaptable.
Can I substitute the frozen whipped topping with homemade whipped cream?
You sure can! Homemade whipped cream works beautifully and adds a fresh flavor. Just whip heavy cream with a little sugar until soft peaks form and fold it in gently as you would with the store-bought topping.
How long does the pie need to chill before serving?
At least 4 hours in the fridge is ideal for the filling to firm up and slice nicely. Overnight chilling is even better if you have the time.
I hope this recipe fills your kitchen—and your heart—with the warm, comforting flavors of peanut butter bliss. Whether you’re a seasoned baker or just starting your dessert journey, this no bake peanut butter pie is a wonderful treat to keep handy. For more inspiration and to keep your dessert game strong, don’t forget to check out the delicious No Bake Peanut Butter Pie variations and other delightful recipes.
Happy baking (or should I say, no-baking!) and be sure to share your pie pics and tweaks with friends and family. And if you love gathering cozy recipes like this, you might want to explore the wonderful world of no-bake treats, including some fun options like Giant No Bake Reese’s Peanut Butter Pie for a chocolate-peanut butter extravaganza.
For even more mouthwatering ideas and seasonal inspiration, follow us on Pinterest. We’re always pinning fresh, cozy recipes that you and your loved ones will adore!

No Bake Peanut Butter Pie
Ingredients
Equipment
Method
- Step 1: Beat the cream cheese and sugar in a mixing bowl until smooth and creamy, ensuring no lumps remain.
- Step 2: Add the peanut butter and vanilla extract to the cream cheese mixture and beat until fully combined and smooth.
- Step 3: Gently fold in the thawed frozen whipped topping using a spatula, being careful not to deflate it.
- Step 4: Spread the filling evenly into the chocolate graham cracker crust, smoothing the top.
- Step 5: Refrigerate the pie for at least 4 hours, preferably overnight, to allow it to set properly.
- Step 6: Serve the pie topped with whipped cream if desired for an extra touch of decadence.