There’s something so comforting about sushi, isn’t there? But sometimes, rolling sushi at home feels a bit intimidating or just too time-consuming for a weeknight dinner. That’s where this Spicy Salmon Sushi Bake comes in—offering all the flavors of your favorite spicy salmon roll but in a warm, easy-to-make casserole form. It’s like a hug from your favorite sushi joint, right in your kitchen, without the fuss of rolling or raw fish prep. I remember the first time I made this recipe; it quickly became a family favorite because it’s fast, flavorful, and so satisfying. Trust me, once you try this, it’ll be on your regular rotation for busy nights or casual get-togethers.
Why You’ll Love Spicy Salmon Sushi Bake
- Fast: From start to finish, you can have this sushi bake ready in under an hour.
- Easy: No sushi skills required! Just simple assembly and baking.
- Giftable: It makes a fantastic dish to bring to potlucks or family dinners.
- Crowd-pleasing: The spicy, creamy salmon topping with fresh garnishes hits all the right notes for any crowd.
Ingredients
Let’s talk about what you’ll need for this recipe. Each component brings something special to the dish and together, they create that perfect balance of creamy, spicy, and fresh.
- Sushi Rice: 1 cup sushi rice, which is sticky and perfect for holding the bake together. The rice wine vinegar, sugar, and salt give it that classic sushi rice tang and subtle sweetness.
- Salmon Fillets: Fresh, flaky salmon is the star here. You can find wild-caught or farm-raised depending on your preference and budget.
- Furikake Seasoning: A Japanese rice seasoning blend packed with sesame seeds, seaweed flakes, and sometimes dried fish bits. It adds a delicious umami punch and texture.
- Cream Cheese & Mayonnaise: These make the salmon topping luxuriously creamy, and I love using Kewpie mayo if I have it—it’s slightly sweeter and richer than regular mayo.
- Sriracha or Sambal Oelek: For that spicy kick that gives this bake its name. Adjust to your spice tolerance.
- Toppings: Fresh avocado and cucumber add a cool, crisp contrast, sliced green onions bring brightness, and nori seaweed sheets let you scoop up the bake like sushi.
- Unagi Sauce: A sweet and savory eel sauce drizzle that takes this bake to the next level. If you’ve never tried it, you’re in for a treat!
How to Make Spicy Salmon Sushi Bake
Now, roll up your sleeves! I’ll walk you through each step so you can make this sushi bake like a pro, even if you’ve never made sushi rice before.
1. Prepare the Sushi Rice
Start by rinsing your sushi rice thoroughly under cold water. This step is super important because it removes excess starch, preventing your rice from turning gummy. Use a fine mesh sieve and rinse until the water runs clear. Then, cook the rice according to the package instructions—usually about 20 minutes. While the rice is still warm, mix in the rice wine vinegar, sugar, and salt. Gently fold the rice with a wooden spatula or rice paddle to distribute the seasoning evenly without smashing the grains. This seasoned rice is the foundation of your bake, so treat it with care!
2. Cook the Salmon
Rub your salmon fillets with soy sauce or tamari if you need a gluten-free option. This adds a savory depth and moisture to the fish. I love using an air fryer for this step at 400°F for about 10 minutes—it keeps the salmon juicy and flaky without drying it out. If you don’t have an air fryer, baking in the oven at 400°F for 15-20 minutes works just as well. Once cooked, use a fork to flake the salmon into bite-sized pieces. This makes it easy to mix into the creamy topping later.
3. Make the Salmon Mixture
In a large bowl, combine the flaked salmon, softened cream cheese, mayonnaise, and sriracha sauce (or sambal oelek). Stir until everything is well incorporated and creamy. I like to taste it here and add a little more sriracha if I want more heat. This spicy salmon mixture is what gives the bake that luscious sushi roll flavor in every bite.
4. Assemble the Bake
Preheat your oven to 425°F. Line a 9×9-inch baking dish with parchment paper or lightly grease it with cooking spray. Press the sushi rice evenly into the bottom of the dish—like packing sushi into a mold. Sprinkle the furikake seasoning generously over the rice; it adds that classic Japanese flavor and a bit of crunch. Then, spread the salmon mixture evenly over the rice layer. This is the moment where your bake really starts to look like sushi magic in the making!
5. Bake Until Bubbly
Pop the assembled dish into the oven and bake for 15 minutes. You’re looking for the salmon mixture to be heated through and just starting to bubble. This warming step melds the flavors beautifully and gives the cream cheese topping a slightly golden finish that’s irresistible.
6. Add Toppings and Serve
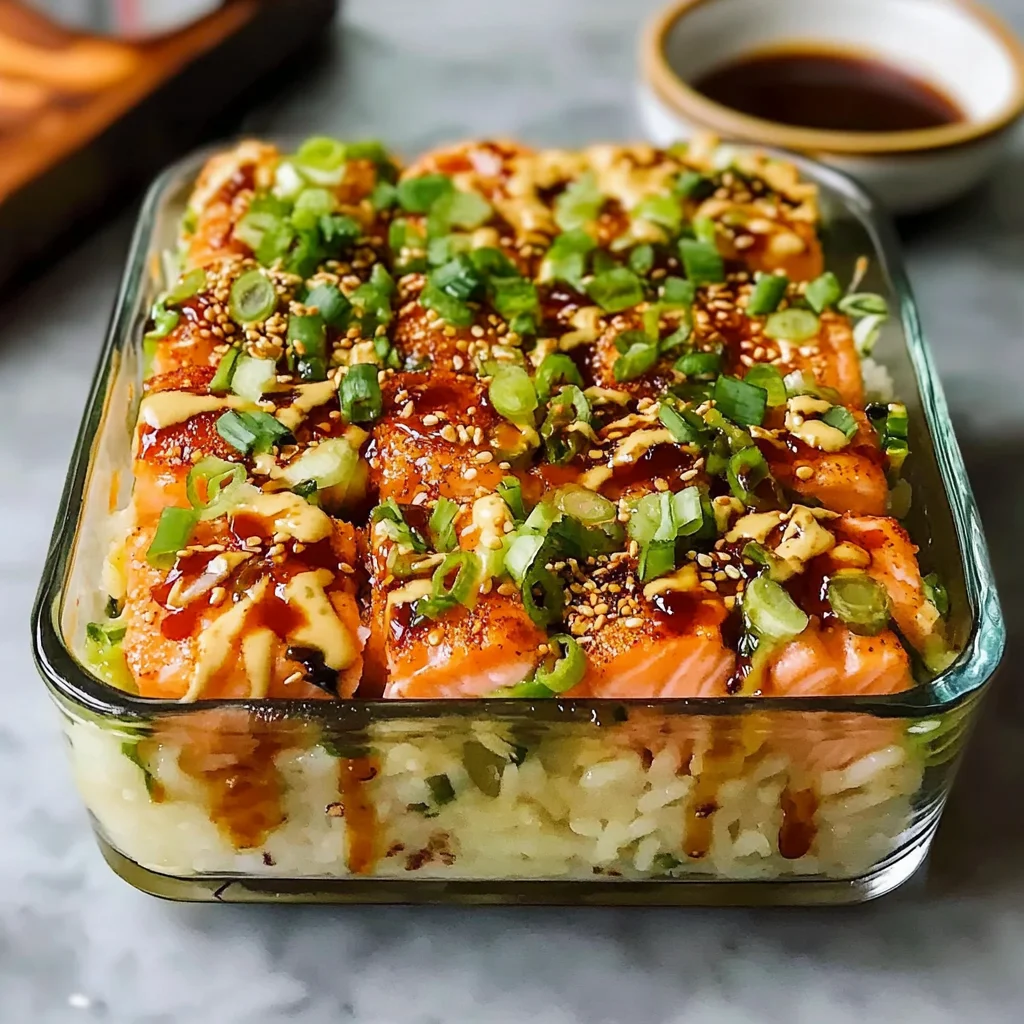
When your bake comes out of the oven, drizzle extra Kewpie mayonnaise over the top in a zigzag pattern for a creamy finish. Scatter sliced green onions, avocado, and cucumber cubes on top for fresh, cooling contrast. Serve your sushi bake with squares of nori seaweed—you can wrap the bake in the seaweed just like traditional sushi. Finally, a drizzle of unagi sauce adds sweetness and umami that ties everything together. It’s fun to serve this family-style with everyone building their own bites!
Substitutions & Additions
One of the best things about this recipe is how flexible it is. If you want to make it your own or need to adapt based on what you have, here are some ideas:
- Rice Alternatives: While sushi rice is ideal, you can use short-grain rice or even cauliflower rice for a low-carb twist.
- Fish Options: Try cooked shrimp, crab meat, or even canned tuna mixed with the spicy mayo for different flavors.
- Spice Level: Adjust the sriracha or sambal oelek to your liking, or swap in a milder chili sauce for less heat.
- Extra Crunch: Add toasted sesame seeds or crushed tempura flakes on top before serving for added texture.
- Veggie Upgrades: Incorporate finely diced bell peppers, pickled ginger, or shredded carrots for extra color and crunch.
- Dairy-Free Option: Use vegan cream cheese and vegan mayo to make this suitable for dairy-free diets.
If you’re looking for more cozy, comforting homemade recipes, you might enjoy my creamy lemon chicken recipe, which balances bright citrus with rich flavors and is just as easy to pull together.
Tips for Success
To get the best results with your Spicy Salmon Sushi Bake, keep these tips in mind:
- Don’t Skip Rinsing the Rice: This prevents your rice from becoming mushy and sticky beyond what you want.
- Use Room Temperature Ingredients: Softened cream cheese mixes more smoothly with the salmon and mayo, creating that perfect creamy texture.
- Press Rice Firmly: When you press the rice into the pan, make sure it’s packed evenly and firmly to hold the layers together after baking.
- Watch the Bake: Keep an eye on the bake during the last few minutes to avoid overcooking the salmon topping or drying out the rice.
- Prep Ahead: You can cook the rice and salmon mixture ahead of time and assemble just before baking, which makes this a great dish to prepare for gatherings.
How to Store Spicy Salmon Sushi Bake
If you have leftovers (which might not last long!), store them in an airtight container in the fridge. The bake keeps well for up to 2 days, but I recommend enjoying it fresh for the best texture and flavor. When reheating, cover it loosely with foil and warm in the oven at 350°F until heated through—microwaving works too, but the rice might get a little soggy. The fresh toppings like avocado are best added right before serving to keep their bright flavor and texture.
FAQs
Can I use raw salmon for the sushi bake?
This recipe calls for cooked salmon to ensure food safety and the creamy topping texture. If you want to use raw salmon, make sure it’s sushi-grade and consult proper handling guidelines, but cooking is recommended for this bake.
What if I don’t have furikake seasoning?
You can substitute with a simple mix of toasted sesame seeds and crushed nori sheets, or even a pinch of sea salt and sesame oil for a similar umami flavor.
Is there a vegetarian version of this dish?
Absolutely! Swap the salmon for seasoned tofu or cooked mushrooms, and use vegetarian-friendly sauces. The creamy spicy topping can stay the same with mayo and cream cheese or their vegan alternatives.
Can I make this gluten-free?
Yes! Use tamari instead of soy sauce and double-check that your furikake and unagi sauce are gluten-free. Kewpie mayo is typically gluten-free, but always check the label just in case.
If you love dishes that are easy to make but have that wow factor, you might also want to explore more recipes on my site, where I share everything from quick grilled fish tacos to cozy casseroles that bring comfort to the table.
Thanks for spending time with me in the kitchen today! If you try this Spicy Salmon Sushi Bake, I’d love to hear how it turned out. And if you’re hungry for more inspiration, be sure to check out my collection of easy and delicious recipes that make weeknight cooking a breeze.
For more mouthwatering recipes and cooking tips, follow me on Pinterest!
Spicy Salmon Sushi Bake
Ingredients
Equipment
Method
- Step 1: Rinse sushi rice thoroughly under cold water using a fine mesh sieve until water runs clear to remove excess starch.
- Step 2: Cook rice according to package instructions, about 20 minutes. While warm, mix in rice wine vinegar, sugar, and salt. Fold gently with a wooden spatula or rice paddle to season evenly.
- Step 3: Rub salmon fillets with soy sauce or tamari. Cook in an air fryer at 400°F for about 10 minutes or bake in oven at 400°F for 15-20 minutes until cooked through. Flake salmon into bite-sized pieces.
- Step 4: In a large bowl, combine flaked salmon, softened cream cheese, mayonnaise, and sriracha or sambal oelek. Mix until creamy and well incorporated.
- Step 5: Preheat oven to 425°F. Line a 9x9-inch baking dish with parchment paper or grease lightly. Press sushi rice evenly into bottom of dish.
- Step 6: Sprinkle furikake seasoning generously over rice. Spread salmon mixture evenly on top.
- Step 7: Bake for 15 minutes until salmon mixture is heated through and slightly bubbly.
- Step 8: Remove from oven. Drizzle extra Kewpie mayonnaise in a zigzag pattern over top. Scatter sliced green onions, avocado cubes, and cucumber cubes evenly.
- Step 9: Serve with nori sheets for scooping and drizzle with unagi sauce. Enjoy family-style!