

Oh, friend, do you ever get that feeling when the air turns crisp, the twinkle lights start to appear, and all you want is to wrap your hands around a warm mug of something utterly delightful? For me, that feeling almost always conjures up memories of chilly evenings by the fireplace, maybe a gentle snowfall outside, and the comforting aroma of hot cocoa filling the kitchen. There’s just something magical about it, isn’t there?
And let me tell you, this Snowy Peppermint Bliss Cocoa isn’t just any hot cocoa. It’s a hug in a mug, a little bit of winter wonderland you can whip up in minutes. It’s so incredibly easy, wonderfully quick, and genuinely memorable – perfect for those spontaneous cozy moments or when you want to treat someone special without a fuss. Get ready to fall head over heels for this creamy, dreamy, minty concoction!
Why You’ll Love Snowy Peppermint Bliss Cocoa
- Fast: From stovetop to mug in under 10 minutes!
- Easy: No fancy techniques or complicated steps, just simple stirring and simmering.
- Giftable: Package the dry ingredients for a charming homemade gift, or share a warm batch with neighbors!
- Crowd-pleasing: The perfect balance of sweet white chocolate and refreshing peppermint will win over everyone.
Ingredients
Gather your cozy squad of ingredients!
- 3 cups whole milk: This is your base, and whole milk gives you that wonderfully rich, creamy texture we’re after. You can use 2% if you prefer, but trust me, the whole milk makes a difference!
- 1 cup heavy cream: For an extra layer of decadence! This is where the “bliss” really comes in. It makes your cocoa incredibly smooth and luxurious.
- 1 cup white chocolate chips: The star of our “snowy” theme! White chocolate adds a beautiful sweetness and a velvety melt.
- 2 tablespoons unsweetened cocoa powder: Just a touch to give it that classic cocoa depth without overpowering the white chocolate.
- 1/4 teaspoon pure peppermint extract: This is where the magic happens! Start with 1/4 teaspoon, and you can always add a tiny bit more if you love a bolder minty punch.
- 1/4 teaspoon vanilla extract: A dash of vanilla always enhances sweet flavors and adds warmth.
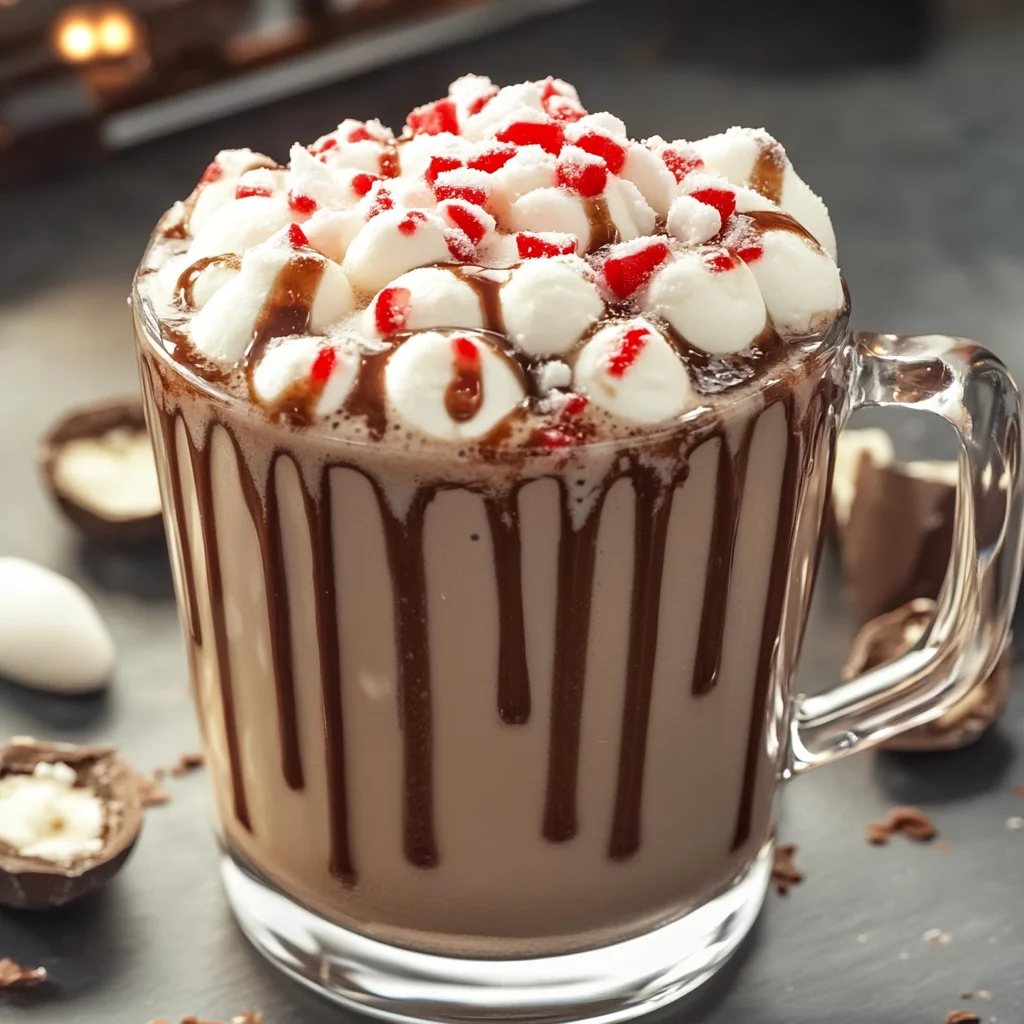
- Mini marshmallows (for topping): Because what’s cocoa without a cloud of fluffy marshmallows?
- Chocolate syrup or melted chocolate (for drizzle): The perfect finishing flourish to make your mug look extra special and give a hint of that classic chocolate flavor.
How to Make Snowy Peppermint Bliss Cocoa
Let’s get cooking! This is truly a breeze, I promise.
- Warm the creamy base: Grab a medium saucepan and pour in your whole milk and heavy cream. Set it over medium heat. You want to heat this gently until it’s steaming and tiny bubbles start to form around the edges – but be careful not to let it come to a full boil, as that can sometimes scorch the milk.
- Melt in the sweetness: Once your milk mixture is steaming, toss in the white chocolate chips and the unsweetened cocoa powder. Now, this is the fun part! Whisk, whisk, whisk until everything is beautifully melted and the cocoa looks perfectly smooth with no lumps. You’ll see it transform into a gorgeous, creamy canvas.
- Infuse with flavor: Take the saucepan off the heat for a moment, and stir in your pure peppermint extract and vanilla extract. Give it a good stir to ensure the flavors are well distributed. Now for my favorite part: taste it! If you’re a big fan of peppermint, feel free to add another tiny dash, a drop at a time, until it’s just right for you. If you really love peppermint, you might even consider making your own homemade peppermint mocha coffee creamer for your coffee fix, using a similar flavor profile!
- Pour and top: Carefully pour your warm, fragrant cocoa into your favorite mugs.
- The finishing touch: Pile those mini marshmallows high on top! For an extra special presentation and a burst of chocolatey goodness, drizzle some chocolate syrup or melted chocolate over the marshmallows. It makes every sip feel like a treat.
Substitutions & Additions
This recipe is super versatile, so feel free to play around and make it your own!
- Dairy-Free Option: You can absolutely swap the whole milk and heavy cream for your favorite dairy-free alternatives like almond milk, oat milk, or coconut milk (for an extra tropical twist!). Just make sure your white chocolate chips are also dairy-free.
- Chocolate Variations: Not a white chocolate fan? You could use milk chocolate chips or even a mix of dark and white chocolate for a different flavor profile.
- Spice it Up: A pinch of cinnamon or a tiny dash of nutmeg would add a lovely warmth, especially around the holidays.
- Extra Peppermint Kick: For serious mint lovers, a few drops of food-grade peppermint oil (use sparingly, it’s potent!) or even a crushed candy cane stirred in at the end can elevate the peppermint experience.
- Adult Version: For a grown-up treat, a shot of peppermint schnapps or Baileys Irish Cream would be a delightful addition to each mug.
- Toppings Galore: Beyond marshmallows and chocolate drizzle, consider whipped cream, shaved white chocolate, a sprinkle of crushed candy canes, or even some mini chocolate chips!
- Pairing Perfection: This cocoa pairs wonderfully with all sorts of sweet treats. Why not try it alongside some easy swirled Christmas fudge for a truly decadent dessert spread?
Tips for Success
Even though this recipe is easy, a few little pointers can ensure your Snowy Peppermint Bliss Cocoa is absolutely perfect every time.
- Low and Slow Heat: When warming the milk and cream, keep the heat at medium or even medium-low. This prevents scorching the bottom of your pan and ensures a smooth, even temperature.
- Whisk Well: Don’t just stir the chocolate and cocoa powder; whisk them! This helps them melt evenly and prevents any clumps, giving you that silky-smooth finish.
- Taste and Adjust Peppermint: Peppermint extract can be strong, so I always recommend starting with the specified amount and then adding more in tiny increments (a drop or two at a time) until you hit your perfect minty balance. You can always add more, but you can’t take it away!
- Serving Temperature: Serve immediately for the best experience. Hot cocoa is at its prime when it’s piping hot and fresh.
- Make Ahead: You can prepare the cocoa base (steps 1-3) ahead of time and store it in an airtight container in the refrigerator for up to 3 days. Reheat gently on the stove over low heat, stirring frequently, until warmed through. This is fantastic for holiday entertaining or busy weeknights!
- Gifting Idea: This cocoa makes a wonderful homemade gift! Layer the dry ingredients (cocoa powder, white chocolate chips, and a tiny baggie of mini marshmallows) in a pretty jar with a tag for the milk, cream, and extracts. It’s a thoughtful and delicious present, perhaps alongside a batch of no-bake peppermint bark snowballs!
How to Store Snowy Peppermint Bliss Cocoa
If you happen to have any leftovers (which is rare in my house!), don’t fret!
- Refrigeration: Allow the cocoa to cool completely, then transfer it to an airtight container. It will keep beautifully in the refrigerator for up to 3-4 days.
- Reheating: When you’re ready for another mug, gently reheat the cocoa on the stove over low to medium-low heat, stirring occasionally, until it’s hot and steaming again. Avoid boiling it to maintain that creamy texture. You can also microwave individual mugs, heating in 30-second intervals and stirring in between.
FAQs
Q: Can I use dark chocolate instead of white chocolate?
A: Absolutely! If you prefer a more traditional dark hot chocolate with a peppermint twist, feel free to use your favorite dark chocolate chips instead of white. The flavor will be richer and less sweet, but still delicious.
Q: Is this recipe good for kids?
A: Yes! This recipe is a huge hit with kids. The sweetness of the white chocolate and the gentle mint flavor are usually very appealing. Just be mindful of the peppermint extract; you might want to start with a slightly smaller amount for very young children.
Q: Can I add a different extract, like almond or orange?
A: You certainly can! While peppermint is classic here, feel free to experiment. Almond extract would give it a marzipan-like quality, and a touch of orange extract with chocolate is always a winning combination. Just like peppermint, start with a small amount and taste as you go.
Q: What kind of cocoa powder should I use?
A: Regular unsweetened cocoa powder works perfectly here. Dutch-processed cocoa powder would also be fine if that’s what you have on hand; it’s a bit less acidic and yields a smoother, mellower chocolate flavor.
For more delicious recipes and kitchen inspiration, be sure to follow us on Pinterest!
Snowy Peppermint Bliss Cocoa
Ingredients
Equipment
Method
- Step 1: Warm the creamy base: Grab a medium saucepan and pour in your whole milk and heavy cream. Set it over medium heat. You want to heat this gently until it's steaming and tiny bubbles start to form around the edges – but be careful not to let it come to a full boil, as that can sometimes scorch the milk.
- Step 2: Melt in the sweetness: Once your milk mixture is steaming, toss in the white chocolate chips and the unsweetened cocoa powder. Whisk, whisk, whisk until everything is beautifully melted and the cocoa looks perfectly smooth with no lumps. You'll see it transform into a gorgeous, creamy canvas.
- Step 3: Infuse with flavor: Take the saucepan off the heat for a moment, and stir in your pure peppermint extract and vanilla extract. Give it a good stir to ensure the flavors are well distributed. Taste it! If you're a big fan of peppermint, feel free to add another tiny dash, a drop at a time, until it's just right for you.
- Step 4: Pour and top: Carefully pour your warm, fragrant cocoa into your favorite mugs.
- Step 5: The finishing touch: Pile those mini marshmallows high on top! For an extra special presentation and a burst of chocolatey goodness, drizzle some chocolate syrup or melted chocolate over the marshmallows. It makes every sip feel like a treat.


