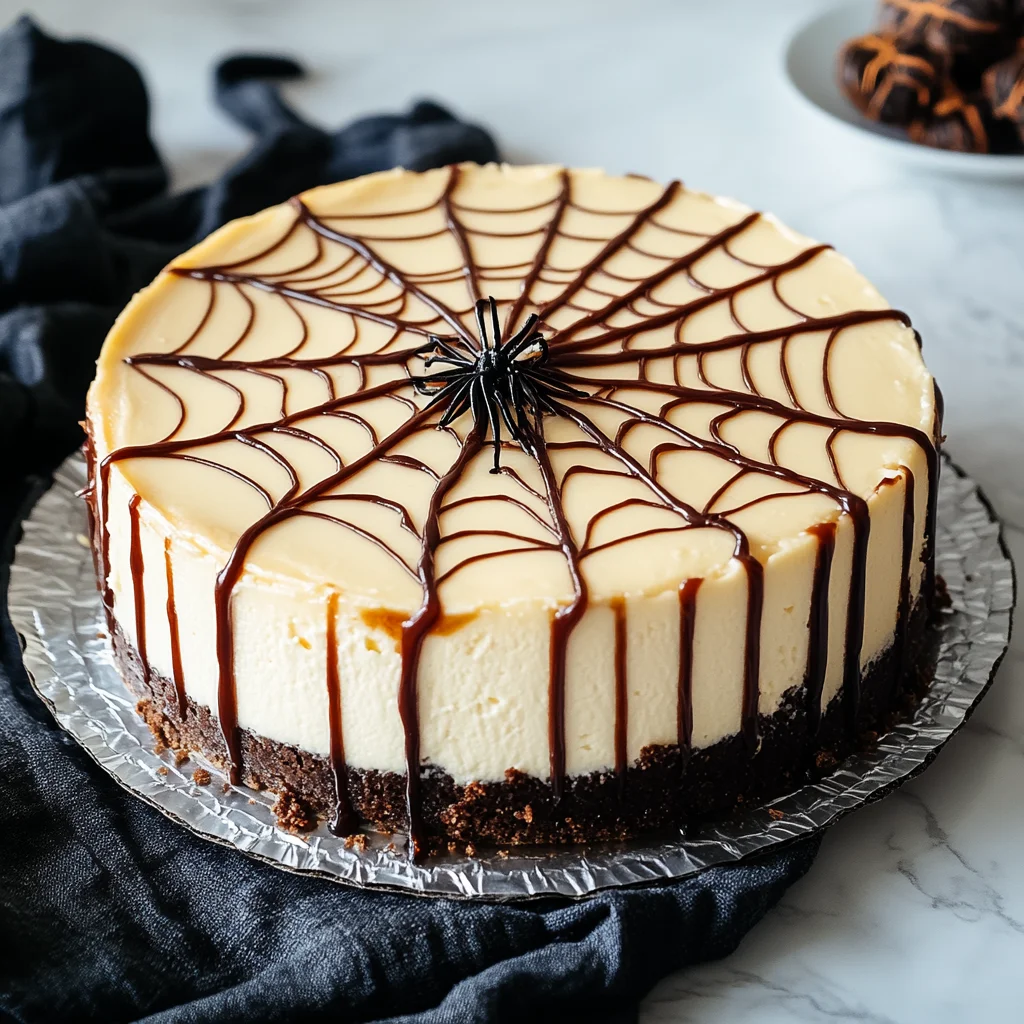
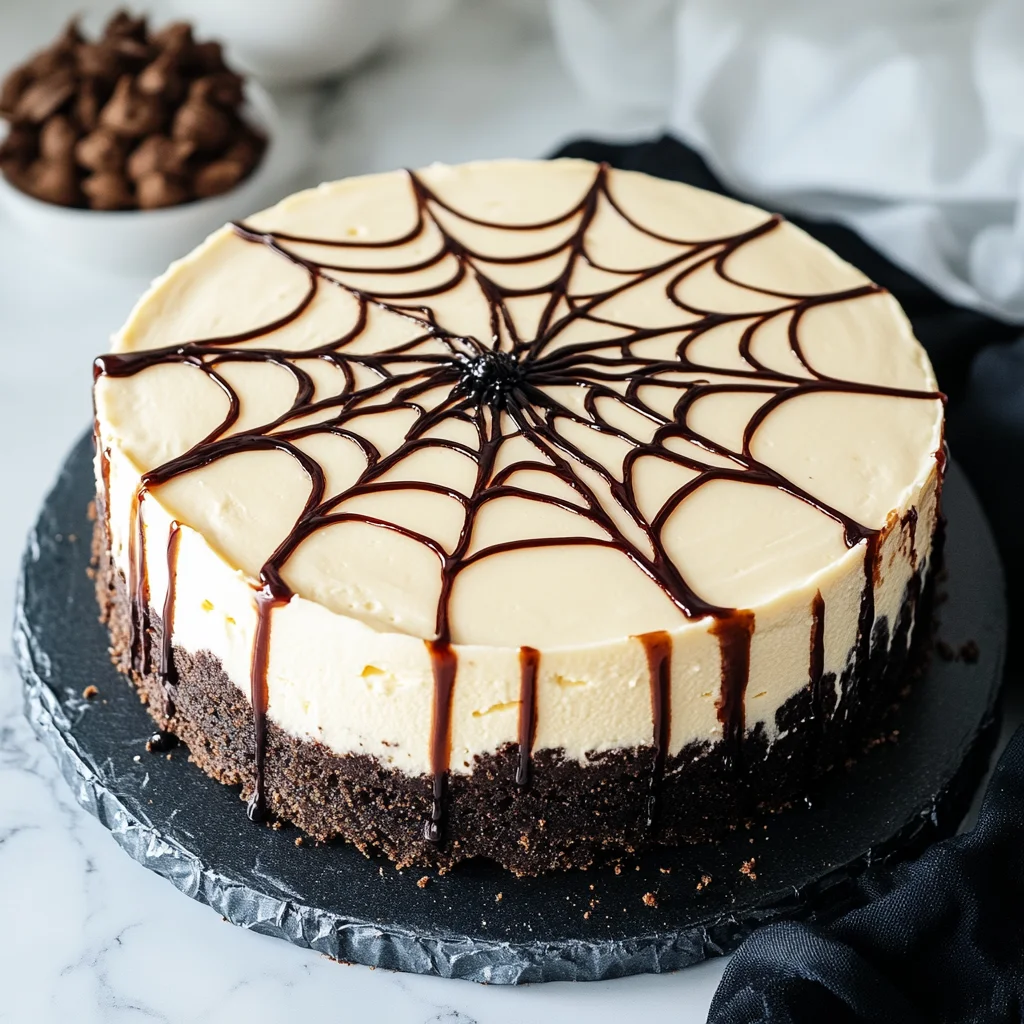
Oh, friend, there’s something truly magical about bringing a show-stopping dessert to the table, isn’t there? That moment when everyone’s eyes light up, and they ask, “Did you really make that?!” Well, get ready for those exact reactions because today, we’re diving into a recipe that looks incredibly impressive but is secretly super simple to create: the Spiderweb Cheesecake! This isn’t just any cheesecake; it’s a creamy, dreamy canvas of velvety goodness, topped with a whimsical chocolate spiderweb design that’s perfect for Halloween parties, fall gatherings, or just a fun weekend treat. It reminds me of those cozy autumn evenings, getting creative in the kitchen, and enjoying something truly special without all the fuss. You’re going to absolutely adore how easy, quick, and memorable this dessert is!
Why You’ll Love Spiderweb Cheesecake
- Fast: Minimal hands-on time means more time for you!
- Easy: No complicated techniques, just simple steps to cheesecake perfection.
- Giftable: A beautiful and delicious treat perfect for sharing with friends and family.
- Crowd-pleasing: A classic flavor with a fun twist that everyone will adore.
Ingredients

Gather your ingredients, sweet friend! Here’s what you’ll need to create this delightful dessert:
- 2 cups chocolate cookie crumbs: Think finely crushed OREO cookies (without the filling!), or any other dark chocolate biscuit. This forms our rich, dark base.
- 1/4 cup unsalted butter, melted: This liquid gold binds our cookie crumbs into a perfect, sturdy crust.
- 24 ounces cream cheese, softened: The absolute star of our cheesecake! Make sure it’s at room temperature for a super smooth, lump-free batter.
- 1 cup granulated sugar: Just the right amount of sweetness to balance the tang of the cream cheese.
- 3 large eggs: These add structure and richness to our cheesecake, making it wonderfully creamy.
- 1 teaspoon vanilla extract: A classic flavor enhancer that truly brings out the best in our dessert.
- 1/4 cup sour cream: This secret ingredient adds a delightful tang and ensures our cheesecake is incredibly moist and velvety.
- 1/2 cup dark chocolate chips, melted: Our artistic medium for crafting that gorgeous spiderweb design!
How to Make Spiderweb Cheesecake
Alright, let’s get baking! Follow these simple steps, and you’ll have a stunning Spiderweb Cheesecake in no time.
- Get Your Oven Ready: First things first, preheat your oven to 325°F (160°C). Then, lightly grease a 9-inch springform pan. This pan is your best friend for cheesecakes, allowing for easy removal!
- Crust Time: In a medium bowl, combine your chocolate cookie crumbs and melted butter. Give it a good mix until everything is nicely coated. Now, press this mixture firmly and evenly into the bottom of your prepared springform pan. I like to use the bottom of a glass to really get it packed down for a solid crust.
- Cream Cheese Magic: Grab a large bowl and your electric mixer. Beat the softened cream cheese and granulated sugar together until it’s wonderfully smooth and free of any lumps. This is key for that silky cheesecake texture!
- Add Eggs and Flavor: Add the eggs one at a time, beating well after each addition until it’s just incorporated. Don’t go crazy here; overmixing can introduce too much air, which can cause cracks. Gently stir in the vanilla extract and sour cream until they’re just combined.
- Pour and Smooth: Carefully pour your luscious cheesecake batter over the prepared crust. Use a spatula to gently smooth the top so it’s nice and even.
- Bake to Perfection: Pop your cheesecake into the preheated oven and bake for 45-50 minutes. You’re looking for the edges to be set, but the center should still have a slight jiggle when you gently shake the pan. That “jiggle” means it’s perfectly cooked and will be super creamy.
- Cool Down Slowly (The Secret to No Cracks!): This step is super important, so don’t rush it! Turn off the oven and let the cheesecake cool completely inside with the oven door slightly ajar for about 1 hour. This slow cool-down prevents those pesky cracks.
- Room Temp & Chill: Once it’s had its oven rest, remove it and let it continue cooling on a wire rack to room temperature. After that, it’s time for its beauty sleep in the fridge! Refrigerate for at least 4 hours, but honestly, overnight is best for the cheesecake to fully set and for the flavors to meld beautifully.
- Time for the Web! Once your cheesecake is thoroughly chilled, transfer your melted dark chocolate to a piping bag with a small tip. If you don’t have one, a small plastic bag with a tiny corner snipped off works perfectly! Pipe concentric circles (like a bullseye target) onto the top of the cheesecake.
- Create the Web: Now for the fun part! Grab a toothpick. Starting from the very center of your cheesecake, gently drag lines outwards through the chocolate circles, radiating like spokes on a wheel. This creates that iconic spiderweb effect.
- Slice and Serve: And just like that, you’ve created a masterpiece! Slice into generous portions and enjoy your creamy, spooky, and utterly delicious Spiderweb Cheesecake.
Substitutions & Additions
One of the best things about baking is making a recipe your own! Here are a few ideas to switch things up:
- Crust Variations: Not a chocolate cookie fan? No problem! You can easily swap the chocolate cookie crumbs for graham cracker crumbs or even vanilla wafer crumbs. Just combine them with the melted butter as instructed.
- Flavor Boosts: Want to add more zest? A teaspoon of orange or lemon zest in the cream cheese batter can add a lovely brightness. A hint of almond extract alongside the vanilla can also be delightful.
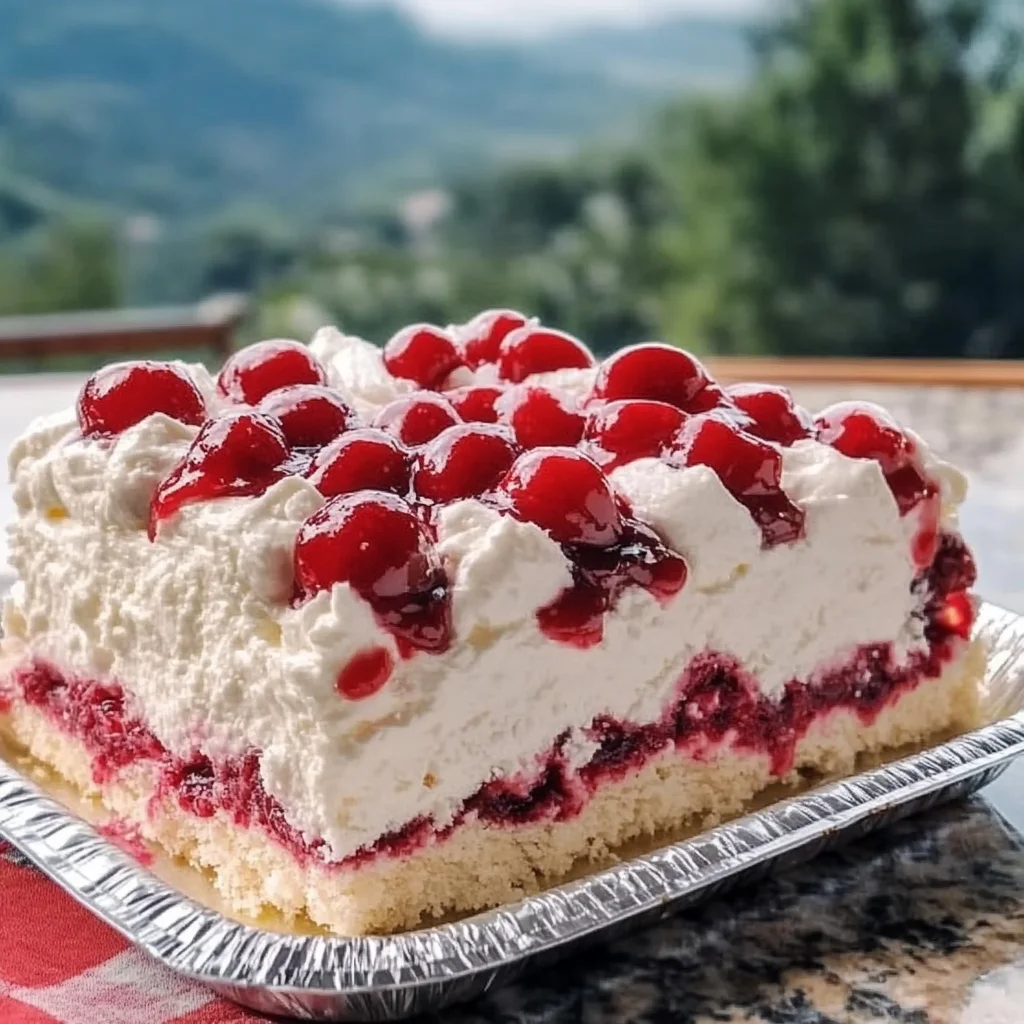
- Topping Fun: Instead of dark chocolate, try using white chocolate for the web on a dark cheesecake base for a striking contrast! Or, for a truly decadent touch, after you’ve made your web, you could drizzle a little melted chocolate over fresh strawberries around the edge. If you’re looking for more unique cheesecake ideas, why not try our easy mini raspberry cheesecake bites for a fruity twist, or even our rich and flavorful Grandma’s Easy Blackberry White Chocolate Cheesecake? If you love the idea of a cheesecake in bar form, our chocolate chip cheesecake bars are another crowd-pleaser!
- Seasonal Spices: For a fall-themed treat, add a pinch of cinnamon or pumpkin spice to the cream cheese mixture.
Tips for Success
Cheesecake can sometimes seem intimidating, but with these tips, you’ll be a pro in no time!
- Room Temperature Ingredients Are Crucial: Seriously, this is probably the most important tip! Make sure your cream cheese and eggs are at room temperature. This ensures a smooth, lump-free batter and helps prevent cracks during baking.
- Don’t Overmix! Once you add the eggs, mix only until they are just incorporated. Overmixing introduces too much air, which can cause the cheesecake to puff up and then crack as it cools. Gentle is the name of the game.
- Slow Cooling Prevents Cracks: I mentioned it in the instructions, but it bears repeating! The slow cooling process in the turned-off oven is essential for a beautiful, smooth top. Rapid temperature changes are the enemy of cheesecake.
- For Clean Slices: Before slicing, run a sharp knife under hot water and wipe it clean between each cut. This will give you perfectly neat, professional-looking slices.
- Plan Ahead: Cheesecake truly benefits from a long chill time. Making it the day before you plan to serve it allows the flavors to deepen and the texture to firm up beautifully.
How to Store Spiderweb Cheesecake
Once you’ve put all that love into your cheesecake, you’ll want to make sure it stays fresh and delicious!
- In the Refrigerator: Cover your Spiderweb Cheesecake loosely with plastic wrap or aluminum foil and store it in the refrigerator. It will stay fresh and delicious for 3-4 days.
- Freezing: Good news! Cheesecake freezes beautifully. If you want to save some for later, place the cheesecake (whole or in slices) uncovered in the freezer for about an hour until firm. Then, wrap it tightly in plastic wrap, followed by a layer of aluminum foil. It can be frozen for up to 1-2 months. Thaw overnight in the refrigerator before serving.
FAQs
Got a few questions bubbling up? Let’s tackle them!
Q: Can I use a different type of chocolate for the web?
A: Absolutely! While dark chocolate gives a nice contrast, semi-sweet or even white chocolate would work perfectly. Just make sure it’s melted smoothly for easy piping.
Q: My cheesecake cracked! What happened?
A: Cracks are usually caused by overmixing the batter (introducing too much air) or by cooling the cheesecake too quickly. Always let it cool slowly in the oven with the door ajar, and try not to open the oven door during baking!
Q: How can I make individual spiderweb cheesecakes?
A: You can absolutely make these in muffin tins lined with paper liners for mini cheesecakes! Just adjust the baking time down to about 20-25 minutes. The web design would be adorable on tiny cheesecakes too!
Q: Can I prepare the chocolate web ahead of time?
A: While you can melt the chocolate ahead, I recommend piping the web design just before serving, or a few hours before, as the chocolate can become quite firm in the fridge, making it less visually appealing if left too long. The cheesecake itself can certainly be made the day before!
Follow us on Pinterest for more delicious recipes!
Spiderweb Cheesecake
Ingredients
Equipment
Method
- Step 1: Get Your Oven Ready: Preheat your oven to 325°F (160°C). Lightly grease a 9-inch springform pan.
- Step 2: Crust Time: In a medium bowl, combine chocolate cookie crumbs and melted butter. Mix well. Press this mixture firmly and evenly into the bottom of the prepared springform pan. Use the bottom of a glass to pack it down for a solid crust.
- Step 3: Cream Cheese Magic: In a large bowl, using an electric mixer, beat the softened cream cheese and granulated sugar together until wonderfully smooth and lump-free.
- Step 4: Add Eggs and Flavor: Add the eggs one at a time, beating well after each addition until just incorporated. Gently stir in the vanilla extract and sour cream until just combined.
- Step 5: Pour and Smooth: Carefully pour the cheesecake batter over the prepared crust. Use a spatula to gently smooth the top so it's nice and even.
- Step 6: Bake to Perfection: Bake for 45-50 minutes. The edges should be set, but the center should still have a slight jiggle when you gently shake the pan.
- Step 7: Cool Down Slowly (The Secret to No Cracks!): Turn off the oven and let the cheesecake cool completely inside with the oven door slightly ajar for about 1 hour. This slow cool-down prevents cracks.
- Step 8: Room Temp & Chill: Remove the cheesecake from the oven and let it continue cooling on a wire rack to room temperature. After that, refrigerate for at least 4 hours, or preferably overnight, for the cheesecake to fully set and for flavors to meld beautifully.
- Step 9: Time for the Web!: Once thoroughly chilled, transfer your melted dark chocolate to a piping bag with a small tip (or a plastic bag with a tiny corner snipped off). Pipe concentric circles (like a bullseye target) onto the top of the cheesecake.
- Step 10: Create the Web: Grab a toothpick. Starting from the very center of your cheesecake, gently drag lines outwards through the chocolate circles, radiating like spokes on a wheel. This creates the iconic spiderweb effect.
- Step 11: Slice and Serve: Slice into generous portions and enjoy your creamy, spooky, and utterly delicious Spiderweb Cheesecake.