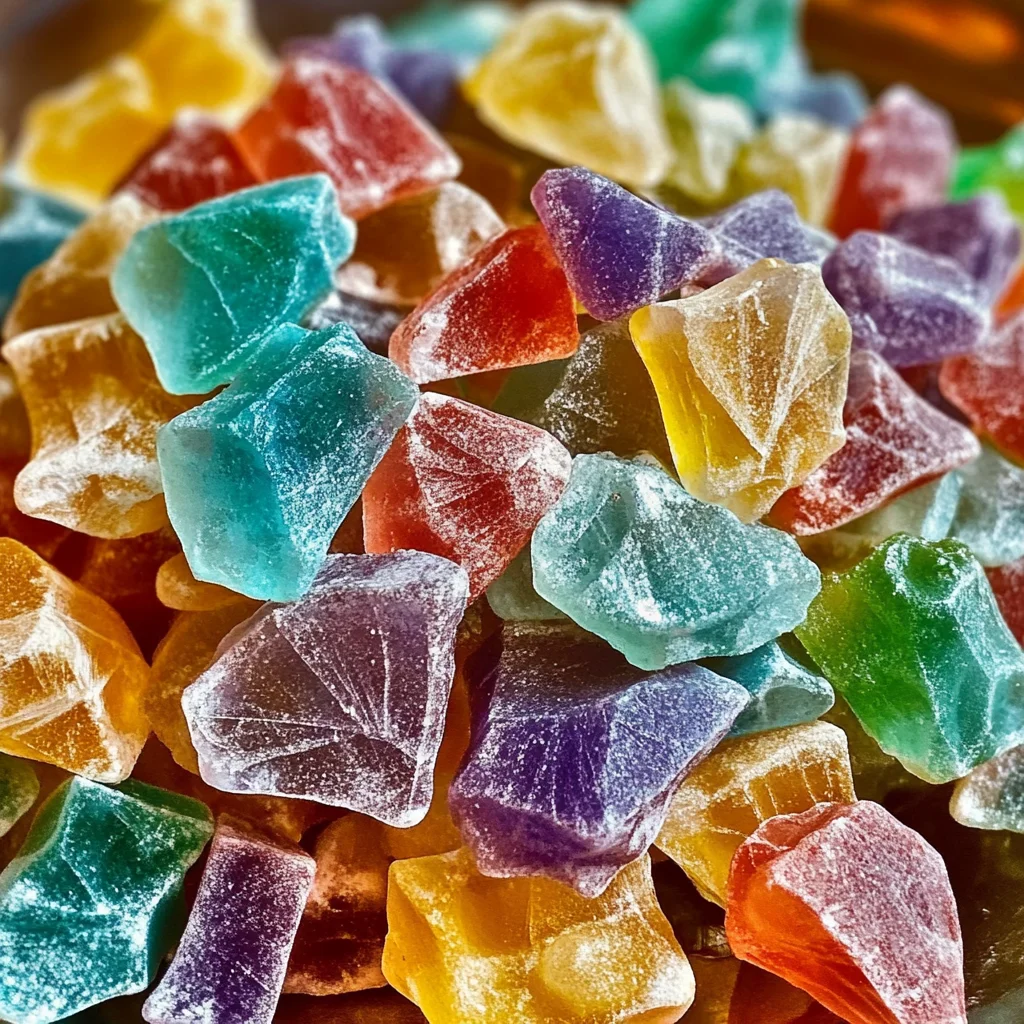
Remember those magical moments as a kid, seeing shimmering, colorful candy glisten in the sunlight, almost like tiny jewels you could eat? Stained glass rock candy has that nostalgic charm that instantly transports you back to simpler times. It’s not just a treat; it’s a little edible work of art that’s as fun to make as it is to enjoy. Whether you’re planning a festive party, looking for a unique gift idea, or just craving a bit of homemade candy magic, this recipe is your ticket to sweet success.
Best of all, making stained glass rock candy at home is surprisingly easy and quick once you get the hang of it. You don’t need fancy ingredients or equipment—just a little patience, some sugar, and your favorite flavors and colors. Let me walk you through everything you need to know so you can create your own brilliant candy shards that will dazzle everyone who sees (and tastes!) them.
Why You’ll Love Stained Glass Rock Candy
- Fast: Once your syrup hits the right temperature, the rest comes together quickly.
- Easy: No candy-making experience necessary, just some basic kitchen tools and a candy thermometer.
- Giftable: These colorful shards make charming homemade gifts that wow both kids and adults alike.
- Crowd-pleasing: Perfect for parties, holiday celebrations, or just brightening up your snack jar.
Ingredients
Here’s what you’ll need for vibrant stained glass rock candy. Each ingredient plays an important role in achieving that perfect crystal-clear, glossy candy:
- 1 cup water: The base to dissolve your sugar and help create the syrup.
- 4 cups granulated sugar: Provides the sweetness and crystal structure.
- 1 ½ cups light corn syrup: Adds shine and prevents crystallization, ensuring smooth candy.
- 2 teaspoons flavored oil or 4 teaspoons flavored extract: Vanilla, lemon, peppermint, or any flavor you love to customize your candy.
- 1 teaspoon gel food coloring: Intense colors that won’t water down your candy, perfect for that stained glass effect.
- 1 ½ cups powdered sugar: Used to coat the baking sheet and create wells to hold the syrup in place as it cools.
This simple list means you probably already have many of these ingredients hanging out in your pantry. If you’re curious about different flavor combos, I’ll share some fun ideas in the Substitutions & Additions section.
How to Make Stained Glass Rock Candy
Now for the fun part! Making stained glass rock candy may look fancy, but the process is straightforward when you follow these steps carefully. I’ll also sprinkle in some tips to keep things smooth and stress-free.
- Prepare your workspace: Line a baking sheet with foil and dust it evenly with powdered sugar. This sugar layer prevents the candy from sticking and acts as a base for your colorful syrup. Using your fingers or a spoon, gently form swirling “S” shaped wells in the powdered sugar—these little wells will hold your syrup as it cools. If you want to make multiple colors or flavors, use separate pans or divide the baking sheet.
- Make the sugar syrup: In a heavy-bottomed saucepan, combine the water, granulated sugar, and light corn syrup. Heat over medium-high heat, stirring constantly until the sugar dissolves completely. This step is key—if the sugar isn’t fully dissolved, your candy might end up grainy.
- Bring to hard crack stage: Attach a candy thermometer to the side of the pan, making sure it doesn’t touch the bottom directly. Let the syrup boil without stirring until it reaches 300°F (hard crack stage). This is the temperature where your candy will harden with that perfect snap. Patience is essential here; rushing can lead to syrup that’s too soft or burnt.
- Cool slightly: Once at 300°F, remove the pan from heat. Wait for the bubbling to completely stop before moving on. This prevents splattering and helps the syrup settle.
- Divide and color: If you’re making multiple colors, carefully pour the hot syrup into separate heatproof bowls. Quickly stir in your gel food coloring and flavored oil or extract. Gel colors work best here because they provide vivid hues without watering down the syrup. Work fast—this syrup sets quickly once it cools.
- Fill the wells: Using a spoon or small ladle, gently drizzle the colored syrup into the powdered sugar wells on your prepared pans. The syrup will spread into a shallow pool, creating a beautiful jewel-like effect. Try not to overfill or the colors might blend too much.
- Let cool and harden: Allow the candy to cool completely at room temperature for about an hour. Don’t rush this by refrigerating—it can cause the candy to become cloudy or sticky.
- Cut into shards: Once hardened, use kitchen scissors or a sharp knife to break the candy into smaller, shard-like pieces. The shapes don’t need to be perfect; the irregular edges add to the charm.
- Prevent sticking: Lightly dust the candy shards with powdered sugar so they don’t stick together. Store them in an airtight container to keep them crisp and shiny.
Simple as that! If you want more inspiration for homemade sweets, you might enjoy browsing the wide variety of homemade recipes here. And if you love citrusy flavors, my favorite creamy lemon chicken recipe pairs beautifully with the bright zing of lemon-flavored rock candy as a fun party snack decoration.
Substitutions & Additions
One of the best things about this recipe is how easy it is to customize. Here are some ideas to make your stained glass rock candy truly your own:
- Flavor swaps: Instead of the standard vanilla or peppermint extracts, try fun flavors like almond, raspberry, lemon, or even bubblegum. Just be sure to use candy or food-safe flavor oils or extracts.
- Color combos: Mix and match gel food colors to create layered or marbled effects inside your candy wells. For example, a swirl of blue and purple looks like a mystical gem, while red and green are perfect for holiday treats.
- Texture touches: Before the syrup hardens, sprinkle edible glitter or tiny nonpareils on top for an extra sparkle. It’s a magical touch that kids especially love.
- Shape variations: Instead of swirling “S” shapes, you can use cookie cutters pressed gently into the powdered sugar to make geometric pools of syrup. This creates more defined shapes, perfect for themed events or gifts.
- Alternative sweeteners: While granulated sugar and corn syrup are traditional, experimenting with organic cane sugar or even honey might add interesting twists. Just note that alternative sweeteners can affect how the candy sets.
If you enjoy no-bake treats, you might also like the no-bake peanut butter brownie cookies for a quick and delicious sweet fix that complements your candy-making day.
Tips for Success
Making candy can feel a bit intimidating, but with these helpful tips, you’ll feel confident and ready to impress:
- Use a reliable candy thermometer: Temperature is everything in candy-making. If you don’t have one, investing in a good candy thermometer will pay off for many recipes.
- Don’t stir once boiling: When the syrup reaches a boil, avoid stirring to prevent sugar crystals from forming and ruining the smooth texture.
- Work quickly when adding color and flavor: Syrup sets fast once off the heat, so have your colors and flavors ready before you start dividing the syrup.
- Prepare your pans in advance: The powdered sugar wells need to be ready before your syrup is done, so don’t wait to start this step.
- Keep kids safe: Hot syrup can cause serious burns. If you’re making this with little helpers, assign them to decorating or cooling duties while adults handle the hot syrup.
- Use kitchen scissors for cutting: Scissors give you better control over the candy shards than a knife, minimizing breakage or cracking.
- Prep-ahead idea: You can make batches of the candy a day or two ahead. Just store them in airtight containers at room temperature, and they’ll stay fresh and shiny.
How to Store Stained Glass Rock Candy
Proper storage is key to keeping your stained glass rock candy looking and tasting its best. Ideally, store the candy shards in an airtight container at room temperature. Avoid humid environments because moisture can cause the candy to become sticky or lose its crispness. I like to line the container with parchment paper and lightly dust the candy with powdered sugar before sealing to prevent any pieces from sticking together.
The shelf life is generally about two to three weeks, though mine rarely last that long! If you live in a particularly humid climate, consider adding a small packet of food-safe silica gel inside the container to absorb moisture—but don’t let it touch the candy directly. Avoid refrigeration or freezing, as this can cause condensation and cloudiness in the candy.
If you want to gift your candy, wrap the shards in parchment or cellophane bags tied with pretty ribbons. These make charming party favors or thoughtful homemade gifts for holidays and birthdays. Pairing them with a batch of easy homemade cookies, like Oreo stuffed cinnamon rolls, can create a sweet gift box that everyone will love.
FAQs
Q: Can I use regular food coloring instead of gel?
A: You can, but gel food coloring is preferred because it won’t add extra liquid to the syrup, which can affect the candy’s texture and setting time.
Q: What if my candy turns out sticky?
A: Sticky candy usually means moisture got in or the candy didn’t reach the hard crack stage. Make sure your syrup hits 300°F and store the candy in an airtight container away from humidity.
Q: Can I make this recipe sugar-free or with alternative sweeteners?
A: Rock candy relies on precise sugar chemistry, so sugar-free or alternative sweeteners won’t typically work well. Sticking to granulated sugar and corn syrup gives the best results.
Q: How do I prevent the syrup from crystallizing while cooking?
A: Stir only while dissolving sugar at the start. Once boiling, avoid stirring. Adding corn syrup helps prevent crystallization as well.
Stained glass rock candy is truly a delightful project that brings a little sparkle to your kitchen and your taste buds. If you’re interested in more sweet treats that are as fun to make as they are to eat, be sure to explore the wide variety of recipes on this site. From easy no-bake desserts to classic favorites, there’s something here for every craving and occasion.
And when you’re ready to dive into more creative kitchen adventures, don’t miss the chance to follow us on Pinterest for daily inspiration, tips, and drool-worthy recipes that will keep your home cooking fresh and exciting!
Stained Glass Rock Candy
Ingredients
Equipment
Method
- Step 1: Line a baking sheet with foil and dust evenly with powdered sugar. Form swirling “S” shaped wells in the powdered sugar to hold syrup as it cools. Use separate pans or divide the sheet if making multiple colors.
- Step 2: In a heavy-bottomed saucepan, combine water, granulated sugar, and light corn syrup. Heat over medium-high, stirring constantly until sugar dissolves completely.
- Step 3: Attach candy thermometer to pan side without touching bottom. Boil syrup without stirring until it reaches 300°F (hard crack stage).
- Step 4: Remove pan from heat once at 300°F and wait for bubbling to stop completely before proceeding.
- Step 5: Divide hot syrup into heatproof bowls if using multiple colors. Quickly stir in gel food coloring and flavored oil or extract. Work fast as syrup sets quickly.
- Step 6: Using a spoon or small ladle, drizzle colored syrup into powdered sugar wells on prepared pans, creating shallow pools. Avoid overfilling to prevent colors blending.
- Step 7: Allow candy to cool completely at room temperature for about 1 hour. Do not refrigerate to avoid cloudiness or stickiness.
- Step 8: Once hardened, use kitchen scissors or a sharp knife to break candy into shard-like pieces with irregular edges for charm.
- Step 9: Lightly dust candy shards with powdered sugar to prevent sticking. Store in an airtight container at room temperature away from humidity to keep crisp and shiny.