There’s something magical about Valentine’s Day, isn’t there? The way little gestures, like a sweet homemade treat, can light up someone’s day and make them feel truly special. I remember the first time I made Valentine Hearts Fudge—it was a chilly February afternoon, and the kitchen smelled like melted chocolate and vanilla. The simple act of swirling pink and chocolate layers together brought a smile to my face, and sharing those heart-shaped pieces with friends and family created memories that still warm my heart.
This Valentine Hearts Fudge recipe is not only a feast for the eyes but also incredibly easy and quick to whip up. Whether you’re looking to surprise your sweetheart, make a thoughtful gift for friends, or simply indulge your own sweet tooth, this fudge delivers every time. And trust me, once you’ve tried your hand at this rich, creamy, luscious fudge, you’ll be hooked—and maybe inspired to explore more fun no-bake desserts like my No-Bake Peanut Butter Brownie Cookies for a quick chocolate fix!
Why You’ll Love Valentine Hearts Fudge
- Fast: Ready in under 30 minutes, plus chilling time.
- Easy: No complicated baking skills required, perfect for beginners.
- Giftable: Heart shapes and pretty pink swirls make it a perfect homemade gift.
- Crowd-pleasing: Sweet, creamy, and chocolatey – a guaranteed hit at any gathering.
Ingredients
Let’s take a closer look at what you’ll need. I like to keep ingredients simple and accessible, so you probably already have most of these in your pantry or can grab them easily from the store.
- Semi-sweet chocolate chips (2 cups): The rich chocolate base that gives the fudge its classic flavor.
- Sweetened condensed milk (1 can, 14 oz for chocolate layer, plus ½ cup for pink swirl): This adds sweetness and gives the fudge that smooth, creamy texture.
- Unsalted butter (2 tbsp): Helps the chocolate melt beautifully and adds richness.
- Vanilla extract (1 tsp + ½ tsp): A little vanilla goes a long way to deepen the flavor.
- Pinch of salt: Balances the sweetness and enhances the chocolate taste.
- White chocolate chips (1 cup): For that gorgeous pink swirl layer.
- Pink or red gel food coloring (2 drops): To tint the white chocolate a soft, romantic pink.
- Decoration options: Crushed nuts, dried raspberries, cookie crumbs, heart sprinkles, or edible shimmer to make your fudge pop!
If you love adding a little extra flair, I always recommend keeping some fun toppings on hand. They not only add texture but also make your treats look like they came from a fancy bakery rather than your cozy kitchen. Speaking of cozy, if you’re into easy no-bake recipes, you might want to check out these Easy No-Bake Chocolate Cherry Pie bites for your next dessert adventure.
How to Make Valentine Hearts Fudge
Alright, let’s get down to the fun part—making the fudge! I’ll walk you through each step so you can feel confident and enjoy the process.
- Preheat and prepare your pan: Line an 8×8-inch baking pan with parchment paper, leaving an overhang on the sides. This overhang is a little kitchen hack I love because it makes it super easy to lift the fudge out once it’s set. Lightly grease the parchment with butter or nonstick spray so the fudge doesn’t stick.
- Make the chocolate layer: In a microwave-safe bowl, combine the semi-sweet chocolate chips, butter, and the full can of sweetened condensed milk. Microwave in 20-30 second bursts, stirring between each, until the mixture is smooth and glossy. This slow melting prevents the chocolate from burning. Once melted, stir in the vanilla extract and a pinch of salt. The salt really brings out the chocolate flavor, so don’t skip it!
- Pour and level: Spread the chocolate mixture evenly into your prepared pan using a spatula. Don’t worry if it looks thick—that’s exactly what you want. Let it rest at room temperature for a few minutes while you prepare the pink swirl layer.
- Prepare the pink swirl layer: In a separate microwave-safe bowl, melt the white chocolate chips with the ½ cup of sweetened condensed milk, again in short bursts, stirring until smooth. Stir in the ½ teaspoon of vanilla extract. Now, add 2 drops of pink or red gel food coloring to get that perfect soft pink hue. Gel coloring works best because it won’t thin out the mixture like liquid food coloring might.
- Create the swirl: Spoon dollops of the pink mixture over the chocolate base. Now, take a skewer or toothpick and gently swirl the two layers together. This part is so satisfying—watch the colors mix and create those gorgeous marbled heart vibes.
- Decorate: Sprinkle crushed nuts, dried raspberries, or cookie crumbs evenly over the surface. If you want to get extra festive, add heart-shaped sprinkles or a touch of edible shimmer to make your fudge sparkle just like your Valentine’s Day spirit.
- Chill: Pop the fudge into the refrigerator for at least 2 hours, or until it’s firm to the touch. This patience pays off—the fudge will be perfectly set and easy to cut.
- Shape and serve: Using the parchment overhang, lift the fudge out of the pan. Here comes the fun part—grab a heart-shaped cookie cutter and press it into the fudge to create cute, bite-sized Valentine hearts. Arrange them on a pretty plate for serving, or pack them in a festive box for gifting. Trust me, these will be the star of your Valentine’s celebration!
Substitutions & Additions
One of the best things about this fudge recipe is how versatile it is. Feel free to tailor it to your taste or pantry supplies. Here are some ideas you might enjoy:
- Chocolate Options: Swap semi-sweet chips for dark chocolate for a richer, less sweet fudge, or milk chocolate for a creamier, sweeter version.
- Dairy-Free Version: Use coconut condensed milk and dairy-free chocolate chips to make this fudge vegan-friendly.
- Flavor Twists: Add a teaspoon of peppermint extract in place of vanilla for a minty twist perfect for wintertime.
- Color Variations: Try purple or blue gel food coloring in the white chocolate layer for a fun surprise twist, especially great for birthdays or baby showers.
- Add-Ins: Mix in mini chocolate chips, chopped dried cherries, or crushed candy canes into the chocolate layer before setting for extra texture and flavor.
If you’re a fan of layered desserts, you might also like the idea of combining this fudge with other no-bake treats like my Easy No-Bake Cheesecake Cups. They pair beautifully for a dessert platter that impresses without the stress.
Tips for Success
Making fudge can seem intimidating, but with a few handy tips, you’ll be a fudge pro in no time. Here are some things to keep in mind:
- Don’t overheat the chocolate: Use short bursts in the microwave and stir often. Chocolate can seize or burn easily, and you want a smooth texture.
- Use parchment paper with an overhang: This is a game-changer for removing fudge cleanly without crumbling or breaking.
- Swirling technique: Be gentle when swirling the pink layer into the chocolate. Too much stirring can blend the colors too much and lose the pretty marbled effect.
- Chill time is key: Make sure the fudge is fully chilled before cutting. This helps it hold its shape and gives you clean edges.
- Prep ahead: You can make this fudge up to 3 days in advance and keep it refrigerated. Just cut and decorate right before serving to keep it looking fresh.
For anyone who enjoys making desserts ahead of time, this fudge is perfect. It’s a great addition to your Valentine’s Day celebration, just like other make-ahead favorites such as my Easy Mini Raspberry Cheesecake Bites that you can prepare early and serve fresh when guests arrive.
How to Store Valentine Hearts Fudge
Once your Valentine Hearts Fudge is ready, proper storage will keep it tasting fresh and looking irresistible.
- Refrigerate: Store fudge in an airtight container in the refrigerator. It will stay soft and delicious for up to 2 weeks.
- Freeze for longer storage: You can freeze fudge wrapped tightly in plastic wrap and then placed in a freezer-safe container or bag for up to 3 months. Thaw overnight in the fridge before serving.
- Room temperature: If your kitchen is cool (below 70°F), fudge can be stored at room temperature for a few days in an airtight container, but it’s best refrigerated to maintain texture.
When you’re ready to gift or serve, let the fudge sit at room temperature for a few minutes to soften slightly—this makes the flavor shine even more.
FAQs
Q: Can I use regular liquid food coloring instead of gel?
A: You can, but gel food coloring is better because it won’t thin out the white chocolate mixture, helping you keep that perfect swirl consistency.
Q: What if my fudge doesn’t set properly?
A: Make sure you’ve used sweetened condensed milk and have chilled the fudge long enough. If it’s still too soft, pop it back in the fridge for additional time. Also, avoid substituting ingredients like evaporated milk, which won’t give the right texture.
Q: How do I avoid grainy or crumbly fudge?
A: Stir gently and don’t overheat the chocolate. Rapid temperature changes or overheating can cause sugar crystallization, leading to graininess.
Q: Can I add nuts inside the fudge?
A: Absolutely! Chopped nuts like pecans or walnuts can be mixed into the chocolate layer before setting for added crunch and flavor.
Making Valentine Hearts Fudge is such a rewarding experience, and I hope this recipe brings a little extra love into your kitchen this season. For more delicious recipes that bring warmth and joy, be sure to explore the full collection of sweets and treats at Crispy Kitchens’ recipe library. You might find some perfect companions to your fudge, like the Easy Chocolate Covered Strawberry Pie that’s just as dreamy and festive.
Happy cooking, and may your Valentine’s Day be filled with sweetness and smiles!
Don’t forget to follow us on Pinterest for more inspiring recipes and kitchen ideas.
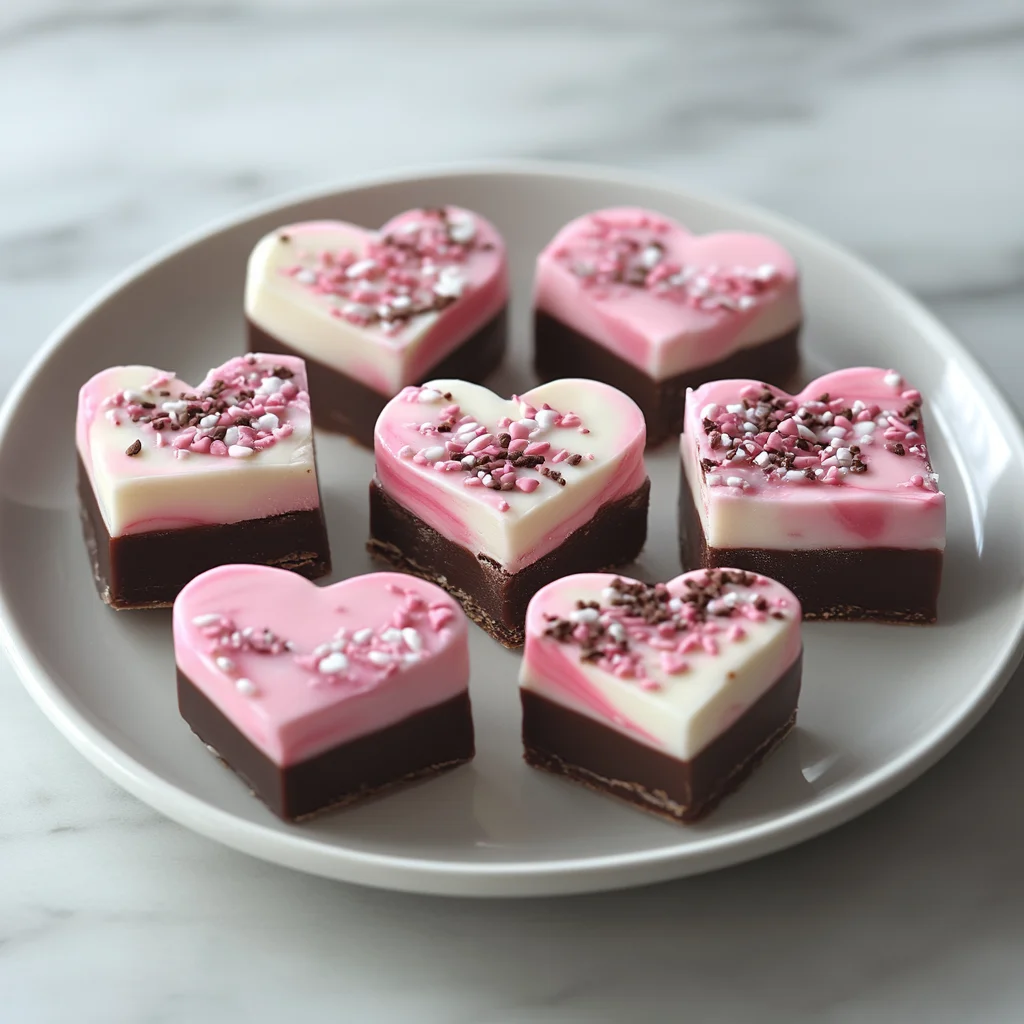
Decadent Valentine Hearts Fudge
Ingredients
Equipment
Method
- Step 1: Line an 8×8-inch baking pan with parchment paper, leaving an overhang. Lightly grease parchment with butter or nonstick spray.
- Step 2: In a microwave-safe bowl, combine semi-sweet chocolate chips, butter, and the full can of sweetened condensed milk. Microwave in 20-30 second bursts, stirring between each, until smooth and glossy. Stir in vanilla extract and a pinch of salt.
- Step 3: Spread the chocolate mixture evenly into the prepared pan using a spatula. Let it rest at room temperature for a few minutes.
- Step 4: In another microwave-safe bowl, melt white chocolate chips with ½ cup sweetened condensed milk in short bursts, stirring until smooth. Stir in ½ teaspoon vanilla extract and 2 drops of pink or red gel food coloring.
- Step 5: Spoon dollops of the pink mixture over the chocolate base. Use a skewer or toothpick to gently swirl the two layers together to create a marbled effect.
- Step 6: Sprinkle crushed nuts, dried raspberries, cookie crumbs, heart sprinkles, or edible shimmer evenly over the surface.
- Step 7: Refrigerate for at least 2 hours or until firm to the touch.
- Step 8: Using the parchment overhang, lift the fudge out of the pan. Press a heart-shaped cookie cutter into the fudge to create bite-sized hearts. Arrange on a plate or pack for gifting.