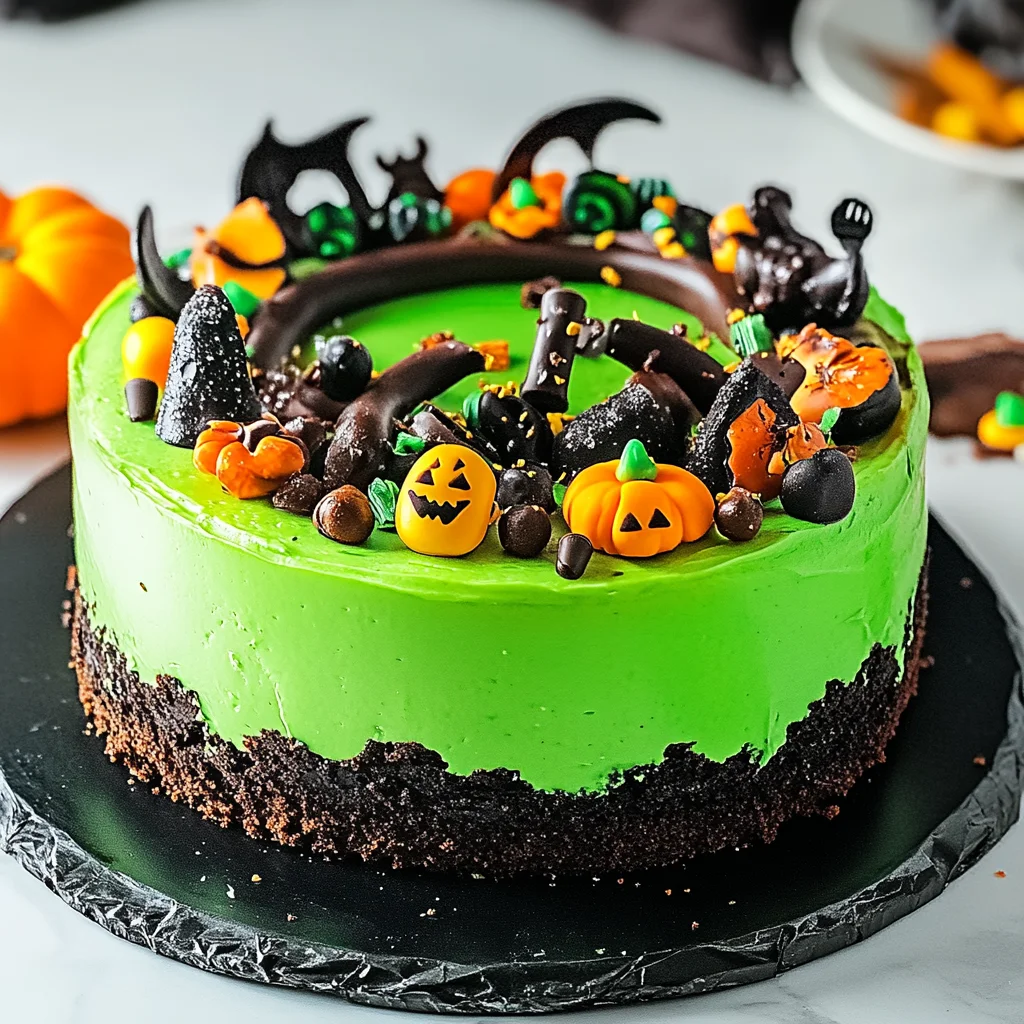
Hey there, my sweet-toothed friends! Are you ready to conjure up some magic in your kitchen this Halloween season? I’m so excited to share one of my absolute favorite spooky treats that’s guaranteed to make your celebrations extra special. There’s something so wonderfully nostalgic about homemade desserts, especially during holidays when memories are made around festive tables. This isn’t just any cheesecake; it’s a vibrant, wickedly green “Witch’s Cauldron Cheesecake” that looks incredible and tastes even better. You’re going to be amazed at how easy and quick it is to pull off, making it a truly memorable dessert without any fuss. No tricky spells required, just simple steps to a show-stopping centerpiece!
Why You’ll Love Witch’s Cauldron Cheesecake
- Fast
- Easy
- Giftable
- Crowd-pleasing
Ingredients

Gather your ingredients, my little kitchen witches! Here’s what you’ll need to make this enchanting dessert. Most of these are likely staples in your pantry, making this recipe a breeze to whip up!
- 1 ½ cups chocolate graham cracker crumbs: These make the perfect dark, earthy “cauldron” base. You can buy them pre-crushed or crush your own graham crackers – it’s super simple!
- ¼ cup melted butter: The magical binder that holds our delicious crust together.
- 24 oz cream cheese, softened: The star of any good cheesecake! Make sure it’s completely softened to room temperature for that irresistibly smooth, lump-free batter. Trust me, this step is non-negotiable for a perfect texture.
- 1 cup sugar: Just the right amount of sweetness to balance the tang of the cream cheese.
- ½ cup sour cream: This secret ingredient adds an incredible richness and a subtle tang that makes your cheesecake truly gourmet.
- 3 large eggs: These help set the cheesecake beautifully, ensuring a creamy, custard-like consistency.
- 1 tsp vanilla extract: A classic flavor enhancer that brightens up all the other tastes.
- Green gel food coloring: This is where the magic happens! Gel coloring gives you a deep, vibrant green that liquid coloring often can’t achieve.
- Gummy worms and candy decorations for topping: Get creative here! Think spooky eyeballs, candy spiders, or even some edible glitter for a bubbling potion effect.
How to Make Witch’s Cauldron Cheesecake
Ready to brew up some deliciousness? Follow these steps, and you’ll have a chillingly good cheesecake in no time!
- First things first, let’s get that oven warmed up. Preheat your oven to a cozy 325°F (160°C). While it’s heating, grab your trusty 9-inch springform pan and give it a good grease. This ensures your beautiful cheesecake slides out effortlessly later!
- Now for the base of our cauldron. In a medium bowl, combine your chocolate graham cracker crumbs and the melted butter. Give it a good mix until everything is nicely moistened. Then, press this mixture firmly into the bottom of your prepared springform pan. You can use the back of a spoon or even the bottom of a flat glass to get it nice and compact.
- Time for the creamy, dreamy filling! In a large bowl, using an electric mixer, beat the softened cream cheese and sugar together until they are perfectly smooth and there are no lumps in sight. This might take a few minutes, but patience is key for that silky texture. Once smooth, add in the sour cream, eggs, and vanilla extract. Mix on low speed until everything is just combined. Be careful not to overmix here; we want to keep it light and airy.
- Here’s the fun part that brings our cauldron to life! Add your green gel food coloring to the batter. Start with a few drops and mix it in. Keep adding and mixing until you achieve that vibrant, spooky deep green hue you’re looking for. It’s like mixing a potion!
- Gently pour your beautifully green cheesecake batter over the chocolate graham cracker crust. Use a spatula to smooth the top, making sure it’s even.
- Pop your cheesecake into the preheated oven and bake for about 45-50 minutes. You’ll know it’s ready when the edges are set and firm, but the center still has a slight, delicate jiggle when you gently shake the pan. This is perfect; it means it will be wonderfully creamy when fully chilled.
- Once baked, turn off the oven and open the door slightly. Let the cheesecake cool in the oven for about an hour. This helps prevent cracking. Then, remove it and let it cool completely at room temperature on a wire rack. After it’s completely cooled, the hardest part begins: refrigerate it for at least 4 hours, or even better, overnight. Chilling is crucial for the cheesecake to firm up and for the flavors to meld perfectly.
- When you’re ready to serve, carefully remove the springform pan. Now for the grand finale – decorating! Arrange your gummy worms and other candy decorations on top to create that fantastic “bubbling cauldron” effect. You can even drizzle a little melted chocolate for extra flair! If you’re looking for more delightful dessert recipes for your gatherings, you’ll find plenty to inspire you on our site.
- Slice into your masterpiece and watch the smiles appear!
Substitutions & Additions
Want to get even more creative with your cauldron? Here are some ideas to mix things up!
- Crust Variations: Instead of chocolate graham crackers, try crushed Oreo cookies (cream and all!) for an even darker, richer crust. Or, for a gingerbread-spiced twist, use gingersnap crumbs.
- Flavor Boost: Add a teaspoon of almond extract along with the vanilla for a subtle, sophisticated twist.
- Extra Spooky Swirls: Before baking, swirl in a few drops of purple or black gel food coloring for a marbled, mystical effect.
- Candy Overload: Beyond gummy worms, consider candy corn, chocolate eyeballs, small chocolate bats, or even crumbled chocolate cookies for a “dirt” effect around the candies. For more spooky fun, you might love our Halloween Cream Cheese Swirl Brownies.
- “Potion” Topping: For an extra gooey look, drizzle with a thin layer of lime green gelatin (prepared according to package directions and slightly cooled) before adding candies.
Tips for Success
Making cheesecake can feel a little intimidating, but with these simple tips, yours will come out perfect every time!
- Room Temperature Ingredients are Key: This is probably the most important tip! Ensure your cream cheese, eggs, and sour cream are at room temperature. This helps them combine smoothly, preventing lumps and ensuring a beautifully creamy cheesecake texture.
- Don’t Overmix: Once you add the eggs, mix only until just combined. Overmixing introduces too much air, which can lead to cracks in your cheesecake as it cools.
- Water Bath (Optional but Recommended): While this recipe doesn’t strictly require it, a water bath creates a moist, even baking environment and significantly reduces the risk of cracking. Wrap your springform pan tightly with foil (two layers!) and place it in a larger roasting pan. Pour hot water into the roasting pan until it comes about halfway up the sides of the springform pan.
- Slow Cooling Prevents Cracks: Don’t rush the cooling process! Allowing the cheesecake to cool gradually (first in the turned-off oven, then at room temperature) is vital for preventing cracks.
- Chill Thoroughly: A well-chilled cheesecake is a happy cheesecake! Don’t skip the refrigeration step. It allows the cheesecake to firm up and the flavors to fully develop.
How to Store Witch’s Cauldron Cheesecake
Once you’ve charmed everyone with your Witch’s Cauldron Cheesecake, you’ll want to make sure any leftovers stay fresh and delicious.
Store your cheesecake, loosely covered with plastic wrap or in an airtight container, in the refrigerator. It will stay wonderfully fresh for up to 3-4 days. If you’ve decorated it with particularly delicate candies that might melt or get sticky, you might want to add them just before serving each slice. And if you’re throwing a party, don’t forget a festive drink like our Easy Witch’s Brew Cocktail!
For longer storage, cheesecake freezes beautifully! You can freeze individual slices or the whole cheesecake (undecorated is best). Wrap it tightly in plastic wrap, then a layer of aluminum foil, and place it in an airtight freezer-safe container. It will keep well in the freezer for up to 1-2 months. Thaw overnight in the refrigerator before serving and decorating.
FAQs
Can I make this cheesecake ahead of time?
Absolutely! This cheesecake is perfect for making ahead. In fact, it tastes even better the next day after the flavors have had a chance to fully meld. You can bake and chill it up to 2 days in advance, then decorate just before serving.
What if my cheesecake cracks?
Don’t fret! Cracks happen, especially if you skip the water bath or cool it too quickly. The good news is that with this Witch’s Cauldron Cheesecake, you’ll be covering the top with fun candy decorations, so any cracks will be completely hidden. No one will ever know!
Do I have to use a springform pan?
A springform pan is definitely recommended for cheesecakes because it makes for easy removal and presentation. If you don’t have one, you could use a regular 9-inch pie plate, but serving slices will be a bit messier. You could also make individual portions in muffin tins lined with paper liners for “mini cauldrons”!
Follow us on Pinterest for more delicious recipes!

Bewitchingly Delicious Witch's Cauldron Cheesecake
Ingredients
Equipment
Method
- Step 1: Preheat your oven to a cozy 325°F (160°C). Grease a 9-inch springform pan.
- Step 2: In a medium bowl, combine your chocolate graham cracker crumbs and the melted butter. Mix until moistened, then press firmly into the bottom of your prepared springform pan.
- Step 3: In a large bowl, using an electric mixer, beat the softened cream cheese and sugar together until perfectly smooth. Add in the sour cream, eggs, and vanilla extract. Mix on low speed until everything is just combined, being careful not to overmix.
- Step 4: Add green gel food coloring to the batter. Start with a few drops and mix, continuing to add until you achieve a vibrant, spooky deep green hue.
- Step 5: Gently pour your green cheesecake batter over the chocolate graham cracker crust. Use a spatula to smooth the top, ensuring it’s even.
- Step 6: Pop your cheesecake into the preheated oven and bake for about 45-50 minutes. It’s ready when the edges are set and firm, but the center still has a slight, delicate jiggle.
- Step 7: Once baked, turn off the oven and open the door slightly. Let the cheesecake cool in the oven for about an hour. Then, remove it and let it cool completely at room temperature on a wire rack. After it's completely cooled, refrigerate it for at least 4 hours, or even better, overnight.
- Step 8: When you're ready to serve, carefully remove the springform pan. Arrange your gummy worms and other candy decorations on top to create a fantastic "bubbling cauldron" effect. Slice into your masterpiece and serve immediately.