Oh, friend, do you ever get that craving for something utterly decadent, something that whispers “treat yourself,” but you just don’t have the time (or energy!) for a big baking project? I know I do! There are days when I dream of a little slice of Italy right in my kitchen, specifically that rich, creamy, coffee-kissed magic known as Tiramisu. But let’s be real, a traditional Tiramisu can be a bit of a production.
That’s where these incredible Tiramisu Domes come in! Imagine all the iconic flavors of your favorite Italian dessert, but transformed into adorable, individual, no-bake domes that are shockingly simple to make. No oven, no fuss, just pure, unadulterated bliss. They’re quick enough for a weeknight dessert, impressive enough for a dinner party, and honestly, just a little bit magical.
Why You’ll Love Tiramisu Domes
- Fast: Whip these beauties up in no time, with minimal hands-on work.
- Easy: Seriously, if you can whisk and fold, you can make these!
- Giftable: They look so elegant, they make the perfect edible gift.
- Crowd-pleasing: Who doesn’t love Tiramisu? These individual portions are always a hit.
Ingredients
Gathering your ingredients is the first step to any great kitchen adventure. Here’s what you’ll need for our delightful Tiramisu Domes:
- 250 g (1 cup) Mascarpone Cheese: This is the heart of our creamy filling! Make sure it’s at room temperature for the smoothest blend.
- 200 ml (¾ cup) Heavy Cream, chilled: Your secret to light, airy perfection. Keep it super cold until you’re ready to whip it.
- 70 g (⅓ cup) Sugar: Just enough sweetness to balance the coffee and mascarpone.
- 2 Egg Yolks: These add incredible richness and a beautiful pale yellow hue to our cream.
- 1 tsp Vanilla Extract: A splash of warmth and classic dessert flavor.
- 100 ml Strong Espresso or Coffee, cooled: The essential coffee kick! Make it strong, then let it cool completely.
- 1 tbsp Sugar (for coffee): To sweeten our coffee layer just a touch.
- 6–8 Ladyfinger Biscuits (Savoiardi): The perfect light, airy sponges to soak up all that wonderful coffee. You might need a few more or less depending on the size of your molds.
- Unsweetened Cocoa Powder: For that signature elegant dusting on top.
- Coffee Beans or Chocolate Shavings: For a pretty garnish that makes these domes extra special.
How to Make Tiramisu Domes
Alright, apron on? Let’s get cooking! These steps are super straightforward, I promise.
- Whip Up the Yolks & Sugar: Grab a big mixing bowl, and let’s get those egg yolks and sugar dancing! You’ll whisk them together vigorously until the mixture becomes pale and beautifully creamy. This usually takes a couple of minutes.
- Fold in the Mascarpone & Vanilla: Now for the star of the show: that luscious mascarpone cheese. Add it to your yolk mixture along with the vanilla extract. Blend it all until it’s perfectly smooth and no lumps remain. Don’t overmix, just until combined!
- Whip the Heavy Cream: In a separate, chilled bowl (I often put my bowl and whisk in the freezer for 10 minutes beforehand!), whip your cold heavy cream until it forms stiff peaks. You want it firm enough to hold its shape.
- Gently Combine: The key here is gentle folding. Take your beautifully whipped cream and, bit by bit, gently fold it into the mascarpone mixture. You want to keep all that lovely air you just whipped in. Continue until everything is fully combined and looks like a cloud. Pop this dreamy cream into the fridge to chill while we prepare our ladyfingers.
- Prepare the Coffee: While our cream is chilling out, let’s get our coffee fix ready. In a shallow dish or a small bowl, mix your cooled strong espresso (or coffee) with the extra tablespoon of sugar until it’s completely dissolved.
- Dip the Ladyfingers: This is where the magic really starts to happen for our domes! Take each ladyfinger and quickly dip it into the coffee mixture. I mean quickly – a second or two on each side is usually enough. You don’t want them soggy, just infused with that glorious coffee flavor.
- Line Your Molds: Carefully line your silicone dome molds or small bowls with the dipped ladyfingers. You’ll likely need to cut them to fit, creating a nice cup or shell. Try to cover the entire inside surface.
- Fill with Cream: Now for the good part: spoon or pipe (if you’re feeling fancy with a piping bag!) our creamy mascarpone filling into each ladyfinger shell. Fill them up about halfway.
- Add More Ladyfingers: Top it off with another quick dip of ladyfinger, placing it on top of the cream. You can also just fill the dome completely with cream if you prefer a thicker cream layer.
- Freeze to Firm: Into the freezer they go! This is crucial for their beautiful dome shape and for easy unmolding. Let them freeze for at least 2 hours, or until they’re nice and firm. If you’re looking for more quick and delicious no-bake treats, you absolutely have to check out my easy no-bake caramel pretzel bars next!
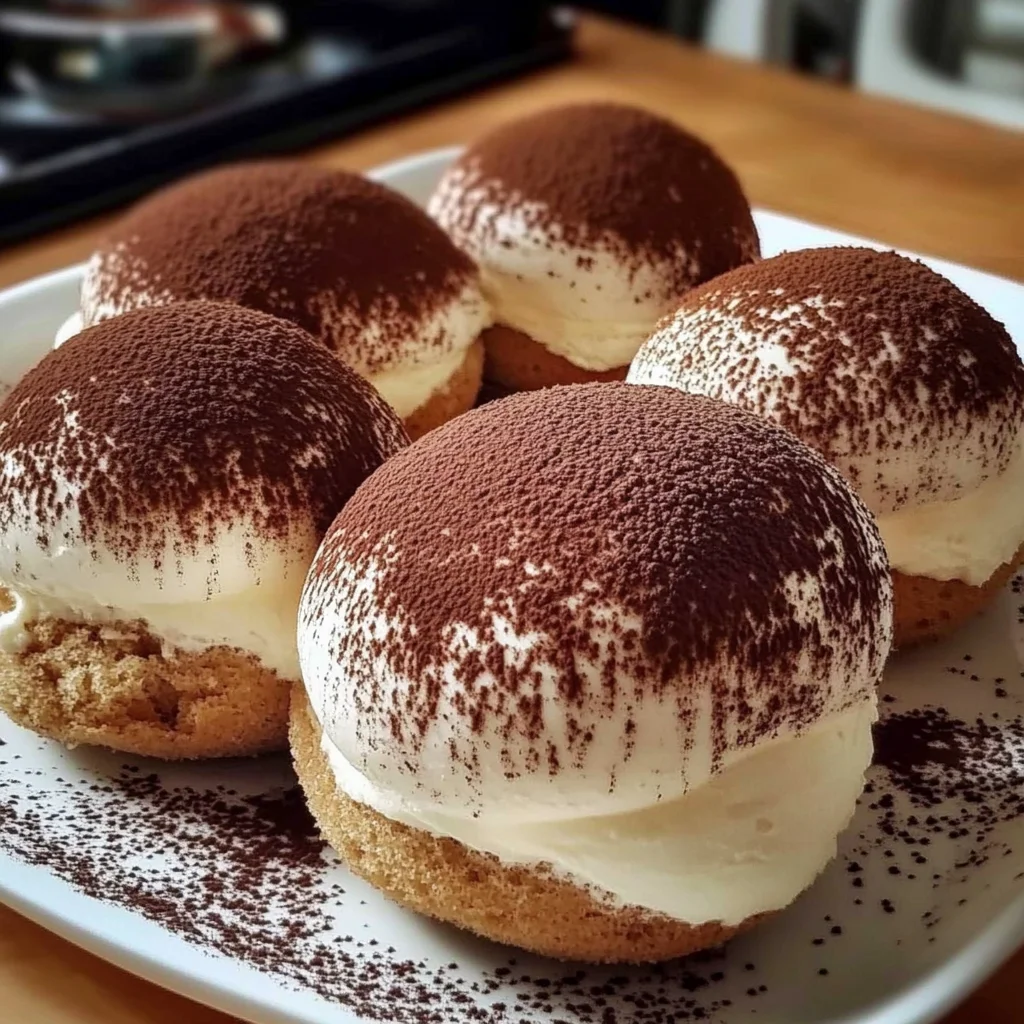
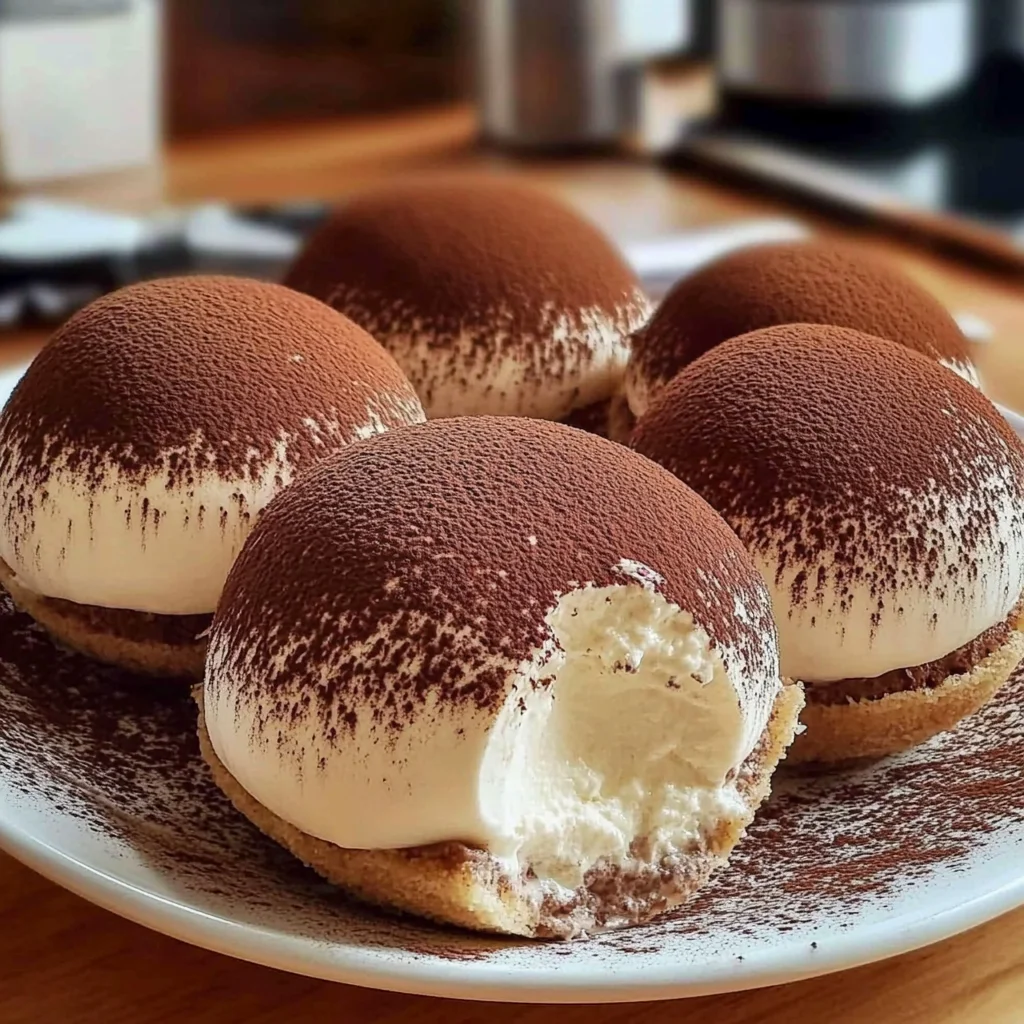
- Unmold & Dust: The moment of truth! Gently unmold the domes. They should pop out easily thanks to the freezing. Then, using a small sieve, generously dust each dome with unsweetened cocoa powder.
- Garnish & Serve: A little sprinkle of cocoa, and maybe some elegant coffee beans or delicate chocolate shavings for garnish, and these beauties are ready to impress! Serve them chilled for the best experience.
Substitutions & Additions
Want to get creative? Here are some ideas to make these Tiramisu Domes uniquely yours:
- Coffee Alternatives: Not a coffee fan? You can swap the espresso for decaf coffee, chai tea, or even a flavored coffee like hazelnut or caramel. For an adult twist, add a splash of Kahlua, rum, or Marsala wine to your coffee mixture.
- Ladyfinger Swaps: If you can’t find ladyfingers, thin slices of pound cake, sponge cake, or even vanilla wafers can work in a pinch. Just be mindful of how much liquid they absorb.
- Mascarpone Alternatives: While mascarpone is traditional, a good quality cream cheese (full fat!) can be used for a slightly tangier, lighter flavor profile.
- Flavor Boosters: Add a pinch of cinnamon or a tiny bit of orange zest to the mascarpone cream for a subtle citrusy note. A sprinkle of mini chocolate chips or finely chopped nuts in the filling would also be delightful.
Tips for Success
Even though these are super easy, a few tricks can make them absolutely perfect!
- Chill Everything: Ensure your heavy cream, bowl, and whisk are very cold before whipping. This helps the cream whip up faster and hold its peaks better.
- Don’t Over-Dip: Ladyfingers are like sponges! A quick dip is all they need. If you soak them too long, they’ll become soggy and break apart, making assembly tricky.
- Quality Ingredients: Since there are so few ingredients, the quality really shines through. Use good espresso and fresh mascarpone for the best flavor.
- Patience with Chilling: The freezing step is key for the domes to hold their shape when unmolded. Don’t rush it! If you prefer a softer texture, you can also chill them in the fridge for 4-6 hours instead of freezing.
- Prep Ahead: You can make the mascarpone cream a day in advance and keep it refrigerated. Assemble the domes and freeze them the day before serving for ultimate convenience. While these tiramisu domes are fantastic for a quick dessert, if you’re ever in the mood for a classic baked treat that you can also prepare ahead for any gathering, my recipe for the ultimate classic carrot cake is always a winner!
How to Store Tiramisu Domes
These individual Tiramisu Domes are perfect for making ahead! Store them in an airtight container in the refrigerator for up to 3-4 days. If you’ve frozen them, they’ll last even longer, up to 2-3 weeks. Just remember to thaw them in the refrigerator for about 30-60 minutes before serving so they soften to that perfect creamy consistency.
FAQs
Got questions? I’ve got answers!
Q: Can I make these without eggs?
A: The egg yolks add richness and color, but if you’re concerned about raw eggs, you can use pasteurized egg yolks or omit them entirely. The cream will still be delicious, just a bit lighter in texture.
Q: What if I don’t have silicone dome molds?
A: No problem! You can use muffin tins lined with plastic wrap, or even small teacups or ramekins. Just be sure to line them well with plastic wrap so you can easily pull them out after freezing.
Q: Can I use instant coffee?
A: Yes, you can! Just make sure to make it strong, perhaps a bit stronger than you’d normally drink, to get that distinct coffee flavor that Tiramisu is known for.
Q: Why does my whipped cream not get stiff?
A: This usually happens if your cream isn’t cold enough, or if your bowl/whisk isn’t chilled. Make sure everything is as cold as possible!
I hope you love these Tiramisu Domes as much as I do! Happy cooking, sweet friend!
For more delicious recipes and kitchen inspiration, be sure to follow us on Pinterest!
Easy No-Bake Tiramisu Domes
Ingredients
Equipment
Method
- Step 1: Whip Up the Yolks & Sugar: In a large mixing bowl, whisk egg yolks and sugar vigorously for a couple of minutes until the mixture becomes pale and creamy.
- Step 2: Fold in the Mascarpone & Vanilla: Add room temperature mascarpone cheese and vanilla extract to the yolk mixture. Blend until perfectly smooth and no lumps remain. Do not overmix.
- Step 3: Whip the Heavy Cream: In a separate, chilled bowl (preferably with a chilled whisk), whip the cold heavy cream until it forms stiff peaks, holding its shape firmly.
- Step 4: Gently Combine: Gently fold the whipped cream, bit by bit, into the mascarpone mixture until fully combined and light and airy. Chill the cream in the fridge while preparing the ladyfingers.
- Step 5: Prepare the Coffee: In a shallow dish, mix the cooled strong espresso (or coffee) with 1 tablespoon of sugar until dissolved.
- Step 6: Dip the Ladyfingers: Quickly dip each ladyfinger into the coffee mixture for only a second or two per side, ensuring they are infused but not soggy.
- Step 7: Line Your Molds: Carefully line silicone dome molds (or muffin tins/small bowls lined with plastic wrap) with the dipped ladyfingers, cutting them to fit and cover the entire inside surface.
- Step 8: Fill with Cream: Spoon or pipe the mascarpone filling into each ladyfinger shell, filling them about halfway.
- Step 9: Add More Ladyfingers: Top the cream layer with another quick-dipped ladyfinger, or simply fill the dome completely with cream for a thicker cream layer.
- Step 10: Freeze to Firm: Place the filled molds into the freezer for at least 2 hours, or until the domes are firm, which is crucial for easy unmolding and shape.
- Step 11: Unmold & Dust: Gently unmold the firm domes. Using a small sieve, generously dust each dome with unsweetened cocoa powder.
- Step 12: Garnish & Serve: Garnish with elegant coffee beans or delicate chocolate shavings. Serve chilled for the best experience.