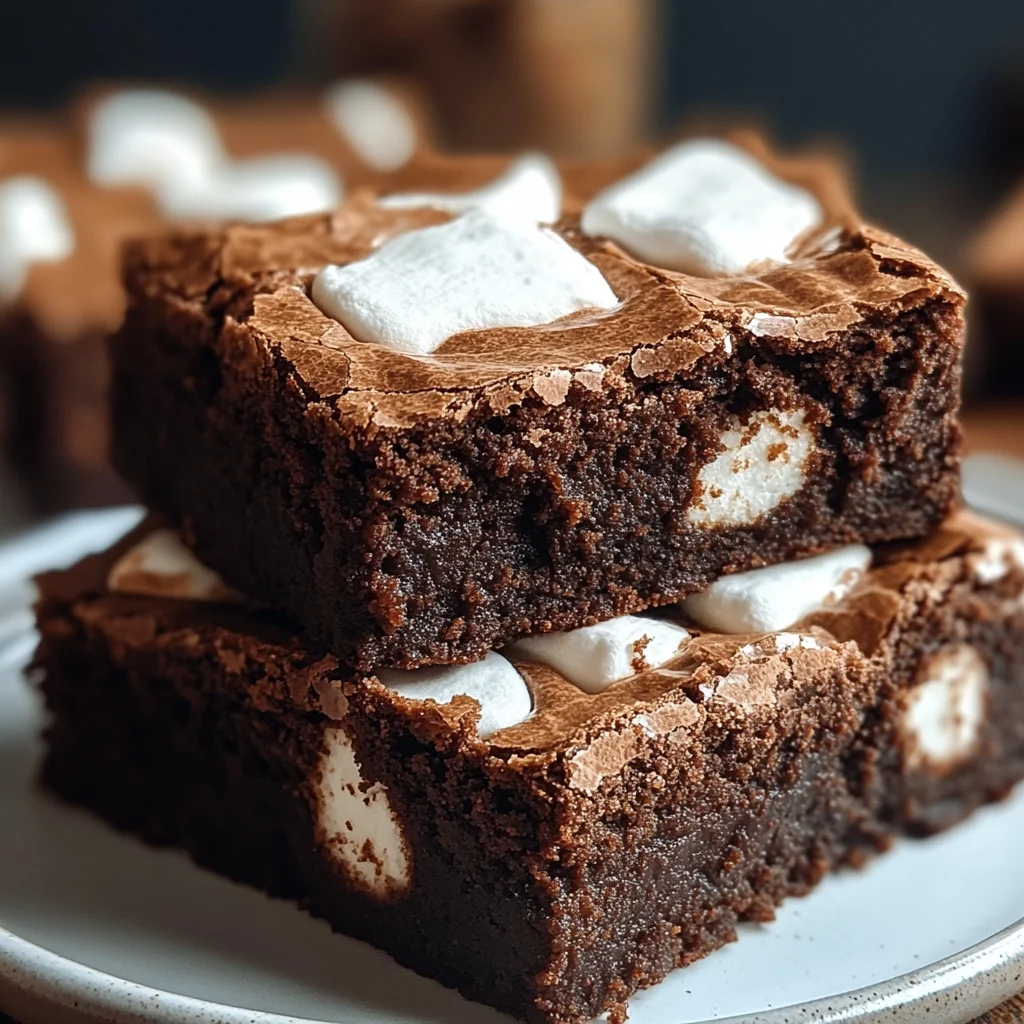
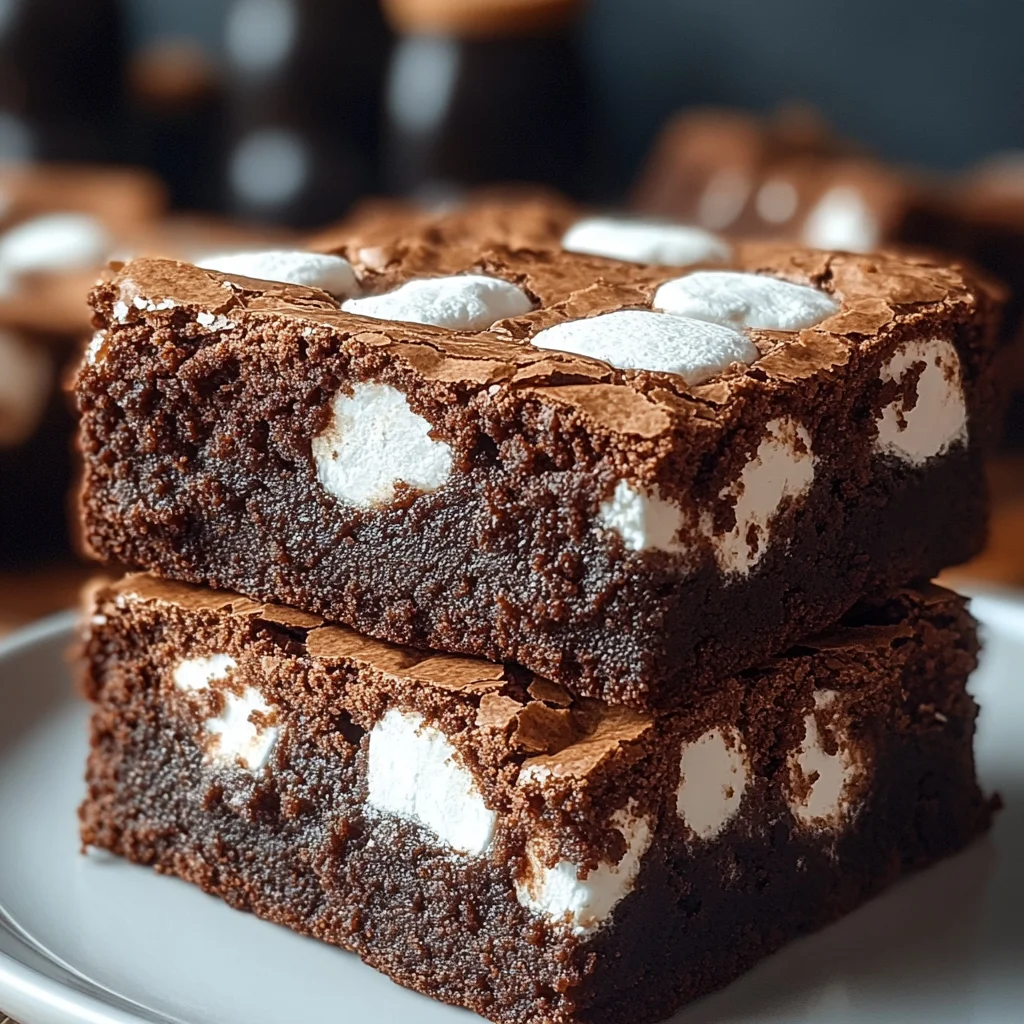
Remember those amazing treats from childhood bake sales, or that one dessert your grandma always brought to family gatherings that disappeared in minutes? For me, it was always something chocolatey and comforting, something that just felt like home. Well, today, I’m bringing you a recipe that captures all that nostalgic magic and then some: Marshmallow Brownies! Imagine a rich, fudgy brownie base swirled with pockets of sweet, gooey marshmallow. It’s pure dessert heaven, a symphony of textures and flavors that will transport you straight to happy memories. And guess what? This isn’t one of those complicated recipes that takes all day. Nope, these beauties are shockingly easy to whip up, come together quickly, and will be memorable for anyone lucky enough to try a bite. They’re seriously that good.
Why You’ll Love Marshmallow Brownies
- Fast: Quick prep means less waiting, more devouring!
- Easy: Simple steps, perfect for bakers of all levels.
- Giftable: Packaged up, they make the sweetest homemade present for friends, family, or neighbors.
- Crowd-pleasing: Who can say no to the ultimate combination of fudgy chocolate and soft, sweet marshmallow?
Ingredients
Gather your ingredients, and let’s get ready to make some magic!
- 2 cups granulated sugar: The foundation of sweetness for these perfectly balanced brownies.
- 3 large eggs + 1 egg yolk: This combination is my secret for giving our brownies that incredible, dense fudgy texture we all crave.
- ½ cup unsalted butter, melted: Brings richness and moisture, so essential for a truly decadent brownie.
- 2 teaspoons pure vanilla extract: Don’t skip this! It enhances all the chocolatey goodness and adds a lovely depth of flavor.
- ½ cup canola or vegetable oil: Another secret weapon for keeping them moist and wonderfully chewy.
- ¾ cup all-purpose flour: Just enough to hold everything together without making them too cakey – we’re aiming for fudgy!
- 1 cup unsweetened cocoa powder (Dutch process recommended): For that deep, dark chocolate flavor and rich color. Dutch process cocoa is less acidic, resulting in a smoother, more intense chocolate taste.
- 1½ tablespoons cornstarch: A little trick for extra tenderness and that perfect chewy bite that sets these brownies apart.
- ½ teaspoon salt: Balances the sweetness beautifully and truly brings out the chocolate flavor, making it pop.
- 1 cup semi-sweet chocolate chips: Because more chocolate is always a good idea in a brownie!
- 1 cup marshmallow creme: The star of the swirl – get ready for that gooey, sweet magic!
How to Make Marshmallow Brownies
Alright, let’s get our hands a little deliciously messy! Follow these simple steps, and you’ll be sinking your teeth into warm, gooey marshmallow brownies in no time.
Step 1: Prep Your Pan and Oven
First things first, preheat your oven to a cozy 350°F (175°C). Then, grab a 9×13-inch baking pan. You’ll want to line this beauty with parchment paper, making sure to leave a little overhang on the sides. This is your secret weapon for easy lifting and cutting later! Give that parchment paper a light spritz with cooking spray or a quick rub with butter. Trust me, future you will thank you for this.
Step 2: Mix the Wet Ingredients
In a large mixing bowl, let’s get those wet ingredients mingling. Whisk together the granulated sugar, eggs, and that extra egg yolk until they’re nicely combined and look a little bit paler. Now, pour in your melted butter, the pure vanilla extract, and the oil. Keep whisking until everything is smooth and totally incorporated. It should look like a silky, golden mixture.
Step 3: Combine the Dry Ingredients
In a separate bowl, it’s time for the dry crew. Sift together your all-purpose flour, unsweetened cocoa powder (remember, Dutch process for that deep, dark richness!), cornstarch, and salt. Sifting helps prevent lumps and ensures a super smooth brownie texture.
Step 4: Create the Brownie Batter
Now for the main event! Gradually add your dry ingredients into the wet ingredients. Use a wooden spoon or a trusty rubber spatula for this. Mix gently, just until everything is combined. Be careful not to overmix here – that’s a common pitfall for tough brownies! Once it’s just combined, fold in those delicious semi-sweet chocolate chips. Because more chocolate, please!
Step 5: Layer and Swirl
This is where the marshmallow magic happens! Pour about half of your rich brownie batter into the prepared pan and spread it out evenly. Next, take spoonfuls of that dreamy marshmallow creme and dollop them all over the batter. It doesn’t have to be perfect – part of the charm is the rustic swirl! Then, carefully pour the remaining brownie batter on top. Grab a knife (a butter knife works great!) and gently drag it through the layers to create beautiful swirl patterns. Don’t go too crazy; just a few good swirls will do the trick.
Step 6: Bake to Perfection
Pop your pan into the preheated oven and bake for 28-32 minutes. You’re looking for a toothpick inserted into the brownie portion (not the marshmallow, as that will be gooey!) to come out with a few moist crumbs. The marshmallow areas will puff up and get a lovely light golden hue. Every oven is a little different, so keep an eye on them!
Step 7: Cool and Serve
I know, I know, it’s tempting to dive right in, but resist the urge! It’s crucial to let these brownies cool completely in the pan before you even think about cutting them. This allows them to set properly and ensures those gorgeous, clean slices. Once cooled, use the parchment paper overhang to lift them out, slice, and enjoy that ultimate gooey, fudgy bliss!
Substitutions & Additions
One of the best things about baking is making a recipe your own! Here are a few ideas to customize your marshmallow brownies and make them even more “you”:
- Chocolate Choices: While semi-sweet chips are classic, feel free to swap them for dark chocolate chips, milk chocolate chunks, or even a mix of white and dark for a marbled effect.
- Nutty Goodness: For an extra layer of texture and flavor, fold in ½ cup of chopped walnuts or pecans with your chocolate chips.
- Flavor Boosts: A tiny splash (¼ teaspoon) of almond extract can add a delightful warmth, or if you’re feeling festive, a dash of peppermint extract (especially around the holidays!) for a fun twist.
- Extra Marshmallow Fun: If you want even more marshmallow goodness, sprinkle a cup of mini marshmallows over the brownies during the last 5-7 minutes of baking. They’ll get perfectly toasted and gooey!
- A Touch of Salt: A sprinkle of flaky sea salt over the top right after they come out of the oven enhances the chocolate flavor beautifully and adds a sophisticated touch.
Tips for Success
Even though these brownies are easy, a few insider tips can make them absolutely perfect every time:
- Don’t Overmix: This is brownie cardinal rule number one! Overmixing develops gluten, leading to tough, cakey brownies instead of that desirable fudgy texture. Mix until just combined, no more.
- Cool Completely: Seriously, I can’t stress this enough! Warm brownies will crumble and be messy. Letting them cool allows the chocolate and marshmallow to set, making for clean, beautiful slices. Patience is a virtue, especially when it comes to brownies!
- Quality Cocoa Matters: Using a good quality cocoa powder, especially Dutch process, makes a noticeable difference in flavor and color. It’s worth the extra effort for a richer, more profound chocolate taste.
- Parchment Paper is Your Friend: The parchment paper sling is a lifesaver for easy removal and neat cutting. Don’t skip it!
- Clean Cuts: For perfectly neat slices, use a sharp knife and wipe it clean with a damp cloth after each cut. This prevents sticking and ensures every brownie looks bakery-perfect.
- Prep Ahead: You can mix your dry ingredients ahead of time and store them in an airtight container until you’re ready to bake. This makes assembly even quicker, perfect for busy days! For another fantastic make-ahead treat that’s always a hit, you might also love my recipe for Easy No-Bake Caramel Pretzel Bars – they’re dangerously delicious!
How to Store Marshmallow Brownies
Once these delicious brownies are completely cool (see, I told you it was important!), storing them properly will keep them fresh and delicious for days.
- Room Temperature: Store your marshmallow brownies in an airtight container at room temperature for up to 3-4 days. This keeps them wonderfully soft and fudgy.
- Refrigeration: While not strictly necessary, if your kitchen is particularly warm or you want them to last a bit longer, you can store them in an airtight container in the refrigerator for up to a week. Just know they might firm up a bit – a quick zap in the microwave for 10-15 seconds can bring back that glorious gooeyness!
- Freezing: For longer storage, wrap individual brownies tightly in plastic wrap, then place them in a freezer-safe bag or container. They can be frozen for up to 3 months. Thaw at room temperature or warm gently in the microwave when you’re ready for a treat.
FAQs
Got questions about these delightful brownies? I’ve got answers!
Q: Can I use regular marshmallows instead of marshmallow creme?
A: Yes, you absolutely can! If you’re using regular mini marshmallows, sprinkle about 2 cups over the top of the brownies during the last 5-7 minutes of baking. They’ll melt and get beautifully toasty, creating a different but equally delicious texture. For another classic chocolatey treat that always brings smiles, you might want to try my Grandma’s Easy Lunch Lady Brownies – they’re a timeless favorite!
Q: Why do you recommend Dutch process cocoa powder?
A: Dutch process cocoa powder has been treated to reduce its acidity, resulting in a darker color and a smoother, less bitter, and more intense chocolate flavor. It makes for a truly rich, deeply chocolatey brownie! However, if you only have natural cocoa, it will still work, but the flavor and color might be slightly different.
Q: How do I know when the brownies are done?
A: Look for the edges to be set and the center to still be slightly jiggly. Insert a toothpick into the brownie portion (avoiding the marshmallow swirls, as they will remain gooey!) – it should come out with moist crumbs, not wet batter. Remember, brownies continue to bake a little as they cool, so slightly underbaked is often better than overbaked for fudgy results!
Speaking of quick and easy fudgy results, if you love simple desserts, be sure to check out these No-Bake Oreo Bars for another effortless win!
For more mouth-watering recipes and kitchen inspiration, be sure to follow me on Pinterest!

Irresistible Gooey Marshmallow Swirl Brownies
Ingredients
Equipment
Method
- Step 1: Prep Your Pan and Oven Preheat your oven to 350°F (175°C). Line a 9x13-inch baking pan with parchment paper, leaving an overhang on the sides for easy lifting. Lightly spritz the parchment paper with cooking spray or rub with butter.
- Step 2: Mix the Wet Ingredients In a large mixing bowl, whisk together the granulated sugar, eggs, and extra egg yolk until nicely combined and slightly paler. Pour in the melted butter, pure vanilla extract, and oil. Continue whisking until smooth and completely incorporated.
- Step 3: Combine the Dry Ingredients In a separate bowl, sift together the all-purpose flour, unsweetened cocoa powder (Dutch process recommended), cornstarch, and salt. Sifting helps prevent lumps and ensures a smooth brownie texture.
- Step 4: Create the Brownie Batter Gradually add the dry ingredients into the wet ingredients. Use a wooden spoon or rubber spatula to mix gently until just combined; be careful not to overmix. Fold in the semi-sweet chocolate chips.
- Step 5: Layer and Swirl Pour about half of the brownie batter into the prepared pan and spread evenly. Dollop spoonfuls of marshmallow creme over the batter. Carefully pour the remaining brownie batter on top. Use a knife to gently drag it through the layers to create swirl patterns.
- Step 6: Bake to Perfection Bake in the preheated oven for 28-32 minutes. The edges should be set, and a toothpick inserted into the brownie portion (avoiding marshmallow) should come out with a few moist crumbs. The marshmallow areas will puff up and achieve a light golden hue.
- Step 7: Cool and Serve Allow the brownies to cool completely in the pan before cutting. This allows them to set properly for clean slices. Once cooled, use the parchment paper overhang to lift them out, slice, and enjoy.